ArduinoTips-Hints
Arduino Hints and Tips:
Below are a number if hints that save time or problems when using Arduino / Yourduino / cables etc:
This is so popular we have added ANOTHER PAGE HERE
Send More of these to terry@yourduino.com


Pins and Pin Strips: (See THIS page)
- When using these pin strips (right), t o snap off a section of a pin strip, hold it on both sides of the break point and rotate hard to twist it off.
- Use these pin strips to create a secure "connector" by wrapping the group of black connectors with regular Scotch tape. Then you can remove and reinstall your 'Custom Cable' easily.
PushButtons on Breadboards: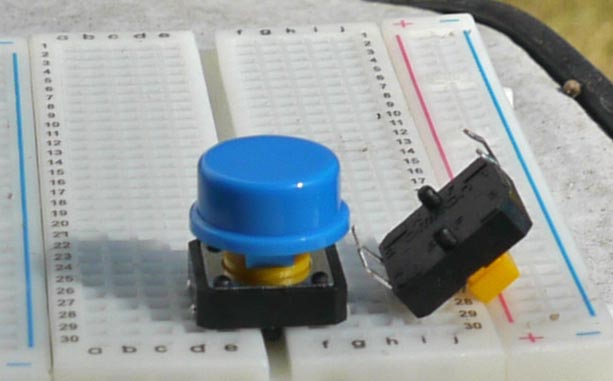

- These Pushbuttons are often used on a breadboard (right). Notice the two black bumps on the bottom. Align them over the slot in the center of the breadboard and push down hard. Now the pushbutton will stay in place firmly.
- ===Connections: Are the close-spaced pairs of pins. The two sets of pins have the same connections which are connected when the button is pressed.===
Here are more Hits and Tips from LarryD on the Arduino Forums:

![]()
Make breadboard friendly switch assemblies from two pin SMD switches. The center header pins are pulled out and discarded.
Avoid plugging header pins next to the center of the breadboard, use these holes for DIP sized pins only.

external image index.php?action=dlattach;topic=445951.0;attach=193471
MOST OF THESE FROM LARRYD!
external image index.php?action=dlattach;topic=445951.0;attach=193628
external image index.php?action=dlattach;topic=445951.0;attach=193934
(RIGHT) are two examples of programming jigs. One is a ZIF socket soldered onto a protoshield that lets me use the ArduinoISP sketch on an Uno to program a chip (in this case, an ATtiny4313).
The other is some male headers soldered onto a 6-wide protoboard. The 2x3 header on top lets me plug in the standard programmer ribbon cable, and the headers on bottom are spaced just wide enough to be able to plug this over a DIP package in a breadboard. You just need to grab the right jig and plug it over the chip to reprogram it in circuit. The one pictured is made for an ATtiny85.
For projects requiring motor mounting or to temporarily mounting other components to prove a design, consider using copper clad PCB material (Below)

  This material is: very strong, easily drilled, filed, hole punched and cut.

  It solders well and conducts electricity.

  Common thicknesses of copper clad board are 1/32 1/16 and 1/8".
  It does oxidize :(

 external image index.php?action=dlattach;topic=445951.0;attach=193943

 external image index.php?action=dlattach;topic=445951.0;attach=193945

 external image index.php?action=dlattach;topic=445951.0;attach=193947

 external image index.php?action=dlattach;topic=445951.0;attach=193949

  zz