Brick-Noisemakers
Jump to navigation
Jump to search
Passive Beeper Brick:
Brick-Noisemakers

Active Buzzer Brick:
This brick has a "Buzzer" module that makes sound when activated by applying 5 volts (usually from an Arduino Output pin). It is NOT a "piezo" element which has to be switched on and off rapidly to make sound.

  These Electronic Bricks are very easily connected to Arduino using 3-wire cables plugged into a YourDuino RoboRED. These come with the YourDuino Electronic Brick Set.

  To quickly test these devices, run the Good Old Blink Program (File>Examples>Basic>Blink) , and plug them into Arduino I/O #13. They should beep On and Off.
Passive Beeper Brick: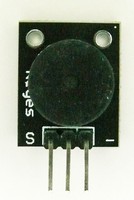

This brick has a small "piezo" element that is like a tiny speaker. It looks almost like the Buzzer Brick. It does not make noise unless a changing On-OFF signal is sent to it. Arduino includes a Tone library that can be used to make many different sounds on the Beeper Brick.

  Plug the Electronic Brick on a 3-pin cable and connect to RoboRED Pin 11
Beep / sweepUp / sweepDown Examples:
This shows/plays examples of making different sounds with the Arduino Tone library.
  (Copy the text in the box below and Paste it into a blank Arduino IDE window)
  (Runs once and stops. Push RESET button to replay.) LISTEN CLOSELY to the Beeper brick!


/* YourDuino Electronic Brick Set Example: Tone Beeper Sounds
 - Uses the Arduino Tone Library to make sounds on the
   Beeper in the set, or an 8 Ohm speaker.
 - SEE the comments after "//" on each line below
 - CONNECTIONS:
 - Beeper/Speaker on Arduino port 11 (Can be changed)
 - If speaker is used, Use 100 ohm resistor
   (or two 220 ohms in parallel) in series with speaker.
 - V1.03 03/26/15
 Questions: terry@yourduino.com */

/*-----( Import needed libraries )-----*/
//None

/*-----( Declare Constants and Pin Numbers )-----*/
#define TONE_PIN  11  // Which pin to connect to
// See: http://arduino.cc/en/tutorial/tone

#define TONE_LOWEST         800
#define TONE_HIGHEST        2100
#define TONE_FREQUENCY_STEP 5
#define TONE_STEP_DELAY     2

/*-----( Declare objects )-----*/
//none
/*-----( Declare Variables )-----*/
int toneFrequencyNow;

void setup()   /****** SETUP: RUNS ONCE ******/
{
  beep(500);
  delay(2000);
  sweepUp();
  delay(2000);
  sweepDown();

}//--(end setup )---


void loop()   /****** LOOP: RUNS CONSTANTLY ******/
{
  // Nothing in Loop
}//--(end main loop )---

/*-----( Declare User-written Functions )-----*/
// none

void beep(int howLong)
{
  tone(TONE_PIN, 2100);
  delay(howLong);
  noTone(TONE_PIN);

}//END beep

//--------------------------------------------------------------
void sweepUp()
{
  for (toneFrequencyNow =  TONE_LOWEST;
       toneFrequencyNow <  TONE_HIGHEST;
       toneFrequencyNow += TONE_FREQUENCY_STEP)
  {
    tone(TONE_PIN, toneFrequencyNow);
    delay(TONE_STEP_DELAY);
  }
  noTone(TONE_PIN);
}// END sweepUp


//--------------------------------------------------------------
void sweepDown()
{
  for (toneFrequencyNow =  TONE_HIGHEST;
       toneFrequencyNow >  TONE_LOWEST;
       toneFrequencyNow -= TONE_FREQUENCY_STEP)
  {
    tone(TONE_PIN, toneFrequencyNow);
    delay(TONE_STEP_DELAY);
  }
  noTone(TONE_PIN);
} // sweepDown

//*********( THE END )***********
Tune Playing Example:
(Copy the text in the box below and Paste it into a blank Arduino IDE window)
  (Runs once and stops. Push RESET button to replay.) LISTEN CLOSELY to the Beeper brick!


/* YourDuino Electronic Brick Set Example: Tone Beeper test
 - Uses the Arduino Tone Library to make sounds on the
   Beeper in the set, or an 8 Ohm speaker.
 - SEE the comments after "//" on each line below
 - CONNECTIONS:
 - Beeper/Speaker on Arduino port 11 (Can be changed)
 - If speaker is used, Use 100 ohm resistor
   (or two 220 ohms in parallel) in series with speaker.
 - V1.03 03/26/15
 Questions: terry@yourduino.com */

/*-----( Import needed libraries )-----*/
//None

/*-----( Declare Constants and Pin Numbers )-----*/
#define TonePIN  11  // Which pin to connect to
// See: http://arduino.cc/en/tutorial/tone
#define NOTE_A3  220
#define NOTE_B3  247
#define NOTE_G3  196
#define NOTE_C4  262


/*-----( Declare objects )-----*/
//none
/*-----( Declare Variables )-----*/
int thisNote;          // which note to play now
int noteDuration;      // How long to play the note
int pauseBetweenNotes; // Length between notes

// notes in the melody: (0 is a 'rest' )
// This is an "array" of data holding the melody
int melody[] = {
  NOTE_C4, NOTE_G3,NOTE_G3, NOTE_A3, NOTE_G3,0, NOTE_B3, NOTE_C4};

// note durations: 4 = quarter note, 8 = eighth note, etc.:
int noteDurations[] = {
  4, 8, 8, 4,4,4,4,4 };

void setup()   /****** SETUP: RUNS ONCE ******/
{
  // go through each of the notes of the melody:
  for (thisNote = 0; thisNote < 8; thisNote++)
  { // Calculate and play one note and a pause after it

    // to calculate the note duration, take one second
    // divided by the note type.
    // e.g. quarter note = 1000 / 4, eighth note = 1000/8, etc.
    noteDuration = 1000/noteDurations[thisNote];
    tone(TonePIN, melody[thisNote],noteDuration);

    // to distinguish the notes, set a minimum time between them.
    // the note's duration + 30% seems to work well:
    pauseBetweenNotes = noteDuration * 1.30;
    delay(pauseBetweenNotes);
   }  // End of one note

}//--(end setup )---


void loop()   /****** LOOP: RUNS CONSTANTLY ******/
{
// Nothing. Once was enough :-)
}//--(end main loop )---

/*-----( Declare User-written Functions )-----*/
// none

//*********( THE END )***********