Brick-Temperature-Thermocouple
Brick-Temperature-Thermocouple

The MAX6675 is a specialized chip that reads temperatures from 0..1024C .
It performs cold-junction compensation and digitizes the signal from a type-K thermocouple. The data is output in a 12-bit resolution, SPI™-compatible, read-only format.
Example Sketches below:
- Thermocouple with MAX6675 to Serial Monitor
- Thermocouple with MAX6675 to LCD Display
- TwoThermocouples with MAX6675 to LCD Display
An Arduino Library that handles communication with the MAX6675 must be downloaded HERE.
(Click on "Clone or Download" then "download ZIP") Install that library in your Arduino IDE.
(HERE IS HOW)
ABOUT THERMOCOUPLES:
Thermocouples (WikiPedia)] are simply made by welding together two metal wires. (See How-To HERE) There is a slight but measurable voltage across the wires that increases with temperature. The type of metals used affect the voltage range, cost and sensitivity. We use a TYPE K here.
The main improvement of using a thermocouple over a semiconductor

sensor or thermistor is that the temperature range is very much increased compared to electronic sensors like the DS18B20. Common thermocouples on the other hand, can go from -200°C to 1350°C (K type) and there are ones that can go above 2300°C! Thermocouples are inexpensive, interchangeable, and are often supplied with standard connectors.
Thermocouples are widely used in science and industry; applications include temperature measurement for kilns, gas turbine exhaust, diesel engines, and other industrial processes. They are also used in homes, offices and businesses as the temperature sensors in some thermostats, and also as flame sensors in safety devices for gas-powered major appliances.
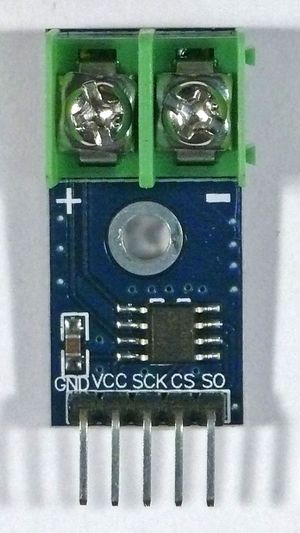
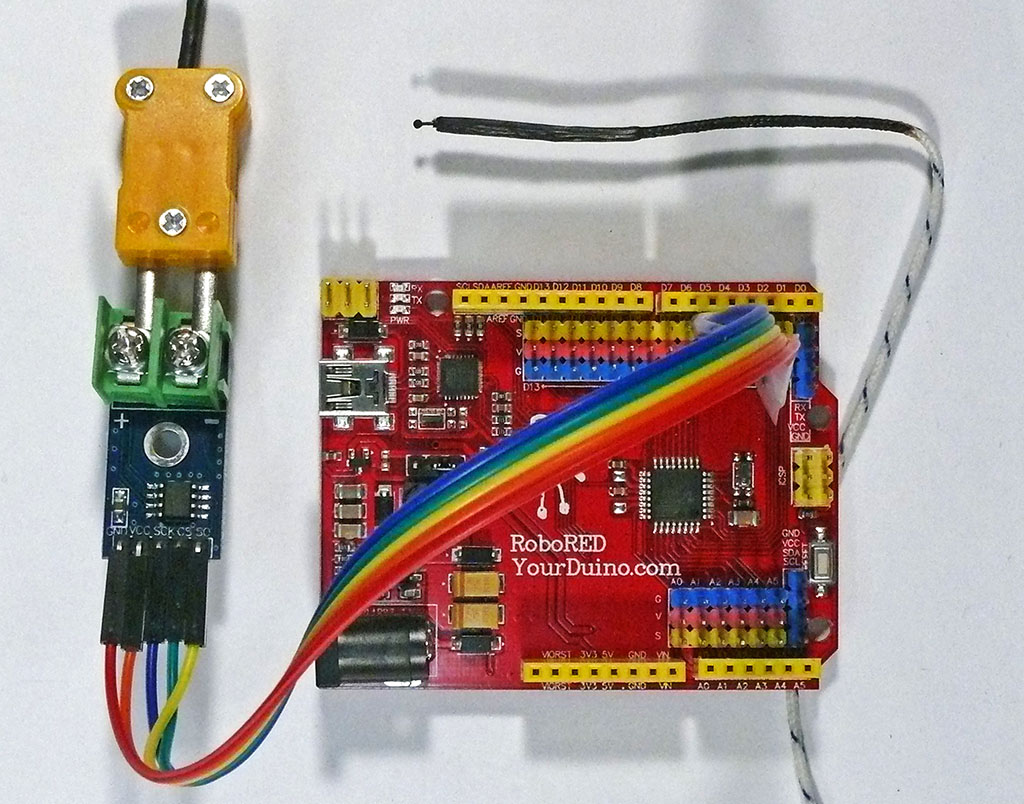
(Upper Photo) is our MAX6675 Module (available HERE) There are 5 wires for GND,VCC,SCK (clock), CS (chip select) ,and SO (serial data output). In the (Right Photo) a thermocouple, the MAX6675 module and a YourDuino RoboRED are connected to read temperatures and output the result to the Serial Monitor. The code for that example is below. The output, with the thermocouple inserted through a small hole in my woodstove stovepipe is below:
(WOODSTOVE CLOSED DOWN. GOOD FIRE GOING ):
YourDuino.com MAX6675 Thermocouple Temperature
C = 192.75
F = 378.95
Temperature above 75.0 F
C = 192.25
F = 378.05
Temperature above 75.0 F
C = 189.50
F = 373.10
Temperature above 75.0 F
C = 189.25
F = 372.65
Temperature above 75.0 F
C = 190.25
F = 374.45
 ( OPENED THE STOVE PRIMARY AIR. 2 MINUTES LATER ) :
YourDuino.com MAX6675 Thermocouple Temperature
C = 291.00
F = 555.80
Temperature above 75.0 F
C = 292.25
F = 558.05
Temperature above 75.0 F
C = 290.50
F = 554.90
Temperature above 75.0 F
C = 291.50
F = 556.70
Temperature above 75.0 F
C = 291.75
F = 557.15
EXAMPLE ARDUINO SKETCHES: MAX6675 Amplifier and Thermocouple
SKETCH (Copy and paste to Arduino IDE page) - Thermocouple to Serial Output
/* YourDuinoStarter Example: Thermocouple Temperature measurement
 - WHAT IT DOES  Reads temperature 0 .. 1024 degrees C from type K Thermocouple
   Uses MAX6675 type Thermocouple Amplifier
 - SEE the comments after "//" on each line below
 - CONNECTIONS:
   -
   -
 - V1.00 09/11/12
   Questions: terry@yourduino.com */

/*-----( Import needed libraries )-----*/
#include "max6675.h"
/*-----( Declare Constants and Pin Numbers )-----*/
#define SO_PIN  2  // 6675 Serial Output
#define CS_PIN  3  // 6675 Chip Select
#define CK_PIN  4  // 6675 Clock Pin

#define TOO_HOT  75.0  // To try limit calculation
#define TOO_COLD 62.5
/*-----( Declare objects )-----*/
MAX6675 thermocouple(CK_PIN, CS_PIN, SO_PIN);
/*-----( Declare Variables )-----*/
float DegreesC;
float DegreesF;

void setup()   /****** SETUP: RUNS ONCE ******/
{
  Serial.begin(115200);
  Serial.println("YourDuino.com MAX6675 Thermocouple Temperature ");

  delay(1000);   // Allow to stabilize
}//--(end setup )---


void loop()   /****** LOOP: RUNS CONSTANTLY ******/
{
   DegreesC = thermocouple.readCelsius();
   DegreesF = thermocouple.readFahrenheit();
   Serial.print("C = ");
   Serial.println(DegreesC);
   Serial.print("F = ");
   Serial.println(DegreesF);
   if (DegreesF > TOO_HOT ) Serial.println("Temperature above 75.0 F");
   if (DegreesF < TOO_COLD) Serial.println("Temperature below 62.5 F");

   delay(1000);  // Not So Fast

}//--(end main loop )---

/*-----( Declare User-written Functions )-----*/
// NONE

//*********( THE END )***********

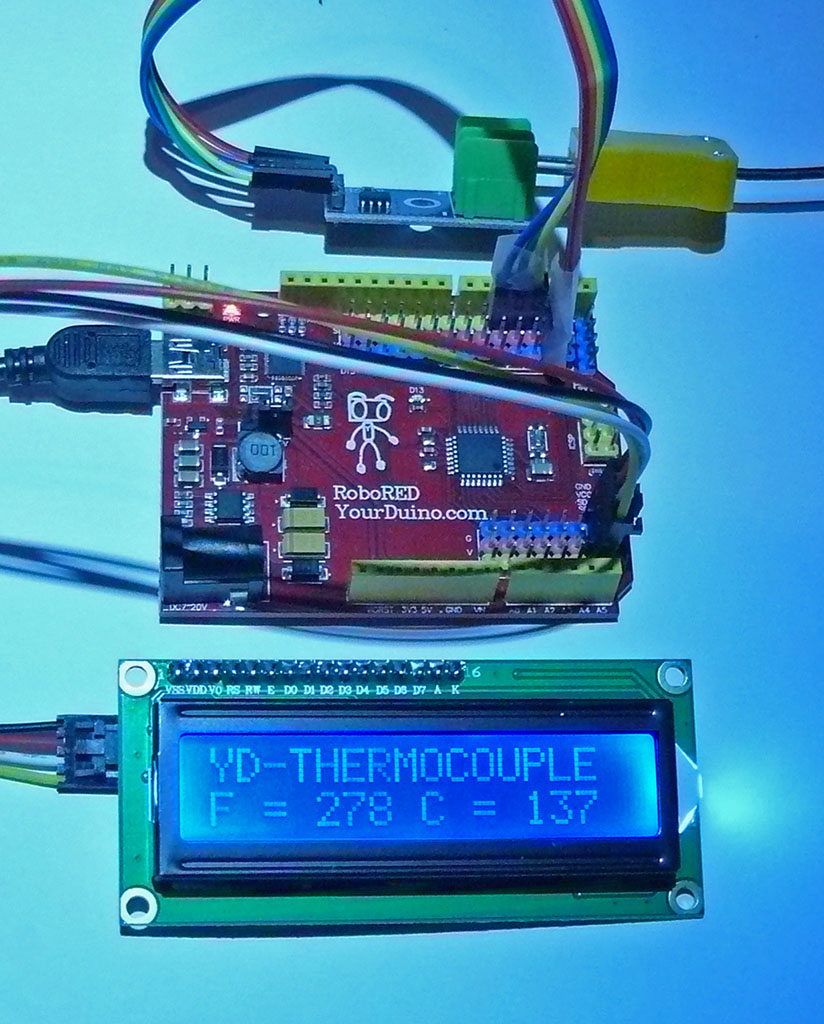
The following sketch also displays the temperature in Degrees F and Degrees C on a small LCD Display. Notice how characters on the display are blanked so that there are no "leftover" characters when the temperature goes from 1000F (4 digits) to lower temperatures. I knew that :-)
SKETCH (Copy and paste to Arduino IDE page)
/* YourDuinoStarter Example: Thermocouple Temperature measurement
 - WHAT IT DOES  Reads temperature 0 .. 1024 degrees C from type K Thermocouple
   Uses MAX6675 type Thermocouple Amplifier and 2x16 character LCD Display
 - SEE the comments after "//" on each line below
 - CONNECTIONS:
   - See defined pins below
   -
 - V1.02 12/18/2016
   Questions: terry@yourduino.com */

/*-----( Import needed libraries )-----*/
#include "max6675.h"
// Get the library HERE: https://github.com/adafruit/MAX6675-library

#include <Wire.h>  // Comes with Arduino IDE
// Get the LCD I2C Library here:
// https://bitbucket.org/fmalpartida/new-liquidcrystal/downloads
// Move any other LCD libraries to another folder or delete them
// See Library "Docs" folder for possible commands etc.
#include <LiquidCrystal_I2C.h>

/*-----( Declare Constants and Pin Numbers )-----*/
#define SO_PIN  2  // 6675 Serial Output
#define CS_PIN  3  // 6675 Chip Select
#define CK_PIN  4  // 6675 Clock Pin

#define TOO_HOT  75.0  // To try limit calculation
#define TOO_COLD 62.5
/*-----( Declare objects )-----*/
MAX6675 thermocouple(CK_PIN, CS_PIN, SO_PIN);

// set the LCD address to 0x27 for a 16 chars 2 line display
// Set the pins on the I2C chip used for LCD connections:
//                    addr, en,rw,rs,d4,d5,d6,d7,bl,blpol
LiquidCrystal_I2C lcd(0x27, 2, 1, 0, 4, 5, 6, 7, 3, POSITIVE);  // Set the LCD parameters

/*-----( Declare Variables )-----*/
float DegreesC;
float DegreesF;

void setup()   /****** SETUP: RUNS ONCE ******/
{
  lcd.begin(16,2);   // initialize the lcd for 16 chars 2 lines, turn on backlight
// ------- Quick 3 blinks to test backlight (COULD use for Overtemperature alarm etc.) -------------
  for(int i = 0; i< 3; i++)
  {
    lcd.backlight();
    delay(250);
    lcd.noBacklight();
    delay(250);
  }
  lcd.backlight(); // finish with backlight on

  Serial.begin(115200);
  Serial.println("YourDuino.com MAX6675 Thermocouple Temperature ");

  delay(1000);   // Allow to stabilize
}//--(end setup )---


void loop()   /****** LOOP: RUNS CONSTANTLY ******/
{
   DegreesC = thermocouple.readCelsius();
   DegreesF = thermocouple.readFahrenheit();
   Serial.print("C = ");
   Serial.println(DegreesC);
   Serial.print("F = ");
   Serial.println(DegreesF);
   if (DegreesF > TOO_HOT ) Serial.println("Temperature above 75.0 F");
   if (DegreesF < TOO_COLD) Serial.println("Temperature below 62.5 F");

//-------- Write characters on the LCD display ------------------
// NOTE: Cursor Position: (CHAR, LINE) start at 0
  lcd.setCursor(0,0); //Start at character 0 on line 0
  lcd.print("YD-THERMOCOUPLE");
  delay(1000);

  lcd.setCursor(0,1);
  lcd.print("F = ");
  lcd.setCursor(4,1);
  if (DegreesC < 1000)
  {
    lcd.print("     ");   // Blank the 3rd  AND 4th positions
    lcd.setCursor(4, 1);
  }
  lcd.print(DegreesF,0);

  lcd.setCursor(8,1);
  lcd.print("C = ");
  lcd.setCursor(12,1);
     if (DegreesC < 1000)
  {
    lcd.print("     ");   // Blank the 3rd AND 4th positions
    lcd.setCursor(12, 1);
  }
  lcd.print(DegreesC,0);

   delay(1000);  // Not So Fast

}//--(end main loop )---

/*-----( Declare User-written Functions )-----*/
// NONE

//*********( THE END )***********


>


 Two Thermocouples to LCD Display
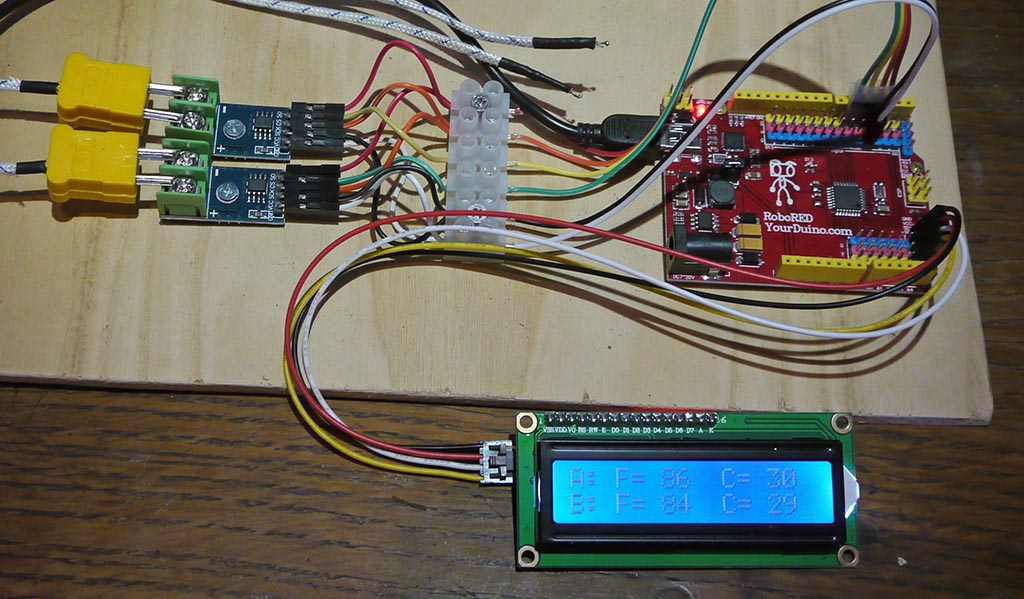
  This shows two MAX6675 modules connected to a RoboRED (UNO compatible). A terminal strip has been used to connect the Vcc, GND, CK and SO wires together. There are separate CS (Chip select) wires so the two thermocouples can be read separately.


  SKETCH (Copy and paste to Arduino IDE page)


/* YourDuinoStarter Example: 2 Thermocouples Temperature measurement
  - WHAT IT DOES  Reads temperature 0 .. 1024 degrees C from two type K Thermocouples
   Uses MAX6675 type Thermocouple Amplifier and 2x16 character LCD Display
   EXAMPLE: http://www.yourduino.com/sunshop/index.php?l=product_detail&p=509
  - SEE the comments after "//" on each line below
  - CONNECTIONS:
   - See defined pins below
   -
  - V1.05 12/20/2016
   Questions: terry@yourduino.com */

/*-----( Import needed libraries )-----*/
#include "max6675.h"
// Get the library HERE: https://github.com/adafruit/MAX6675-library

#include <Wire.h>  // Comes with Arduino IDE

// Get the LCD I2C Library here:
// https://bitbucket.org/fmalpartida/new-liquidcrystal/downloads
// Move any other LCD libraries to another folder or delete them
// See Library "Docs" folder for possible commands etc.
#include <LiquidCrystal_I2C.h>

/*-----( Declare Constants and Pin Numbers )-----*/
#define SO_PIN    2  // 6675 Serial Output for both modules
#define CK_PIN    3  // 6675 Clock Pin for both modules

#define CS_PIN_A  4  // 6675 Chip Select for Module A
#define CS_PIN_B  5  // 6675 Chip Select for Module B

#define TOO_HOT  75.0  // To try limit calculation
#define TOO_COLD 62.5

/*-----( Declare objects )-----*/
MAX6675 thermocoupleA(CK_PIN, CS_PIN_A, SO_PIN);  // Create two Thermocouple objects with different chip selects
MAX6675 thermocoupleB(CK_PIN, CS_PIN_B, SO_PIN);

// set the LCD address to 0x27 for a 16 chars 2 line display
// Set the pins on the I2C chip used for LCD connections:
//                    addr, en,rw,rs,d4,d5,d6,d7,bl,blpol
LiquidCrystal_I2C lcd(0x27, 2, 1, 0, 4, 5, 6, 7, 3, POSITIVE);  // Set the LCD parameters

/*-----( Declare Variables )-----*/
float DegreesC_A;  // For thermocouples A and B
float DegreesF_A;

float DegreesC_B;
float DegreesF_B;

void setup()   /****** SETUP: RUNS ONCE ******/
{
  lcd.begin(16, 2);  // initialize the lcd for 16 chars 2 lines, turn on backlight
  lcd.setCursor(0, 0); //Start at character 0 on line 0
  lcd.print("YourDuino TEST");
  lcd.setCursor(0, 1); //Start at character 0 on line 1
  lcd.print("Thermocouple A+B");
  delay(2500);

  // ------- Quick 3 blinks to test backlight (COULD use for Overtemperature alarm etc.) -------------
  for (int i = 0; i < 3; i++)
  {
    lcd.backlight();
    delay(250);
    lcd.noBacklight();
    delay(250);
  }
  lcd.backlight(); // finish with backlight on
  lcd.begin(16, 2);

  Serial.begin(115200);
  Serial.println("YourDuino.com MAX6675 Thermocouple Temperature ");

  delay(1000);   // Allow to stabilize
}//--(end setup )---


void loop()   /****** LOOP: RUNS CONSTANTLY ******/
{
  DegreesC_A = thermocoupleA.readCelsius();
  DegreesF_A = thermocoupleA.readFahrenheit();
  Serial.print("Thermocouple A: C = ");
  Serial.print(DegreesC_A);
  Serial.print(" F = ");
  Serial.println(DegreesF_A);

  DegreesC_B = thermocoupleB.readCelsius();
  DegreesF_B = thermocoupleB.readFahrenheit();
  Serial.print("Thermocouple B: C = ");
  Serial.print(DegreesC_B);
  Serial.print(" F = ");
  Serial.println(DegreesF_B);

  //----( Example of testing temperature and taking some action )----
  if (DegreesF_A > TOO_HOT ) Serial.println("Temperature A above 75.0 F");
  if (DegreesF_A < TOO_COLD) Serial.println("Temperature A below 62.5 F");

  //-------- Write characters on the LCD display ------------------

  // NOTE: Cursor Position: (CHAR, LINE) start at 0
  lcd.setCursor(0, 0); //Start at character 0 on line 0
  lcd.print("A: ");
//------( Display the F Value )-------
  lcd.setCursor(3, 0);
  lcd.print("F= ");
  lcd.setCursor(6, 0);
  if (DegreesF_A < 100)
  {
    lcd.print("   ");   // Blank the 3rd position
    lcd.setCursor(6, 0);
  }
  lcd.print(DegreesF_A, 0);
//------( Display the C Value )-------
  lcd.setCursor(10, 0);
  lcd.print("C= ");
  lcd.setCursor(13, 0);
  if (DegreesC_A < 100)
  {
    lcd.print("   ");   // Blank the 3rd position
    lcd.setCursor(13, 0);
  }
  lcd.print(DegreesC_A, 0);

//-----( Second Line )------------------------------------------
  lcd.setCursor(0, 1); //Start at character 0 on line 0
  lcd.print("B: ");
//------( Display the F Value )-------
  lcd.setCursor(3, 1);
  lcd.print("F= ");
  lcd.setCursor(6, 1);
  if (DegreesF_B < 100)
  {
    lcd.print("   ");   // Blank the 3rd position
    lcd.setCursor(6, 1);
  }
  lcd.print(DegreesF_B, 0);
//------( Display the C Value )-------
  lcd.setCursor(10, 1);
  lcd.print("C= ");
  lcd.setCursor(13, 1);
  if (DegreesC_B < 100)
  {
    lcd.print("   ");   // Blank the 3rd position
    lcd.setCursor(13, 1);
  }
  lcd.print(DegreesC_B, 0);


  delay(1000);  // Not So Fast

}//--(end main loop )---

/*-----( Declare User-written Functions )-----*/
// NONE

//*********( THE END )***********
zz
