DS1307 RealTime Clock Brick
 DS1307-RealTime-Clock-Brick

This Electronic Brick (Available Here) allows you to have the correct time and date available for your project. Date/Time is saved even when your project is powered off. This is really needed for Home Automation, Greenhouse and Aquarium applications etc.
DETAILS:
The DS1307 real-time clock (RTC) is a low-power, full binary-coded decimal (BCD) clock/calendar plus 56 bytes of NonVolatile SRAM. Address and data are transferred over an I²C, bidirectional bus.
The clock/calendar provides seconds, minutes, hours, day, date, month, and year information. The end of the month date is automatically adjusted for months with fewer than 31 days, including corrections for leap year. The clock can operate in either the 24-hour or 12-hour format with AM/PM indicator, but the library only supports the 24-hour mode.
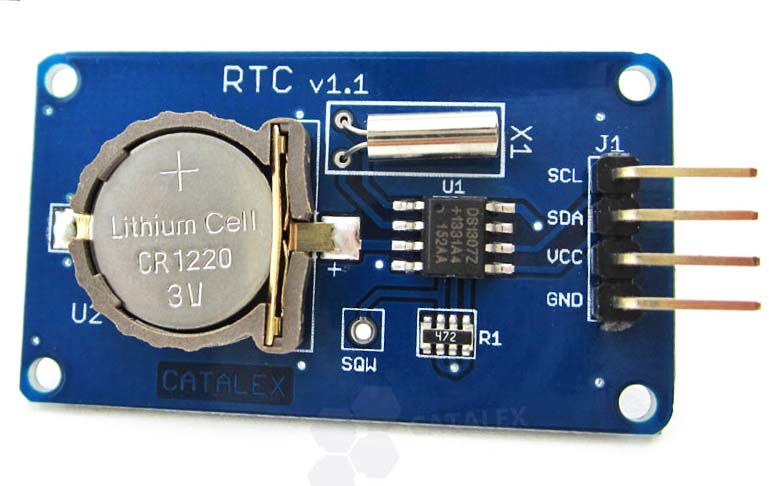
The DS1307 has a built-in power-sense circuit that detects power failures and automatically switches to the backup battery supply. Timekeeping operation continues while the part operates from the backup supply. Note: this module must have the battery installed to work normally and retain data and time with power off.. The battery is a button (type CR1220), the positive upward:
SOFTWARE LIBRARY
This unit requires a software library to support it. We are now using the library originated by Adafruit.
This library is included with the regular Arduino IDE Library Manager. Search for "RTClib". See How-To On The Arduino Site HERE If needed, the original library can be downloaded HERE:
NOTE: If you want to get started using the functions of a Real Time Clock before you get the hardware, look in the EXAMPLES for "RTCLIB" for the software sketch "softrtc". This will give you the same functions without the hardware (but the time will drift off much more quickly).
CONNECTIONS:
This Brick communicates using the I2C "I squared C" protocol and needs the following 4 connections to an Arduino or Mega:
|
Function |
Arduino Pin |
Mega Pin |
|
-Gnd |
Gnd |
Gnd |
|
+Vcc |
+5V |
+5V |
|
SDA |
Analog A4 |
20 |
|
SCL |
Analog A5 |
21 |
There are several ways to make these connections:
- Easiest Way: Use a 4-pin cable plugged into a Sensor Shield or YourDuino RoboRED (Black wire to - )
- Easy Way: Use a 4-pin section of a Cablemaker to make connections. Note the colors on each end.
- Or your own wiring...
NOTE: If you need to use more than one I2C device, you will have to make a parallel connection to the same 4 pins for each device. (Because they have different I2C addresses, they can coexist).. There are small breakout boards with multiple parallel 4-pin sections, or you can use 4 colums of a breadboard.
TEST SOFTWARE:
Like most complex devices, the easiest way to program it is with a Library someone else has written. Download and install the Library as noted above. See ABOUT LIBRARIES. If you get a Verify error like " does not name a type" that means the library is not installed correctly.
Here is a test Software Sketch you can cut and paste to test this brick. Also you can check the EXAMPLES folder of the library.
NOTE SEE the line in the code below that SETS the clock. After you write some other sketch using the RTC, you can always go back and run this example to SET the clock to agree with your computer.
/* YourDuinoStarter Example: DS1307 Real Time Clock
 - WHAT IT DOES: Set and/or Run DS1307 Real Time Clock
 - SEE the comments after "//" on each line below
 - CONNECTIONS:
   Function  Arduino Pin  Mega Pin
   -         Gnd          Gnd
   +         +5V          +5V
   SDA       Analog A4    20
   SCL       Analog A5    21
 - V1.02 04/26/2015
   Questions: terry@yourduino.com */

/*-----( Import needed libraries )-----*/
#include <Wire.h>
#include "RTClib.h"

/*-----( Declare Constants and Pin Numbers )-----*/
// Not needed: RTC Lib expects connections as above

/*-----( Declare objects )-----*/
RTC_DS1307 rtc;    // Create a RealTimeClock object

/*-----( Declare Variables )-----*/
// NONE because the library handles this...

void setup()   /****** SETUP: RUNS ONCE ******/
{
  Serial.begin(9600); // Set up for Serial Monitor to be able to see this work
  // Set this in the lower right of the Serial Monitor screen

  Serial.println("YourDuino.com DS1307 Real Time Clock - Set / Run Utility");

  /*----( These lines allow code to work also on Arduino DUE )----- */
#ifdef AVR
  Wire.begin();
#else
  Wire1.begin(); // Shield I2C pins connect to alt I2C bus on Arduino Due
#endif

  rtc.begin(); // Start the RTC library code

  /*----( SET the date and time.  Comment OUT these lines after setting )----*/
  // Put these "//" in front of the line you do NOT want to use
  // following line sets the RTC to the date & time this sketch was compiled
     rtc.adjust(DateTime(F(__DATE__), F(__TIME__)));
  // This line sets the RTC with an explicit date & time, for example to set
  // May 21, 2015 at 6pm you would call: (use 24 hour time)
  //    rtc.adjust(DateTime(2015, 5, 21, 18, 0, 0));

}//--(end setup )---


void loop()   /****** LOOP: RUNS CONSTANTLY ******/
{
  DateTime now = rtc.now();  // Read data from the RTC Chip

  Serial.print(now.year(), DEC); //
  Serial.print('/');
  Serial.print(now.month(), DEC);
  Serial.print('/');
  Serial.print(now.day(), DEC);
  Serial.print(' ');
  Serial.print(now.hour(), DEC);
  Serial.print(':');
  Serial.print(now.minute(), DEC);
  Serial.print(':');
  Serial.print(now.second(), DEC);
  Serial.println();

  delay(3000);

}//--(end main loop )---

/*-----( Declare User-written Functions )-----*/
//NONE

//*********( THE END )***********
Cut and paste this example into a blank Arduino IDE page. UNcomment the line that SETS the clock, and Verify (compile) it. Then upload it.
After uploading the program, start the Serial Monitor (Make sure it's set to 9600 in the box on lower right).
The output should look like this:
---------------------( COPY )--------------------------
2015/4/26 19:29:32
2015/4/26 19:29:35
2015/4/26 19:29:38
-----------------( END COPY )----------------------
To Have Clock run on it's own, and be used in other applications: Comment OUT the line in the above example that SETS the time, and upload that version. The clock will keep running.
-