PhysicalComputingRobotKit
UNDER CONSTRUCTION!
(SAMPLE is available. email Terry: HERE )
The Yourduino Physical Computing and Robot Kit
With this kit you will learn about Physical Computing, Sensors, Actuators, Motors and Arduino. You will use what you learn to build an intelligent Robot.
What Is PHYSICAL COMPUTING?
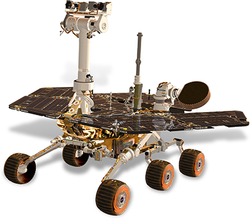
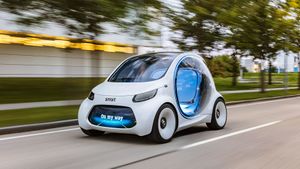
PHYSICAL COMPUTING is quite different than using personal computers where the only physical inputs are the Mouse and Keyboard. It creates the world of Mars Rovers, Self-Driving Cars, Home Automation and the Internet Of THINGS. It covers the educational fields usually known as Electrical Engineering, Mechatronics, Robotics, and Computer Science.
It is a challenge to introduce the concepts of Physical Computing (WikiPedia) to people who have no previous experience with electronic devices, sensors, actuators and programming. The Yourduino Physical Computing Robot Kit and teaching materials will make that a reachable goal.
INTRO here about what it IS .. Also preview of robot and parts
The YourDuino Physical Computing Robot Kit
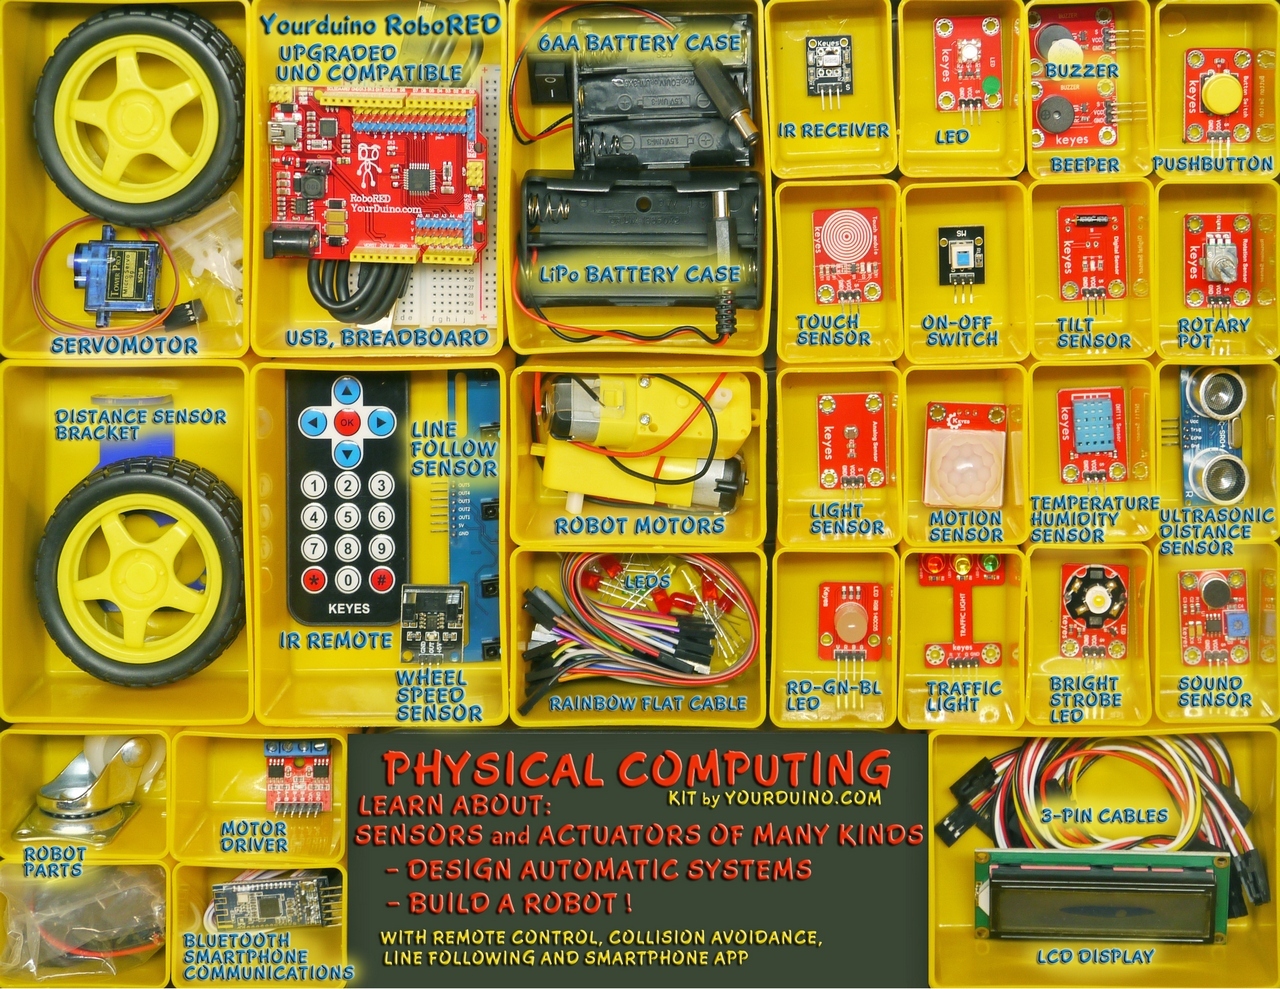
The YourDuino Physical Computing Robot Kit and accompanying Educational Materials are specifically aimed at people with little experience with Arduino and Electronics. Learning begins with several "Experiments" in which you will explore various sensors and actuators. You'll learn how to connect several different SENSORS that will tell you values for things like Temperature, Humidity, Motion, distance, Light intensity, Sound, Touch, Tilt and Switches (On-Off). And you will control ACTUATORS like motors, servomechanisms, sounds and lights. You'll also use Communications devices like a handheld remote and Bluetooth transceiver that can connect to Smartphones and run APPs.
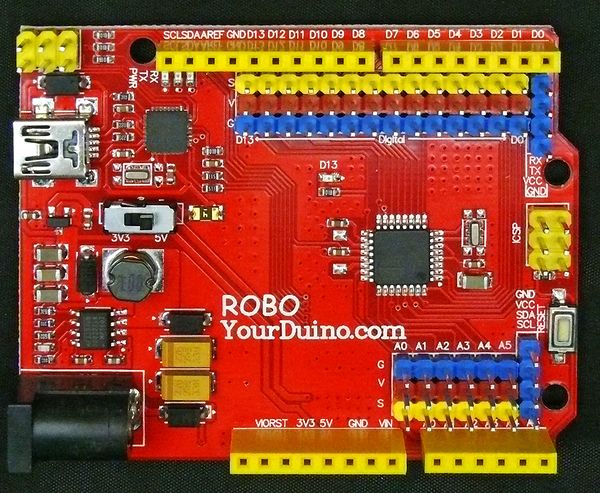
You will use the Yourduino RoboRED microcomputer (See Below) which is compatible with the Arduino UNO, but instead of tiny pins it has 3-pin connectors that make it easy to connect to different devices.
You will start with working examples of these things, and learn how to change them and create your own intelligent devices. You will build an intelligent Robot from the parts in this kit, test the different parts, learn how to program it, and try out intelligent Robot actions like Collision Avoidance, Line Following and Remote Control.
UNSURE ABOUT THIS??
The Control Board comes pre-programmed with 8 to 10 experiments as individually-selectable Software Sketches which are selected with an IR Remote. The kit can run on a student's desk without an external computer, powered by a 9V 1 amp power supply or a battery case (supplied) with 6 AA batteries. Later the Arduino software system can be used to program the Control Board just like an UNO.
MAKING Things With The Physical Computing Robot Kit
A goal of Arduino and (Next-GenStandards etc..) is to encourage young people to DESIGN things. They need to become familiar with the Engineering Design Process and making things with PARTS that are combined together, often with SOFTWARE to create new SYSTEMS. After exploring the world of SENSORS and ACTUATORS and DECISION MAKING that makes up PHYSICAL COMPUTING, you can design and build new inventions from the parts and concepts you have learned about.
How PHYSICAL COMPUTING Works
NEED UPDATE to current kit contents ASAP: Photos here are not right.
Physical Computing: SENSORS
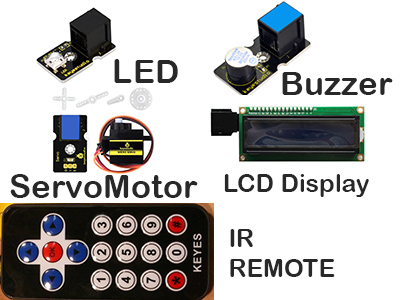
Physical Computing uses electronic SENSORS to "Feel The Real World". Like These: (NEED TO UPDATE)
- A pushbutton that you can press
- A Touch Sensor that can tell when a person touches it
- A Rotation Sensor that can tell where you turned it's knob
- A Photocell Sensor that can measure how bright light is
- A Sound Sensor that can measure how loud the environment is
- A Temperature and Humidity Sensor that can measure the air environment
- An UltraSonic Sensor that can detect objects and measure their distance away
- An Infrared Receiver that receives button commands from a handheld remote
All these Sensors are included in the YourDuino Physical Computing Robot kit.
Physical Computing: ACTUATORS
AND, Physical Computing can take ACTIONS that happen out in the Real World. Like these: (NEED TO UPDATE)
- LEDs (Light Emitting Diodes) that can be turned ON and OFF with different colors and be made brighter or dimmer
- A Buzzer that can make sounds
- A ServoMotor whose motion and position can be controlled
- A DC MOTOR WITH WHEEL AND TIRE Whose speed and direction can be controlled by a Motor Driver. You will use two of these to build a robot.
- An LCD Display which can display words and numbers to communicate to people
- A HandHeld Remote which can send commands when its buttons are pressed
All these Actuators (Action devices) are included in the YourDuino Physical Computing Robot Kit
Physical Computing: COMMUNICATIONS
AND, a COMMUNICATION device that can talk to your Smartphone!
AND, Decisions can be Made based on information from sensors, to take Actions. Examples: (NEED TO UPDATE)
- When the Light Sensor detects low light, LED Lights can be turned on
- The LCD Display can show the current temperature and humidity. The Touch Switch can change the display between Fahrenheit and Centigrade
- The Ultrasonic Sensor can detect objects and make different sounds as the object comes closer or goes farther away
All these and many more examples are Pre-Loaded into the YourDuino EasyConnect Control Board when you receive it. (NEED TO UPDATE)
WHAT's All This "DIGITAL" and "ANALOG" stuff?
The SENSORS in the kit (List above) are of two different types and we need to understand them.
DIGITAL Sensors
DIGITAL sensors are either ON or OFF
- The pushbutton that you can press. It's OFF until you press it, then it's ON
- The Touch Sensor Is OFF until it senses a light touch by your body, then it's ON
- The Tilt Sensor that is ON at some angles and OFF at other angles
- The Motion Sensor Is OFF until it detects humans or animals moving near it, then it's ON
ANALOG Sensors
ANALOG sensors are not just ON or OFF, but give us VALUES of what they sense.
- The Rotation Sensor gives us a VALUE for the POSITION of it's Knob
- The Photocell Sensor gives us a VALUE for how bright light is
- The Temperature and Humidity Sensor gives us VALUES for the air environment TEMPERATURE and HUMIDITY
- The UltraSonic Sensor gives us a VALUE for the DISTANCE to a detected object
Making DECISIONS
Our Microcomputer (The YourDuino RoboRED) can make COMPARISIONS between VALUES which gives us a powerful capability to DECIDE that:
- It's TOO HOT !
- It's TOO DARK !
- It's TOO CLOSE !
So we can MAKE DECISIONS to TAKE ACTIONS
HOW TO THINK ABOUT THIS:
OK, let's start to understand how all this stuff works!
All automatic systems, from a simple thermostat to the Mars Rover have these same 3 parts:
-------------[Sensor Inputs | Software Behavior | Action Outputs]-------------
The diagram below shows all the many things we have to work with in the Physical Computing Robot Kit.
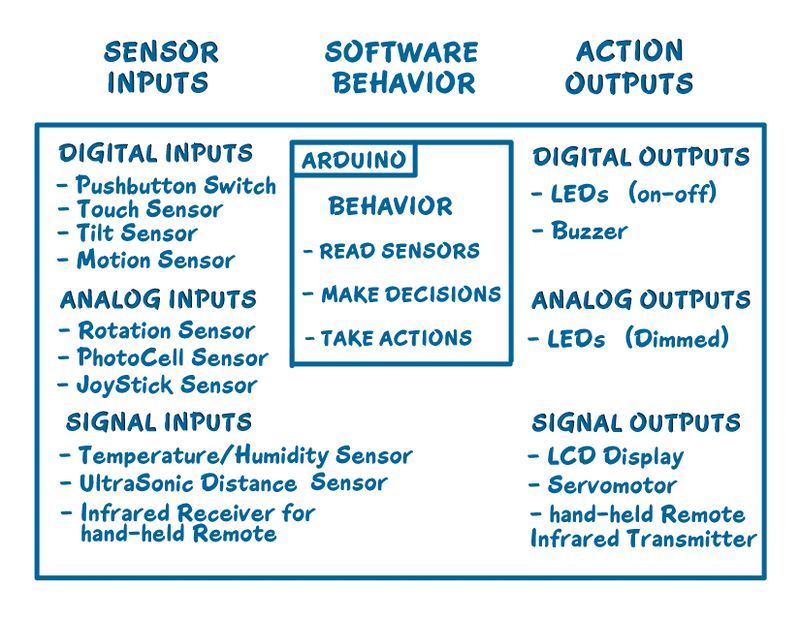
It works this way: Do THIS over and over and over again:
- READ SENSORS
- MAKE DECISIONS
- TAKE ACTIONS
That's what a Weather Station, or a Robot or a Mars Rover does. And thousands of other devices with Microcomputers inside.
You are learning how to combine a Microcomputer, Sensors and Actuators to make new automatic THINGS.
LEARNING TO CODE AND MAKE THINGS WORK
Making things with Electronics and MicroComputers is different than Woodworking or Metalworking.
There are a couple of little problems:
AND ... CODE IS INVISIBLE! (Just look at your phone? See any CODE? )
Not to worry! We will show you the ways to make these powerful tools VISIBLE so you can use them.
Maybe you have done the "HOUR OF CODE" at your school, or gone to some workshops with CODE.ORG ,or programmed in SCRATCH. Then you have a clue about Coding. You can use the same ideas here. We will use a similar thing called MIXLY
WHAT IF you just want to plug in one Red LED module and make it blink on and off? We will show you two ways to do that. To start we can use the LED built into the RoboRED board. The you can connect more LEDs and stuff. What you will see with MIXLY is visual programming like this:
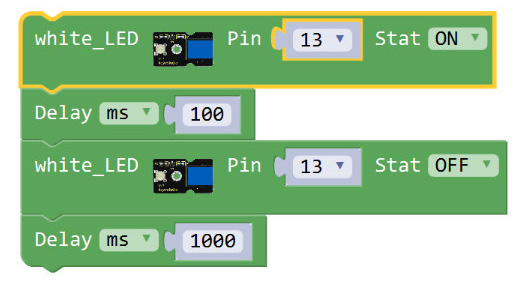
Look closely. There are 4 blocks that are stuck together. Later we'll show how MIXLY works, and how you can drag and drop and set up many different blocks.
BELOW is a more complex example, proving that this is not just a toy! This example connects to a DHT11 module that measures temperature and humidity, and an LCD Display. It reads the humidity and temperature in C, then converts C to F. It displays the values on the LCD display. THere is an optional pushbutton. If connected, it changes the displayed temperature from Centigrade to Fahrenheit.
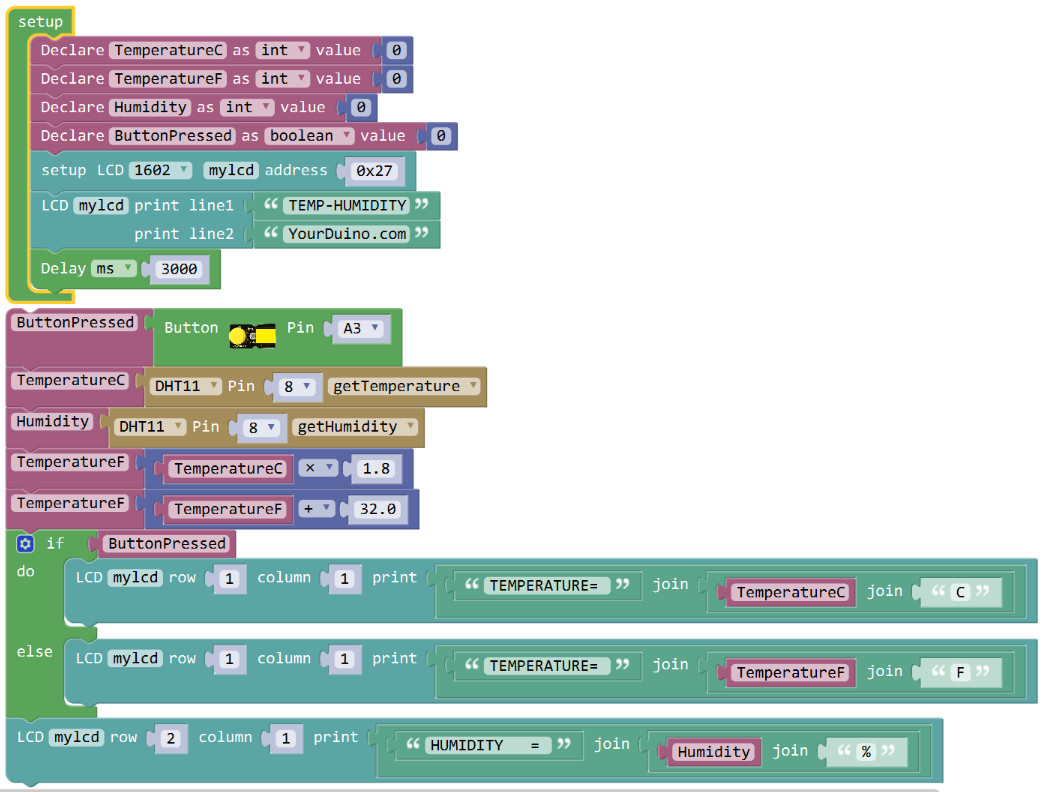
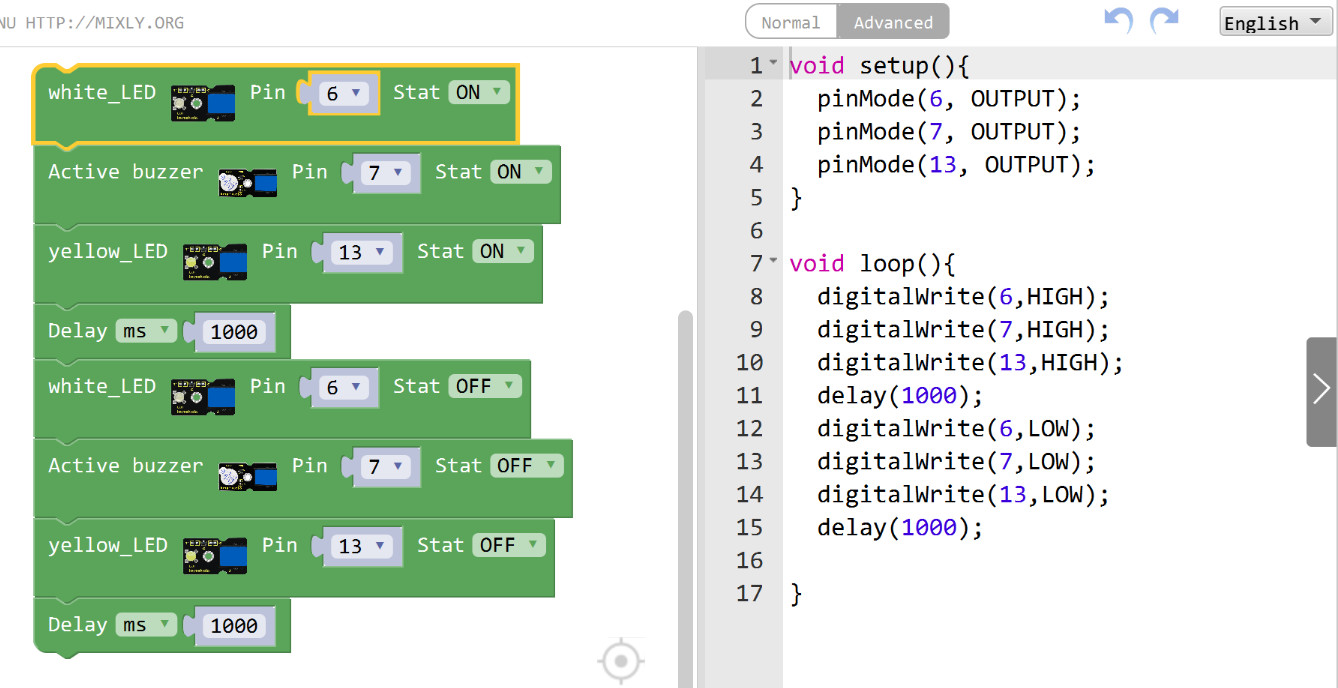
AND just click on the right and the just-compiled Arduino CODE appears. (See below) Cut and paste it into the Arduino IDE and you can program there..
INSTALLING MIXLY for WINDOWS and MAC
Here is the page with all the MIXLY files and How-To Installation information:
BUILD A ROBOT!!
OK, time to use what you've learned to BUILD A ROBOT .
Go HERE for the Robot-Building Instructions ((THAT must be customized for the New Robot))
We'd also like to hear your suggestions. Happy Building!
Please email comments, critiques, suggestions and questions to:
terry@yourduino.com
