YourDuino-RoboRED
YourDuino-RoboRED: Information and How-To
The YourDuino RoboRED is a derivative of the Arduino UNO Microcomputer board. It includes several design and capability upgrades, including Advanced Power capability: it provides MUCH more 5V power than the original: up to 2 Amps (2000 mA) to power many servos or Relay Boards or powerful LEDs, etc. And the Input Voltage rating is higher at 7-23V.
It has 3-pin connectors for all I/O.
See a comparision of RoboRED, Arduino UNO and Robo1 HERE:
Features: Logically and software equivalent to the Arduino UNO, with many important improvements:
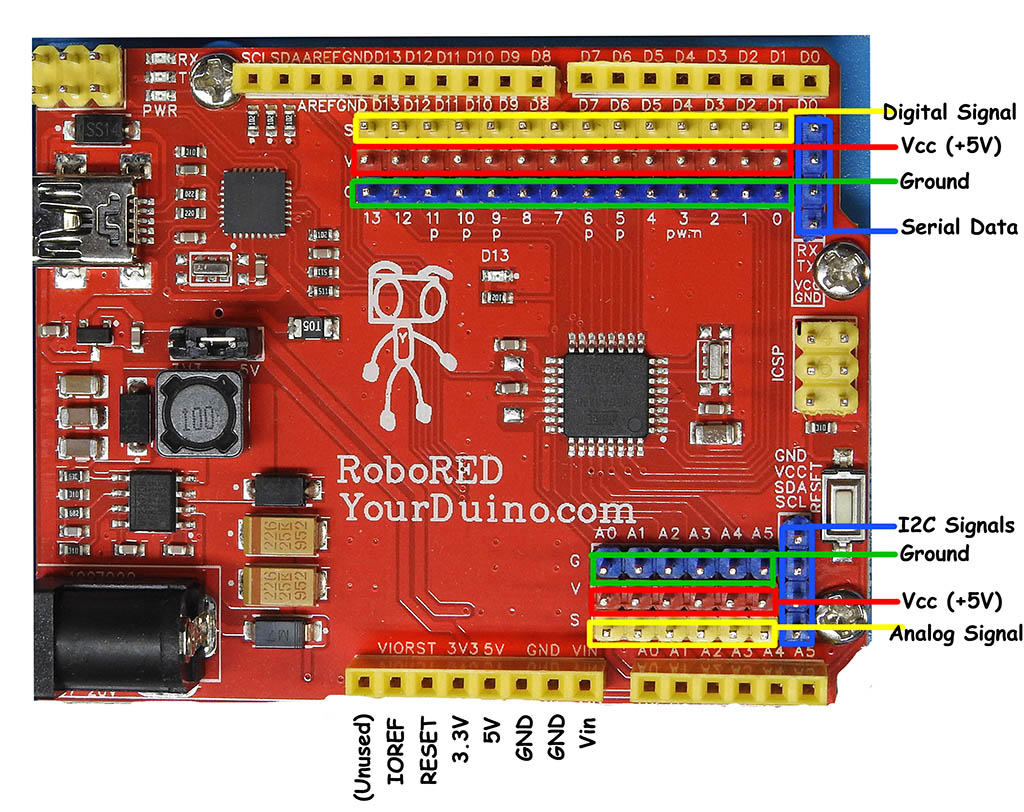
- All Digital and Analog I/O pins are provided on 3-pin connectors so you have Ground-Voltage-Signal pins together for Every signal.
- Original Arduino UNO R3 Connectors and Pinout (Outer yellow connectors) for shields etc.
- PWM: 3, 5, 6, 9, 10, and 11. Same as Arduino UNO. Provide 8-bit PWM output with the analogWrite() function.
- Dual operating Voltages: The processor chip can be run at 5.0 or 3.3 V by flipping a small switch (early version) OR moving a jumper. This can accommodate newer peripheral chips that can only operate at 3.3V signal levels. Then the "V" pins on the 3-pin connectors supply 3.3V
- Advanced Power for your designs with new onboard 5.0V and 3.3V power supplies.
- Earlier Arduino versions had only 50 mA of current available at 3.3V but now RoboRED provides up to 500 mA at 3.3V
- An advanced 5.0V switch-mode power supply onboard the RoboRED provides MUCH more 5V power than the original: up to 2 Amps (2000 mA) to power many servos or Relay Boards or powerful LEDs, etc. And the Input Voltage rating is higher at 7-23V.
- New 4-pin communications pin groups for Serial: (Receive/Transmit/Voltage/Ground) and I2C (Ground/Voltage/SDA/SCL) make it easy to connect to devices such as LCD displays, GPS, RealTime Clock, etc.
- 6-pin ICSP (In-Circuit-Serial-Programming) connectors on main controller chip (MEGA328P) (Mid-right) and the USB Interface Controller (MEGA16U2) at upper left. NOTE: Pin 1 locations are marked.
- Better Analog noise levels: Careful layout of Analog input circuits reduces interference from I2C signals on A4 and A5
- See RoboRED Schematic Diagram below
- FCC Certification ID: CST-FV140423070 RoHS

Using the RoboRED:
In Arduino IDE Select TOOLS > BOARD > UNO
In Arduino IDE Select TOOLS > SERIAL PORT > (Your correct Serial Port)
Cables / Wires / Devices: The 3-pin connectors on every I/O pin make it easy to connect things. See more about Cables, Wires and Pins HERE.
The RoboRED also has 4-pin connectors for Serial and I2C communications (marked in Blue above).
Problem-Solving for the RoboRED:

If you have a new YourDuino RoboRED, or are experiencing problems uploading software sketches, here are a few tips:
- Make sure you have the right board type selected. RoboRED is equivalent to an Arduino UNO. In the Arduino IDE software on your computer:
- Click on Tools, Then click on Board , Then click on ARDUINO UNO . See the example above.

- Turn up your computer's sound output. Plug in the USB cable on your RoboRED. You should hear a sound like "Low-High" when the USB device is recognized. If your RoboRED is recognized you should be able to see it on a port list in the Arduino IDE. See the example above. Click on Tools, Then Port: You should see an entry for your RoboRED with a port number (usually Com10 or less) and a label "(Arduino UNO") . Click on that port number.

- If your RoboRED is not recognized at all you may see the situation in the example above.The only Port shown will be COM1 or COM2 and no other ports. Try unplugging and replugging the USB cable. Try another cable! Some cables, especially type C, are "Charge Only"
RoboRED Schematic Diagram
If you want to see the INSIDE of an Arduino chip CLICK HERE
