YourDuinoStarter LightingControl
Jump to navigation
Jump to search

This is an example of an automatic system. It is very similar to YourDuinoStarter_2AnalogValues
However is is organized like a more complex system that follows the structure and sequence:
- Read Sensors
- Make Decisions
- Take actions.
You'll see those sections in the code. When you start to make something complex, like a Robot, you'll be happy you kept things organized...
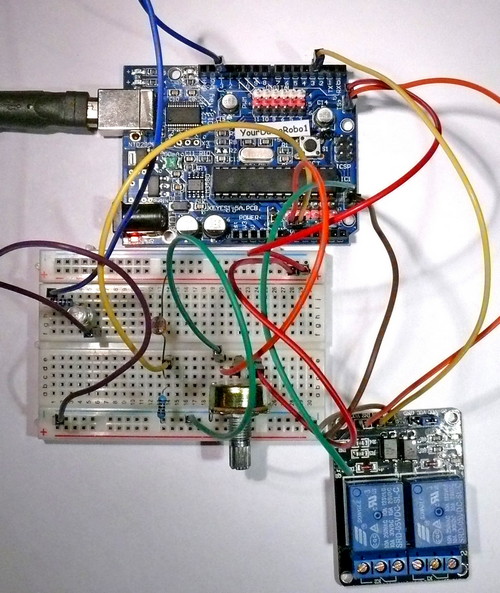
If you connect a relay board to Pin 3 in this example, it will be controlled by the light level and you can use it to control room or outdoor lights. You will note that the relay is "Active Low" and so the sketch sets the relay pin LOW to turn on lights.. Be sure to read about [/ArduinoPower Arduino Power Here:]
(Copy the text in the box below and Paste it into a blank Arduino IDE window)
/* YourDuinoStarter Example: Lighting Control
 - Reads voltage on Analog Pin 0 and displays value
 - Reads voltage on Analog Pin 1 and displays value
 - Compares values and turns on light if darker than setting
 - SEE the comments after "//" on each line below
 - CONNECTIONS:
 - Potentiometer from +5 to Ground, center to pin A0
 - Photoresistor from +5V to pin A1, 10K from A1 to Gnd.
 - Relay may be connected to Pin 3 or other if changed.
 - V1.02 02/11/13
 Questions: terry@yourduino.com */

/*-----( Import needed libraries )-----*/
//none
/*-----( Declare Constants and Pin Numbers )-----*/
#define potPin    A0  // In separate group of pins
#define photoPin  A1
#define ledPin    13  // The onboard LED
#define RelayPin  3   // Control an active-low relay
/*-----( Declare objects )-----*/
//none
/*-----( Declare Variables )-----*/
int      potValue;  // Hold the values read in
int      photoValue;
boolean  lightsOn;  // Should Lights should be turned on?
// Value can be "true" or "false"

void setup()   /****** SETUP: RUNS ONCE ******/
{
  pinMode(ledPin, OUTPUT);
  pinMode(RelayPin, OUTPUT);
  lightsOn = false;     // Start with Lights off
  Serial.begin(9600);   //Start sending to "Serial Monitor"
  Serial.println("YourDuinoStarter Example: Lighting Control.");
}//--(end setup )---


void loop()   /****** LOOP: RUNS CONSTANTLY ******/
{
  /*-----( Read Sensors )-------------------*/
  potValue   = analogRead(potPin); //Read value
  photoValue = analogRead(photoPin); //Read value
  Serial.print("POT VALUE = ");
  Serial.print(potValue,DEC); // Print value
  Serial.print("  PHOTORESISTOR VALUE = ");
  Serial.println(photoValue,DEC); // Print value

  /*-----( Make Decisions )-------------------*/
  if (photoValue < potValue)
  {
    lightsOn = true;
  }
  else
  {
    lightsOn = false;
  }

  /*-----( Take Actions )-------------------*/
  if (lightsOn == true)
  {
    digitalWrite(ledPin, HIGH);
    digitalWrite(RelayPin, LOW);  // This relay is Active LOW!
  }
  else
  {
    digitalWrite(ledPin, LOW);
    digitalWrite(RelayPin, HIGH);
  }

  delay(2000);     // Wait 1 second
}//--(end main loop )---

/*-----( Declare User-written Functions )-----*/
//none
//*********( THE END )***********