YourDuinoStarter TemperatureSensor
YourDuinoStarter Example: TemperatureSensor
This example uses the DS18B20 Electronic Thermometer in the Starter Kit.
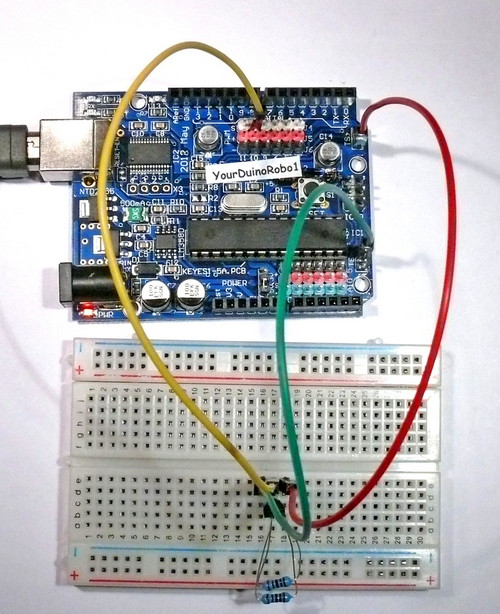
Photo on right shows how we connected it with the breadboard.
- Communicates with a DS18B20 temperature sensor, shows value read.
CONNECTIONS: (Holding chip with pins down, label towards you):
- Left pin: Ground
- Right pin: +5V
- Center pin: Arduino Pin 10 and ALSO "Pullup Resistor":
- Center pin: to 4700 (4.7K) or 5K resistor * (other end goes to +5V)
NOTE: Two 10K resistors connected in parallel can be used.
To make this work, you MUST download and install the library for DallasTemperature chips:
Then you need to copy it to your Arduino software installation Library folder. (this is called a "Library" not a Book! ) For more about Libraries see our Arduino Libraries page.
Questions: terry@yourduino.com
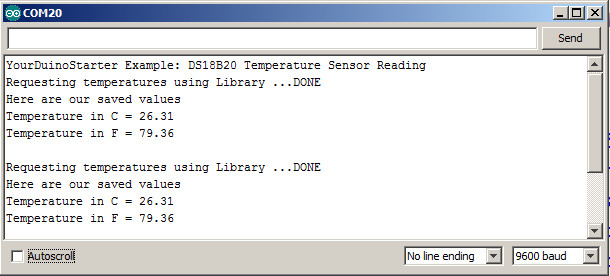
The output on the Serial Monitor should look like this: 
(Copy the text in the box below and Paste it into a blank Arduino IDE window)
/* YourDuinoStarter Example: Temperature Sensor
 - Communicates with a DS18B20 temperature sensor, shows value read.
 - SEE the comments after "//" on each line below
 - CONNECTIONS: (Holding chip with pins down, label towards you)
 - Left  pin:  Ground
 - Right pin:  +5V
 - Center pin: Arduino Pin 10 and ALSO "Pullup Resistor":
 - Center pin: to 4700 (4.7K) or 5K resistor * (other end goes to +5V)
 * NOTE: Two 10K resistors connected in parallel can be used.
 - V1.04 02/11/13
 Questions: terry@yourduino.com */

/*-----( Import needed libraries )-----*/
#include <OneWire.h>            // For many "1-wire" devices
#include <DallasTemperature.h>  // Specific for temperature sensors

/*-----( Declare Constants and Pin Numbers )-----*/
// Data wire is plugged into port 10 on the Arduino (can be changed)
#define ONE_WIRE_BUS 10    // NOTE: No ";" on #define

/*-----( Declare objects )-----*/
// Setup a oneWire instance to communicate with any OneWire devices
// (not just Maxim/Dallas temperature ICs)
OneWire oneWire(ONE_WIRE_BUS);
// Pass address of our oneWire instance to Dallas Temperature.
DallasTemperature sensors(&oneWire);

/*-----( Declare Variables )-----*/
float  TempInC  ; //Floating Point variable for C Temperature
float  TempInF  ; //Floating Point variable for F Temperature

void setup()   /****** SETUP: RUNS ONCE ******/
{
  Serial.begin(9600);    // start serial port
  Serial.println("YourDuinoStarter Example: DS18B20 Temperature Sensor Reading");
  sensors.begin();    // Start up the temperature measurement library
}//--(end setup )---

void loop()   /****** LOOP: RUNS CONSTANTLY ******/
{
  Serial.print("Requesting temperatures using Library ...");
  sensors.requestTemperatures(); // Send the command to get temperatures
  Serial.println("DONE");

  /*----( Here we will save values to use for other things)------*/
  TempInC = sensors.getTempCByIndex(0); // Get and save sensor value
  TempInF = sensors.getTempFByIndex(0); // Get and save sensor value
  Serial.println("Here are our saved values");
  Serial.print("Temperature in C = ");
  Serial.println(TempInC, 2);    // "2" sets the number of decimal places
  Serial.print("Temperature in F = ");
  Serial.println(TempInF, 2);    // "2" sets the number of decimal places
  Serial.println();
  delay(5000);
}//--(end main loop )---

/*-----( Declare User-written Functions )-----*/
//none

//*********( THE END )***********
