Air-Environmental-Monitoring
Air-Gas-Environmental-Monitoring
| MQ-3 Gas Sensor Module |
| MQ-2 Gas Sensor Module |
| MQ-2 Gas Sensor |
Arduino can measure or monitor many different gases, including molecules in air such as smoke, solvents, alcohol, propane, butane, etc.
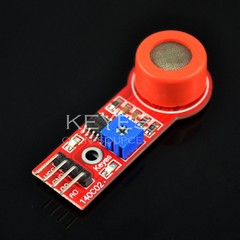
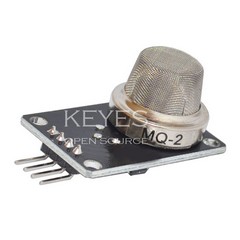
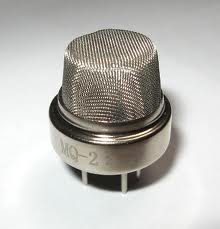
The most common low-cost monitoring devices are the "MQ" series of gas sensors. Examples are shown on the right. A fine metal screen protects the sensor. The leftmost image is of a sensor alone; most have 6 pins on the bottom.

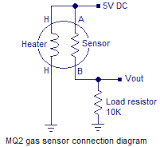
A basic sensor is usually wired as shown on the left. However, most gas sensors used with Arduino are easier to use because they are mounted on a small printed circuit board with a comparator chip and an adjustment potentiometer that can set a digital "alarm" point. An analog output is also available.
These are "Taguchi Gas Sensors"(WikiPedia) , abbreviated TGS, which are a type of electro-chemical sensor that consists of a small pellet or bead with a chemical composition that will oxidize or reduce gases that come in contact with it. This reaction causes an increased electrical signal from electrodes embedded in the pellet. A heating element embedded in the sensor element is needed to drive off contaminants and make it sensitive to the desired gases. The heater needs to be on for about 3 minutes (tested with MQ-2) before the readings become stable.
There are several different available sensors that are sensitive to different gases: (Details on the Arduino site HERE ) The datasheets for each type are in the list below.
Available Sensor Types:
MQ-2 Sensitive for Methane, Butane, LP Gas, smoke.
Available HERE DATASHEET: MQ2.pdf
MQ-3 Sensitive for Alcohol, Ethanol, smoke
Available HERE DATASHEET:Media:MQ-3.pdf
MQ-4 Sensitive for Methane, CNG Gas<
DATASHEET:Media:MQ-4.pdf
MQ-5 Sensitive for Natural gas, LPG
Available HERE DATASHEET:Media:MQ-5.pdf
MQ-6 Sensitive for LPG, butane gas
DATASHEET:Media:MQ-6.pdf
MQ-7 Sensitive for Carbon Monoxide
Available HERE DATASHEET:Media:MQ-7.pdf
MQ-8 Sensitive for Hydrogen Gas
Media:MQ-8 Ver1.3 - Manual.pdf
MQ-9 Sensitive for Carbon Monoxide, flammable gasses.
DATASHEET: Media:MQ9.pdf
MQ-135 Sensitive to Air Pollution
Available HERE DATASHEET: Media:MQ135.pdf
Connections for following test sketch:
|
SENSOR |
ARDUINO |
|
GND |
GND |
|
VCC |
+5V |
|
DO |
2 |
|
AO |
A0 |
TESTING SENSORS:
Load the test Software Sketch below into a blank Arduino IDE Window. Verify and then upload to your board. Unplug the USB connection, connect the Gas Sensor module as shown above. Then reconnect the USB.
Open the Arduino IDE Serial Monitor (Info) Check that it's set to 9600 baud (Lower right). You should see output like the listing at the end of this page.
STARTUP: When a new sensor is first connected you will see larger Analog values such as 500. Then the values will slowly decrease over 5 or 10 minutes. When the number is stable, use a small screwdriver to adjust the potentiometer. First turn it fully clockwise. The Arduino pin 13 should light and "ALARM" should be displayed. Slowly turn the potentiometer counterclockwise until the LED goes out, then a little more. Now an increase in the gas the detector is designed for will increase the analog value and turn the alarm digital output on (it is active LOW).
A sip of wine then a breath toward many sensors will cause a value change (especially the MQ-3). Some cigarette smoke will cause the MQ-2 and MQ-135 to react. A typical butane cigarette lighter, (lit and then blown out but held down) will trigger the LP Gas sensitive sensors. Hey, these sensors are SUPPOSED to go off when they sense "Stuff That Is Bad For You"..
EXAMPLE Software Sketch
(Copy and paste into blank Arduino IDE window)


/* YourDuino.com Electronic Bricks Set - MQ Gas Sensors
See it here: http://yourduino.com/sunshop2/index.php?l=product_detail&p=364
Starter Example: Sketch Template
 - MQ Gas Sensor Brick with an LM393 and both digital and analog outputs.
 - SEE the comments after "//" on each line below
 - CONNECTIONS:
   - GND  - GND
   - +5V  - VCC
   - DOUT - 2
   - AOUT - A0
 - V1.00 04/12/2015
   Questions: terry@yourduino.com */

/*-----( Import needed libraries )-----*/
//NONE YET
/*-----( Declare Constants and Pin Numbers )-----*/
#define LED_PIN 13          // define on-board LED
#define DIGITAL_IN_PIN  2   // define the digital input pin
#define ANALOG_IN_PIN   A0  // define the analog input pin

/*-----( Declare objects )-----*/
//NONE YET

/*-----( Declare Variables )-----*/
int digitalValue ;  // read digital value
float sensorValue;  // read analoog value

void setup()   /****** SETUP: RUNS ONCE ******/
{
  pinMode (LED_PIN, OUTPUT) ;      // Onboard LED
  pinMode (DIGITAL_IN_PIN, INPUT) ;// digital input signal (Not actually required; INPUT is default)
  pinMode (ANALOG_IN_PIN, INPUT)  ;// analog  input signal (Not actually required; INPUT is default)
  Serial.begin(9600);              // Start the Serial Monitor connection
  delay(100);
  Serial.println("YourDuino.com MQ Gas Sensor Test ");
}//--(end setup )---


void loop()   /****** LOOP: RUNS CONSTANTLY ******/
{
  sensorValue = analogRead(ANALOG_IN_PIN);
  Serial.print("Analog value = ");
  Serial.print(sensorValue), DEC; // display analog value

  digitalValue = digitalRead (DIGITAL_IN_PIN) ;

  Serial.print("   Digital value = ");
  Serial.print(digitalValue), DEC; // display digital value

  if (digitalValue == LOW) // Gas Sensor Module is active LOW when alarmed
  {
    digitalWrite (LED_PIN, HIGH);
    Serial.println(" ALARM! ");
  }
  else
  {
    digitalWrite (LED_PIN, LOW);
    Serial.println();
  }


  delay(1000);

}//--(end main loop )---

/*-----( Declare User-written Functions )-----*/


//*********( THE END )***********
Expected Program output on Serial Monitor:
YourDuino.com MQ Gas Sensor Test
A
YourDuino.com MQ Gas Sensor Test
Yourduino.com MQ Gas Sensor Test
Analog value = 115.00   Digital value = 1
Analog value = 114.00   Digital value = 1
Analog value = 115.00   Digital value = 1
Analog value = 116.00   Digital value = 1
Analog value = 116.00   Digital value = 1
Analog value = 133.00 ALARM!    Digital value = 0
Analog value = 155.00 ALARM!    Digital value = 0
Analog value = 141.00 ALARM!    Digital value = 0
Analog value = 135.00 ALARM!    Digital value = 0
Analog value = 128.00 ALARM!    Digital value = 0
Analog value = 125.00 ALARM!    Digital value = 0
Analog value = 123.00 ALARM!    Digital value = 0
Analog value = 122.00 ALARM!    Digital value = 0
Analog value = 121.00 ALARM!    Digital value = 0
Analog value = 120.00 ALARM!    Digital value = 0
Analog value = 119.00 ALARM!    Digital value = 0
Analog value = 118.00 ALARM!    Digital value = 0
Analog value = 117.00   Digital value = 1
Analog value = 117.00   Digital value = 1
Analog value = 116.00   Digital value = 1
Analog value = 116.00   Digital value = 1
Analog value = 115.00   Digital value = 1
Analog value = 115.00   Digital value = 1
EXAMPLE Sketch: Displays values on 16x2 LCD Displays, buzzes for alarms
(Copy and paste into blank Arduino IDE window)
/* YourDuinoStarter Example: Read, display TGS Gas sensors
  - WHAT IT DOES Reads TGS sensors sucj as MQ-2
  - SEE the comments after "//" on each line below
  - CONNECTIONS:
   -
   -
  - V1.00 01/28/2021  Written by Hudson Lusk
   Questions: terry@yourduino.com */

/*-----( Import needed libraries )-----*/
#include <Wire.h>
#include <hd44780.h>  // For LCD DISPLAYS
#include <hd44780ioClass/hd44780_I2Cexp.h>

/*-----( Declare Constants and Pin Numbers )-----*/
#define LED_PIN 13 // define on-board LED
#define BUZZ_PIN 11 // define active buzzer pin
#define DIGITAL_IN_PIN  2   // define the digital input pin
#define ANALOG_IN_PIN   A0  // define the analog input pin

const int LCD_COLS = 16;
const int LCD_ROWS = 2;
int status;   // For LCD Library

/*-----( Declare objects )-----*/
hd44780_I2Cexp lcd;
/*-----( Declare Variables )-----*/
int digitalValue ;  // read digital value
float sensorValue;  // read analoog value


void setup()   /****** SETUP: RUNS ONCE ******/
{
  pinMode (LED_PIN, OUTPUT) ;      // Onboard LED
  pinMode (BUZZ_PIN, OUTPUT) ;     // active buzzer
  pinMode (DIGITAL_IN_PIN, INPUT) ;// digital input signal (Not actually required; INPUT is default)
  pinMode (ANALOG_IN_PIN, INPUT)  ;// analog  input signal (Not actually required; INPUT is default)
  Serial.begin(9600);              // Start the Serial Monitor connection
  delay(100);
  Serial.println("YourDuino.com MQ Gas Sensor Test ");
  status = lcd.begin(LCD_COLS, LCD_ROWS);
  if (status) // non zero status means it was unsuccesful
  {
    // hd44780 has a fatalError() routine that blinks an led if possible
    // begin() failed so blink error code using the onboard LED if possible
    hd44780::fatalError(status); // does not return
  }

}//--(end setup )---


void loop()   /****** LOOP: RUNS CONSTANTLY ******/
{
  sensorValue = analogRead(ANALOG_IN_PIN);
  Serial.print("Analog value = ");
  Serial.print(sensorValue), DEC; // display analog value
  lcd.setCursor(0, 0);
  lcd.print("Analog = ");
  lcd.print(sensorValue);


  digitalValue = digitalRead (DIGITAL_IN_PIN) ;

  Serial.print("   Digital value = ");
  Serial.print(digitalValue), DEC; // display digital value
  lcd.setCursor(0, 1);
  lcd.print("Digital = ");
  lcd.print(digitalValue);

  if (digitalValue == LOW) // Gas Sensor Module is active LOW when alarmed
  {
    digitalWrite (LED_PIN, HIGH);
    digitalWrite (BUZZ_PIN, HIGH);
    delay(500);
    digitalWrite(BUZZ_PIN, LOW);
    Serial.println(" ALARM! ");
    lcd.clear();
    lcd.setCursor(0, 0);
    lcd.print("     ALARM!");
    lcd.setCursor(0, 1);
    lcd.print("     ALARM!");
  }
  else
  {
    digitalWrite (LED_PIN, LOW);
    Serial.println();
  }


  delay(1000);

}//--(end main loop )---

/*-----( Declare User-written Functions )-----*/
//None

//*********( THE END )***********
zz


