ArduinoInstall-WIN-Older
Arduino Software IDE Installation for Windows BEFORE WIN10
NOTE! If you are using WINDOWS 10 or 11 or later USE THIS VERSION
NOTE: The new YourDuino RoboRED is equivalent to an Arduino UNO.
If you have windows7/8 see section below.
DOWNLOAD THE SOFTWARE:
First, we will get your YourDuino Arduino-compatible board and the free Arduino Software installed and working. Wait to plug your board in until after the software is installed.
Note: We are showing the YourDuinoRoboRED board here, but this applies to most other Arduino-compatible boards as well.
This shows the new version called 2.2.1 or later You should download the Windows Installer Version HERE: (Unless you got it on a USB drive)
WINDOWS INSTALLATION:
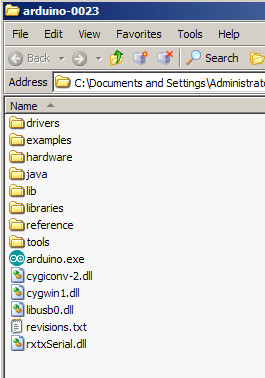
When the download finishes, click on the downloaded file. It will install the software and create a folder with subfolders inside it (see example ).
NOTES:
- The YourDuino RoboRED and YourDuino-UNO is like an Arduino UNO
- The Robo1 and the YourDuino328 are like an Arduino Duemilanove
Those are the choices you should take whenever asked for "Which Board".
PLUG IN THE HARDWARE, LOAD SOFTWARE DRIVER:
Arduino boards automatically draw power from either the USB connection to the computer or an external power supply.
Connect the Arduino board to your computer using the USB cable. The PWR LED (labelled PWR) should light up.
When you connect the board, Windows should initiate the driver installation process (if you haven't used the computer with your Arduino board before). Windows 7 / 8 / 10 will usually automatically install the USB drivers. They will usually ask for Administrator Permission to install drivers. Say YES.
If the Add Hardware Wizard opens, (perhaps you have an earlier Arduino Duemilanove or YourDuino Robo1) follow these instructions:
- When asked Can Windows connect to Windows Update to search for software? select No, not this time. Click next.
- Select Install from a list or specified location (Advanced) and click next.
- Make sure that Search for the best driver in these locations is checked
- UNcheck Search removable media
- Check Include this location in the search and browse to the drivers directory of the Arduino software folder.
- Click "Next" and hopefully the wizard will find a driver. If Windows can not find a driver, click "Back" to reach the screen where you specified the folder to search.
- Select "Don't Search, I will choose" and click Next.
- If ask to select a device type, select "All Devices" (anything will work) and click Next.
- Click the button "Have Disk".
- Click "Browse" and navigate to a possible folder. The display must show one or more files of type ".inf", or the folder is not correct. Click "Open", then "OK", and see if Windows can match your device to an .inf file.
- Start with the drivers/FTDI USB Drivers directory of the Arduino software folder, then try one level up in the drivers directory of the Arduino software folder, then try folders for drivers you have downloaded from the FTDI website
or other vendor CH341SER pro mini/micro.
If Windows installs a driver for a "USB Serial Converter" or "USB Serial Controller", it may start the new hardware wizard again. Follow the same steps again and look in the same folder. This time a "USB Serial Port" should be installed.
The FTDI drivers used by the YourDuinoRobo1 and the Arduino Duemilanove are included with every download of Arduino, in the “drivers\FTDI USB Drivers” folder of the Arduino install. Drivers for other boards, such as the Arduino/Genuino Mega/Mega 2560, may be found in the “drivers” folder of the Arduino software folder (e.g. C:\Program Files\Arduino\drivers).
WINDOWS XP - 7 - 8 - 10 INSTALL PROBLEMS:
Windows 7 / 8 / 10 will usually automatically install the USB drivers. BUT Windows 7 / 8 might not see the Yourduino or Arduino board when you first plug it in.
IF YOU HAVE A YourDuino RoboRED board:
The YourDuino RoboRED is equivalent to the Arduino UNO
Installing drivers for the Arduino UNO or Arduino Mega 2560 with Windows 7, Vista, or XP:
- Make sure the small switch labelled 3V3-5V is in the 5V position.
- Plug in your board and wait for Windows to begin it's driver installation process. After a few moments, the process will fail, despite its best efforts
- Click on the Start Menu, and open up the Control Panel.
- While in the Control Panel, navigate to System and Security. Next, click on System. Once the System window is up, open the Device Manager.
- Look under Ports (COM & LPT). You should see an open port named "Arduino UNO (COMxx)". If there is no COM & LPT section, look under "Other Devices" for "Unknown Device".
- Right click on the "Arduino UNO (COmxx)" port and choose the "Update Driver Software" option. You may need Administrator privilege to do this.
- Next, choose the "Browse my computer for Driver software" option.
- Finally, navigate to and select the driver file named "arduino.inf", located in the "Drivers" folder of the Arduino Software download (not the "FTDI USB Drivers" sub-directory). If you are using an old version of the IDE (1.0.3 or older), choose the Uno driver file named "Arduino UNO.inf"
Windows will finish up the driver installation from there.
IF YOU HAVE A YourDuino Robo1 board:
The YourDuino Robo1 is equivalent to the Arduino Duemilanove
You must install the USB serial port drivers for the YourDuino Robo1. Download and install the Virtual COM Port Driver from this web site: http://www.ftdichip.com/Drivers/VCP.htm (but see next section).
The easiest way is to get their Setup executable that can load the drivers here: http://www.ftdichip.com/Drivers/CDM/CDM%20v2.10.00%20WHQL%20Certified.exe
This is an executable program that loads the drivers. It SHOULD work for Windows XP, Windows Server 2003, Windows Vista, Windows Server 2008, Windows 7, Windows Server 2008 R2 and Windows 8/8.1.
After downloading that .exe file, run it to install the USB drivers. You may need Administrator privilege to run it.
You can check that the drivers have been installed. Plug in your Arduino/Yourduino and then open the Windows Device Manager (Control Panel > All Control Panel Items > Device Manager). Look for a "USB Serial Port" in the Ports section; that's the Arduino board.
SELECTING THE RIGHT BOARD, PROCESSOR and PORT :
Start the Arduino IDE
On your desktop you should now have the Arduino ICON like this: Click it! ![]()
The Current Arduino IDE is Version 1.8.5, and it should look like this :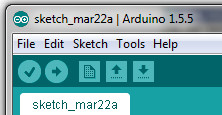
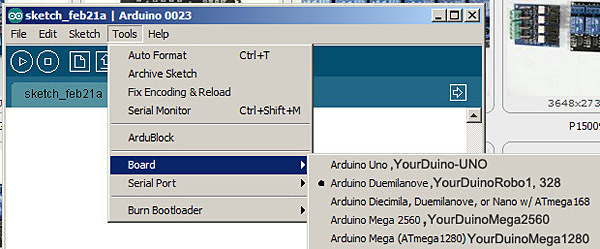
Click on TOOLS and hover over BOARD: 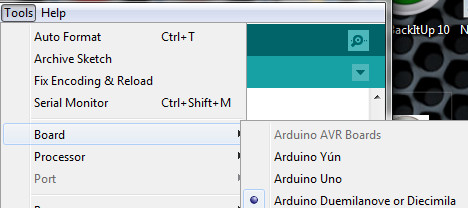
For the newer Arduino UNO and the YourDuino RoboRED, Click on TOOLS and hover over BOARD: and pick Arduino Uno.
OR pick "Arduino Duemilanove" which is compatible with the YourDuino Robo1 and YourDuino328. Hover over PROCESSOR and pick ATMEGA328 
Plug in your YourDuino/Arduino board. Now, hover over PORT and click on the one that just was added: usually a higher number. This is likely to be COM3 or higher.
To find out, you can disconnect your Arduino board and re-open the menu; the entry that disappears should be the Arduino board. Reconnect the board and select that serial port.
NOW: Test uploading by going to FILE > EXAMPLES > BASICS > BLINK and click Upload
![]() to upload the Blink program. Your PIN 13 LED should start blinking on and off once per second.
to upload the Blink program. Your PIN 13 LED should start blinking on and off once per second.
FOR Earlier Arduino IDE Versions: See the following Photos:
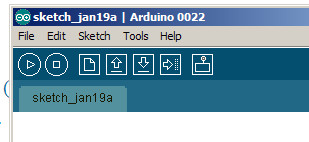
Click on the ARDUINO Icon, and you should see the "Arduino IDE Window" pop up like this:
Select your board (left):
You'll need to select the entry in the Tools | Board menu that corresponds to your Arduino. For the YourDuino328 or YourDuinoRobo1, select Arduino Duemilanove or Nano w/ ATmega328. (Click Tools then hover over Board and select the board).
Select your serial port:
Select the serial device of the Arduino board from the Tools | Serial Port menu. This is likely to be COM3 or higher. To find out, you can disconnect your Arduino board and re-open the menu; the entry that disappears should be the Arduino board. Reconnect the board and select that serial port.
DONE! You're ready to program. Now go back to the Starter Set or Robot Kit How-To or wherever you came from, like the Personal Tech page of the New York Times??
