ArduinoInstall-WIN10+
Arduino Software IDE Installation for Windows 10 and later
NOTE: The YourDuino RoboRED is equivalent to an Arduino UNO.
If you have windows7/8 see THIS VERSION !
DOWNLOAD THE SOFTWARE:
First, we will get your YourDuino Arduino-compatible board and the free Arduino Software installed and working. Wait to plug your board in until after the software is installed.
Note: We are showing the YourDuinoRoboRED board here, but this applies to most other Arduino-compatible boards as well.
You should usually download the Windows MSI Installer Version HERE: (Unless you got it on a USB drive)
You can UPDATE your Arduino IDE later when you have it running. Go to HELP and CHECK FOR UPDATES.
WINDOWS INSTALLATION:
When the download finishes, click on the downloaded file. It will install the software and create a folder with subfolders inside it.
NOTES:
- The YourDuino RoboRED and YourDuino-UNO is like an Arduino UNO
- The Robo1 and the YourDuino328 are like an Arduino Duemilanove
Those are the choices you should take IF you are asked for "Which Board".
PLUG IN THE HARDWARE
With Win10 and later the installer installs the drivers needed to allow the Arduino IDE communicate with your Arduino over the USB cable. You may have to answer YES during installation for the drivers. If you are asked for Administrator Permission to install drivers. Say YES. You may have to get your school administrator to allow this.
IF you have other boards you might need to load specific drivers for them. Refer to the board documentation.
Arduino boards automatically draw power from either the USB connection to the computer or an external power supply if used.
Connect the Arduino board to your computer using the USB cable. The PWR LED (labelled PWR) should light up.
!!!! Maybe need this ?? !!!!
or other vendor CH341SER
pro mini/micro.
SELECTING THE RIGHT BOARD, PROCESSOR and PORT :
Start the Arduino IDE
On your desktop and the Windows START menu you should now have the Arduino ICON like this: Click it! ![]()
The Current Arduino IDE is Version 2.3.3, and it should look like this :
Now Click on TOOLS and hover over BOARD: 
\
Then hover over BOARD: and pick Arduino Uno or your other baord.
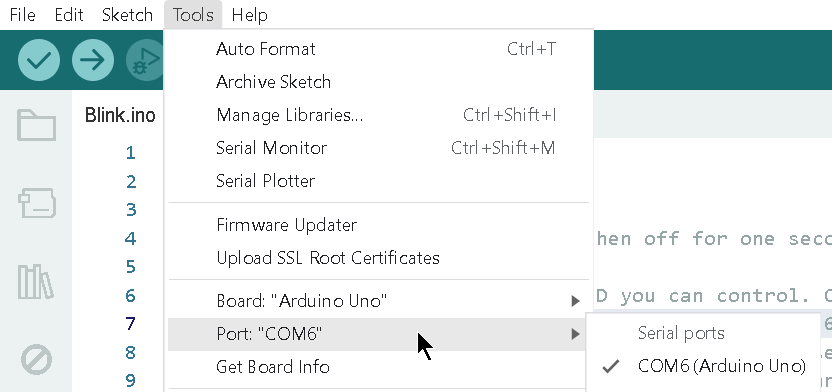
Plug in your YourDuino/Arduino board. Now, hover over PORT 
and click on the one that just was added: usually a higher number. This is likely to be COM3 or higher.
To find out, you can disconnect your Arduino board and re-open the menu; the entry that disappears should be the Arduino board. Reconnect the board and select that serial port.
NOW: Test uploading by going to FILE > EXAMPLES > BASICS > BLINK and click Upload
![]() to upload the Blink program. Your PIN 13 LED should start blinking on and off once per second.
to upload the Blink program. Your PIN 13 LED should start blinking on and off once per second.
DONE! You're ready to program. Now go back to your Kit or Robot Kit How-To or wherever you came from, like the Personal Tech page of the New York Times??