Arduino for Chromebooks
From Noah King THANKS!
The Google Chromebook is becoming increasingly popular, especially for schools trying to go 1 to 1 with laptops for all students. Unfortunately due to the strange nature of the ChromeBook/ChromeOS (basically it's a laptop with just a chrome browser) it's impossible to load and use the normal Arduino IDE (for Windows/MAC/Linux) on a Chromebook. There is a solution to this; Arduino Create is an in-browser online "Cloud" Arduino IDE for Chrome. Because of this it works really well on the Chromebook, with all the pieces playing well together. There is a significant drawback to Arduino Create, which is that it costs $1 a month. Which isn't a lot, but also isn't nothing. My understanding as to why there is a subscription cost is that Arduino Create does it's processing in the Cloud on Arduino's machines. Regardless, Arduino Create is the only good solution to using Arduino with Chromebooks. There is a free 5 day trial if you want to try it out. There are also educator versions available for cheaper, but only for multiple students, and only through Google Education.
Using Arduino Create
The Basics
For the most part using Arduino Create is very similar to the normal Arduino IDE. All the same functionality is available and most Arduino variants are supported. To get started you'll need to create an account with Arduino. Go to: https://www.arduino.cc/en/Main/Create
It is best to use the same account you use for your Chromebook. Once logged in click the icon of nine squares arranged in a square in the upper right corner, a menu should pop up. Choose the Arduino Web Editor. You should see a blank Arduino sketch in the center of the screen, in the programming window. Inside the programming window everything will be exactly the same as in the normal IDE. In addition, an auto-generated ReadMe is created as a second tab. Above this area are from left to right the verify and upload buttons, a drop-down for choosing the board to use, a drop down with general actions (save as, rename, ect.). Finally a new feature is the Share button, which generates a shareable link for others to view your code. Along the left column we have Sketchbook, which brings up a menu of all the sketches you have written, as well as allowing you to import a zipped version of your old Windows/MAC sketchbook from the normal IDE. The Examples tab has all of the standard Arduino examples available. Libraries will be talked about in it's own section. Help and Preferences are self exploratory.
Serial Monitor
The Create IDE has a feature that can be a great help in debugging sketches or controlling Arduino from your computer's keyboard. The Monitor tab opens the serial monitor in a very handy and easy to use form.
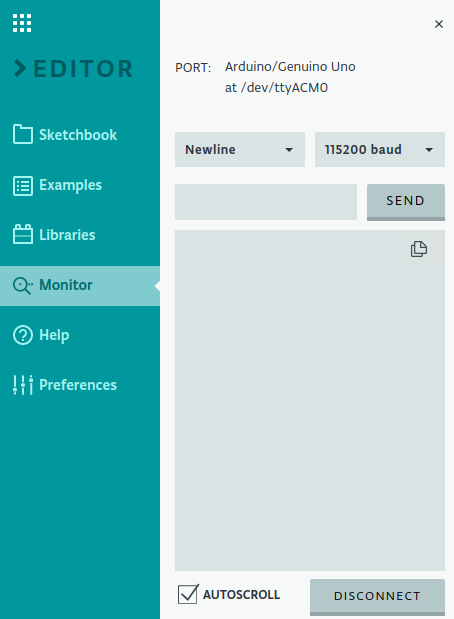
The Serial Monitor is a window that acts as a separate terminal that communicates by receiving and sending Serial Data. Serial Data is sent over a single wire (but usually travels over USB in our case) and consists of a series of 1's and 0's sent over the wire. Data can be sent in both directions (In our case on two wires). Here's what our example Serial Monitor Sketch looks like with the Monitor opened: 
Look at the Serial Monitor window. - The small upper box is where you can type in characters (hit <enter> or click "Send")
- The larger area (Corner can be dragged to enlarge) is where characters sent From Arduino will be displayed.
- At the top are two pulldowns:
- One sets the "line ending" that will be sent to Arduino when you <enter> or click Send
- The other sets the Baud Rate for communications. (If this does not match the value set up in your sketch in Setup, characters will be unreadable). Example:Serial.begin(9600); Some sketches or other applications may use a different Baud Rate.
DEBUGGING WITH SERIAL MONITOR:
If you are testing a new sketch you may need to know what's happening when you try to run it. But "Software Is Invisible". So you need the tell the software to tell you what it's doing, and sometimes the value of changing variables. You do this by using the Serial Monitor and adding code to your sketch to send characters that you can see.
SETUP:
In Setup you need to begin Serial Communications and set the Baud Rate (speed) that data will be transferred at. That looks like this:
Serial.begin(9600); // Other baud rates can be used...
Serial.println("My Sketch has started");
The second line is optional...
LOOP:
Here you can print helpful info to the Serial Monitor. Examples:

  Serial.println("Top of loop");
  Serial.println("Reading Temperature Sensor");
  Serial.print("LoopCounter value = ");
  Serial.println(LoopCounter);

  NOTE: Every time you start the Serial Monitor it resets Arduino and your sketch starts over at the beginning.
Example Serial Communications Sketch: (Cut-Paste)
Libraries
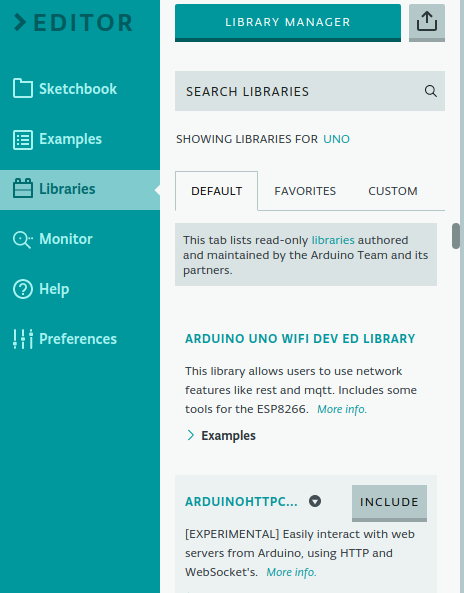
There is full support for libraries in Arduino Create. Navigating to the Libraries tab will show this:
The library manager is currently fairly useless. All it does is allow you to add default libraries to the favorites tab. So far it does not seem to allow you to add custom libraries to the favorites tab. Hopefully this will be fixed soon. The search feature also leaves something to be desired, mostly because it is very very slow, but it can help you not have to scroll through the huge number of default libraries. Finally we have the Custom tab. This is where libraries you upload will end up.
Importing Libraries
To import libraries into Arduino Create you must first get them onto the Chromebook. If you have libraries downloaded onto another machine simply upload the .zip files to your drive. Then navigate to the libraries tab and click the upload button next to the Library Manager button. This will bring up the usual google drive document picker. Navigate to the uploaded library and then hit open. The new library should pop up in the Custom tab. If you need to download a library from an online source things are even easier, just download the library, and navigate to the downloads folder when you are in the document picker window.
Multiple Arduinos
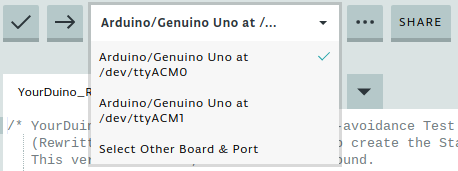
You can use the Create IDE to talk to multiple Arduinos at once. Simple plug in a second Arduino, and it will come up in the same menu.

To upload to a particular Arduino simply click the one you want. In addition the Monitor will show incoming serial data from whichever Arduino is currently selected.