LCD4884-Examples
Jump to navigation
Jump to search
LCD 4884 SHIELD EXAMPLES:
Basic Example: Displays characters, tests the Joystick Button
(Copy and paste into blank IDE window)
NOTE: You need this Library installed:
LCD SHIELD WITH Nokia 5110 DISPLAY and 'Joystick' SWITCH
LCD 4884 SHIELD EXAMPLES: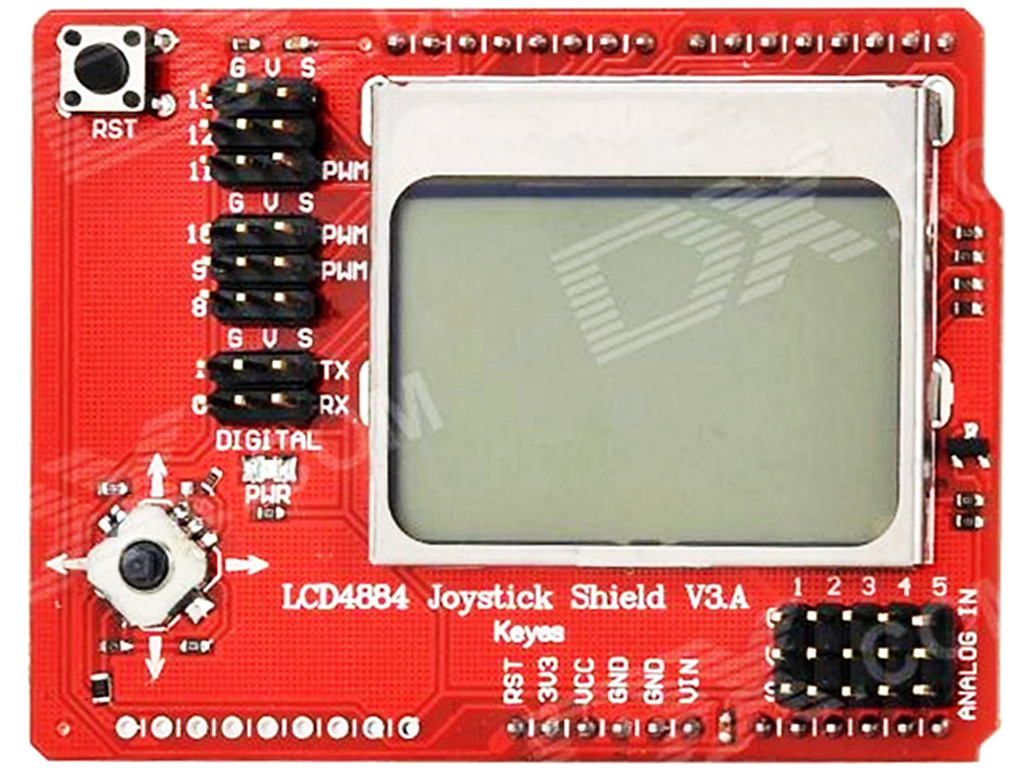

Examples for the Yourduino LCD4884 Joystick Shield V3.A (Update Fix 5/4/2016 THANKS Don!)
  This LCD is available HERE

  NOTE: Make sure the LCD display is pushed tightly against the pc board; bend the metal tabs to hold it in place if this had not already been done. See photo.

Basic Example: Displays characters, tests the Joystick Button
(Copy and paste into blank IDE window)
NOTE: You need this Library installed:
[/file/view/LCD4884.zip/574418681/LCD4884.zip LCD4884.zip]
[/file/view/LCD4884.zip/574418681/LCD4884.zip LCD4884.zip]
- [/file/detail/LCD4884.zip Details]
- [/file/view/LCD4884.zip/574418681/LCD4884.zip Download]
- 12 KB
(see Install Libraries)


/* YourDuinoStarter Example: LCD SHIELD with 'Joystick' button
 - WHAT IT DOES Displays on LCD4884, reads button
 - SEE the comments after "//" on each line below
 - CONNECTIONS:
   - LCD 4884 Shield has all connections
   -
   NOTE: Start Serial Monitor to see switch voltage values
 - V1.00 02/08/2016
   Questions: terry@yourduino.com */

/*-----( Import needed libraries )-----*/
#include <LCD4884.h>  // UPDATED version 2/16 Yourduino
/*-----( Declare Constants and Pin Numbers )-----*/
#define LCD_BACKLIGHT_PIN  7

/*-----( Declare objects )-----*/
//None: Included in library
/*-----( Declare Variables )-----*/
int displayDelay = 1000;
int switchDelay  = 100;  // Switch scanning delay
int switchVoltage ;   // From Analog read of the button resistors

void setup()   /****** SETUP: RUNS ONCE ******/
{
  Serial.begin(115200);
  pinMode(LCD_BACKLIGHT_PIN, OUTPUT);
  lcd.LCD_init(); // creates instance of LCD
  lcd.LCD_clear(); // blanks the display
  for (int a = 0; a < 5; a++)
  {
    digitalWrite(LCD_BACKLIGHT_PIN, LOW);
    delay(300);
    digitalWrite(LCD_BACKLIGHT_PIN, HIGH);
    delay(300);
  }
  for (int a = 0; a < 6; a++)
  {
    lcd.LCD_write_string(0, a, "01234567980123", MENU_NORMAL); // ignore MENU_NORMAL for now
    delay(displayDelay);
  }
  delay(displayDelay);
  lcd.LCD_clear();   // blanks the display
  delay(500);
  // Show the BIG characters (0..9, + - only)
  lcd.LCD_write_string_big(0, 0, "012345", MENU_NORMAL);
  lcd.LCD_write_string_big(0, 3, "-+-+-+", MENU_NORMAL);
  delay(1000);
  lcd.LCD_clear();  // now  read the joystick using analogRead(0

}//--(end setup )---


void loop()   /****** LOOP: RUNS CONSTANTLY ******/
{
  lcd.LCD_write_string(1, 1, "PUSH A BUTTON", MENU_NORMAL);
  switchVoltage = analogRead(0);
  Serial.print("Switch analog value = ");
  Serial.println(switchVoltage);

  if (switchVoltage == 0)
  {
    lcd.LCD_write_string(2, 2, "LEFT ", MENU_NORMAL);
  }
  else if (switchVoltage > 0 && switchVoltage < 180)
  {
    lcd.LCD_write_string(2, 2, "PUSH IN", MENU_NORMAL);
    delay(switchDelay);
  }
  else if (switchVoltage > 180 && switchVoltage < 400)
  {
    lcd.LCD_write_string(2, 2, "DOWN ", MENU_NORMAL);
    delay(switchDelay);
  }
  else if (switchVoltage > 400 && switchVoltage < 600)
  {
    lcd.LCD_write_string(2, 2, "RIGHT", MENU_NORMAL);
    delay(switchDelay);
  }
  else if (switchVoltage > 600 && switchVoltage < 800)
  {
    lcd.LCD_write_string(2, 2, "UP   ", MENU_NORMAL);
    delay(switchDelay);
  }
  else if (switchVoltage > 800)              {
    lcd.LCD_write_string(2, 2, "NONE    ", MENU_NORMAL);
    delay(switchDelay);
  }

}  //--(end main loop )---

/*-----( Declare User-written Functions )-----*/
//NONE

//*********( THE END )***********
xx