RobotKitMenu-9
ADDING CAPABILITIES:
We plan to show more project ideas here. As of now we plan:
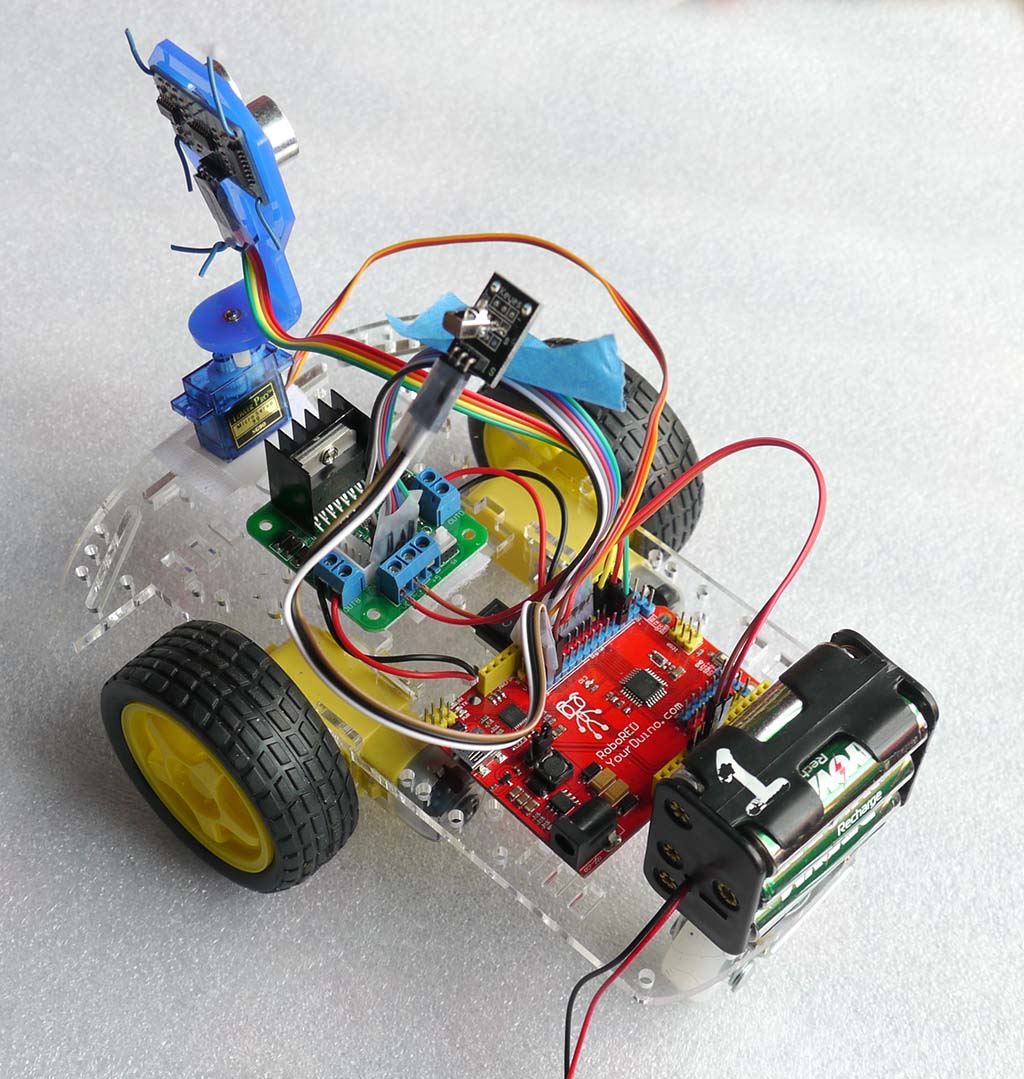
- IR Infrared Robot Remote Control Kit for remote control of the Robot (See early version below)
- Line Following, using the Robot 7-way Multi Tracking Sensor
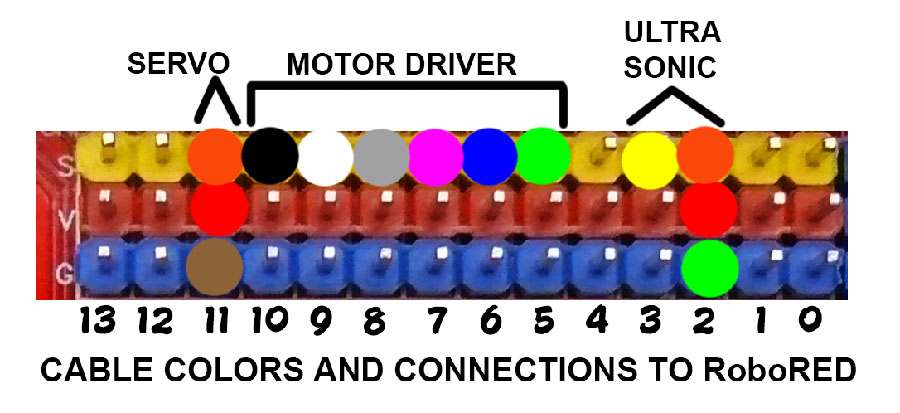
PINS Used on the RoboRED:
Later you might want to connect other things to the RoboRED on your robot, like maybe an IR remote control. Arduino UNO and RoboRED have 13 Digital I/O Pins and 6 Analog/Digital I/O pins. Here's what the robot uses them for, and what's still available:

So, as you can see, only Input-Output pins 4 and 12 are available for new ideas.
BUT, BUT! We are not using ANY of the Arduino "Analog" pins.
| PIN Number |
What the robot uses it for |
| 0 |
Upload Software Sketches |
| 1 |
Upload Software Sketches |
| 2 |
UltraSonic Sensor |
| 3 |
UltraSonic Sensor |
| 4 |
AVAILABLE |
| 5 |
Motor Controls |
| 6 |
Motor Controls |
| 7 |
Motor Controls |
| 8 |
Motor Controls |
| 9 |
Motor Controls |
| 10 |
Motor Controls |
| 11 |
Servo |
| 12 |
AVAILABLE |
| 13 |
LED/Beeper "Object was Sensed" |
| A0 |
AVAILABLE |
| A1 |
AVAILABLE |
| A2 |
AVAILABLE |
| A3 |
AVAILABLE |
| A4 |
AVAILABLE |
| A5 |
AVAILABLE |

NOTE: The A0 to A5 pins may be used just like pins 0..13 as Digital Inputs and Outputs, as well as for measuring Analog voltages from 0..5.0 Volts
Suggested pins for future add-ons:
12 - Infrared Remote Control
back to the Main Menu:
Infrared Remote Control for YourDuino Basic Robot Kit V2
This is an early version, apparently working, which adds a simple IR receiver to the Yourduino Basic Robot Kit V2. (See it near Blue Tape: above)
If you haven't already, download the motor driver library HERE and add it to your "libraries" folder.
Copy and paste the following code into your Arduino IDE and upload it to your Robot. HINT: Connect both battery and USB for upload. Use the small white button on the Motor Driver to turn motors OFF while uploading. After upload, unplug the USB, put the robot down and turn the motors back on.
PLEASE give feedback on how this works for you! terry@yourduino.com
/* YourDuino.com Robot Kit 2 Infrared Remote Control Example
    YD_Robot_IR_Control.ino
    Adapted from Club Electron (South Africa) Example

  Adds an Infrared Receiver on Pin 12 to usual Robot Kit configuration

  Controls DC motors and servo from Robot kit to run depending on button pressed on IR remote
  Forward
  Reverse
  Turn Right
  Turn Left
  OK (Stop now)
*/

/*-----( Import needed libraries )-----*/
#include "IRremote.h"
#include "IRremoteInt.h"
#include <YD_MotorDriver1.h>

/*------( Define pin numbers )----- */
//NOTE: Pins 9 and 10 are already used by the Motor Library
#define Motor1A_PIN 8
#define Motor1B_PIN 7
#define Motor2C_PIN 6
#define Motor2D_PIN 5
#define LED_PIN     13

#define IR_RECEIVER_PIN  12

/*-----( Declare Other Constants )-----*/
#define MOVE_FORWARD 10    // Remote Button
#define MOVE_LEFT    11
#define MOVE_STOP    12
#define MOVE_RIGHT   13
#define MOVE_REVERSE 14
#define SPIN_MODE    20
#define AUTO_MODE    30

#define REPEAT_CODE  -2   // Return codes from TranslateIR
#define BAD_IR_DATA  -1

/*-----( Declare global variables )-----*/
int ButtonValue;               // Value returned by TranslateIR
int LastCommand;               // Used by Repeat
boolean SpinOption = false;    // Turns can be TURN (One wheel stopped) or SPIN (Wheels in opposite directions).
boolean AutoMode   = false;    // Switch to autonomous collision avoidance mode (NOT YET!)

int StopCounter = 0;
int Timeout = 20000; // Stop motors if no button signal detected for some time (range 15000 - 30000)


/* Motor speed can be in the range of 200 - 400 only */

/*-----( Declare objects )-----*/
IRrecv robotRemote(IR_RECEIVER_PIN); // Create instance of 'IRrecv'
decode_results results;              // Create instance of 'decode_results'
YD_MotorDriver1 RobotDriver(Motor1A_PIN, Motor1B_PIN, Motor2C_PIN, Motor2D_PIN); // Set pins used

/*-----( Declare Variables )-----*/
/* Max speed should be 400. Positive numbers turn more right, negative numbers turn more left.*/
#define MOVE_SPEED  370
#define MOVE_ADJUST 0  // Adjust to go straight: - Left + Right??

void setup() /*----( SETUP: RUNS ONCE )----*/
{
  pinMode(LED_PIN, OUTPUT);
  Serial.begin(115200);
  Serial.println("YourDuino.com Robot Kit 2 Infrared Remote Control");

  robotRemote.enableIRIn(); // Start the Receiver

  RobotDriver.init(); // Start up the Robot Driver Library

} /*--(end setup )---*/

void loop()     /*----( LOOP: RUNS CONSTANTLY )----*/
{

  CheckButtons(); // Check if a button is pressed
  StopMotors();  // Stop motors if no button is pressed

} /* --(end main loop )-- */

/*-----( Declare User-written Functions )-----*/
int TranslateIR() // returns value of Remote IR code received
{

  switch (results.value)

  {
    case 0xFF629D:
      return MOVE_FORWARD;
      break;
    case 0xFF22DD:
      return MOVE_LEFT;
      break;
    case 0xFF02FD:
      return MOVE_STOP;
      break;
    case 0xFFC23D:
      return MOVE_RIGHT;
      break;
    case 0xFFA857:
      return MOVE_REVERSE;
      break;
    case 0xFF42BD:      // *
      return SPIN_MODE;
      break;
    case 0xFF52AD:      // #
      return AUTO_MODE;
      break;
    case 0xFFFFFFFF:
      return REPEAT_CODE; // REPEAT: Button Held down
      break;
    default:
      return BAD_IR_DATA; // Other Button / Bad Code / IR receive error

  } //END case

} //END TranslateIR

//-------------------------------------------------------------------------------
void CheckButtons() //Checks if button pressed and moves motors accordingly
{
  if (robotRemote.decode( & results)) // Have we received an IR signal?
  {
    StopCounter = 0;
    ButtonValue = TranslateIR();
    if (ButtonValue != REPEAT_CODE) LastCommand = ButtonValue;
    if (ButtonValue == REPEAT_CODE) ButtonValue = LastCommand;
    if (ButtonValue == BAD_IR_DATA)
    {
      digitalWrite(LED_PIN, HIGH);
    }
    else
    {
      digitalWrite(LED_PIN, LOW);
    }

    //    Serial.println(ButtonValue, DEC);

    switch (ButtonValue)
    {
      case MOVE_FORWARD:
        Serial.println(" FORWARD");
        Forward();
        break;

      case MOVE_REVERSE:
        Serial.println(" REVERSE");
        Back();
        break;

      case 6:
        SpinRight();
        break;

      case 4:
        SpinLeft();
        break;

      case MOVE_RIGHT:
        if (SpinOption == false)
        {
          Serial.println(" TURN RIGHT");
          TurnRight();
        }
        else
        {
          Serial.println(" SPIN RIGHT");
          SpinRight();
        }
        break;

      case MOVE_LEFT:
        if (SpinOption == false)
        {
          Serial.println(" TURN LEFT");
          TurnLeft();
        }
        else
        {
          Serial.println(" SPIN LEFT");
          SpinLeft();
        }
        break;

      case MOVE_STOP:
        Serial.println(" STOP");
        StopMotors();
        break;

      case SPIN_MODE:
        Serial.println(" CHANGE SPIN MODE");
        SpinOption = !SpinOption;
        delay(1000);
        break;

      case AUTO_MODE:
        Serial.println(" AUTO MODE");
        AutoMode = ! AutoMode;
        delay(1000);
        break;

      case REPEAT_CODE:
        Serial.println("+++RPT+++");
        break;

      default:
        StopMotors();
        Serial.println("Invalid Number");
        break;
    }
    ButtonValue = 0;

    robotRemote.resume(); // Receive the next value
  }
} // END CheckButtons


/*-------------------( MOTOR CONTROL FUNCTIONS )--------------------*/

void Forward()
{
  RobotDriver.Motor1Speed(MOVE_SPEED + MOVE_ADJUST);
  RobotDriver.Motor2Speed(MOVE_SPEED - MOVE_ADJUST);
}

void Back()
{
  RobotDriver.Motor1Speed(-MOVE_SPEED);
  RobotDriver.Motor2Speed(-MOVE_SPEED);
}

void TurnLeft()
{
  RobotDriver.Motor1Speed(0);
  RobotDriver.Motor2Speed(MOVE_SPEED);
}

void TurnRight()
{
  RobotDriver.Motor1Speed(MOVE_SPEED);
  RobotDriver.Motor2Speed(0);
}

void SpinLeft()
{
  RobotDriver.Motor1Speed(-MOVE_SPEED);
  RobotDriver.Motor2Speed(MOVE_SPEED);
}

void SpinRight()
{
  RobotDriver.Motor1Speed(MOVE_SPEED);
  RobotDriver.Motor2Speed(-MOVE_SPEED);
}

void StopMotors()
{
  StopCounter += 1;
  if ( StopCounter >= Timeout ) // Stop motors if there is no signal after Timeout cycles
  {
    RobotDriver.Motor1Speed(0);
    RobotDriver.Motor2Speed(0);
  }
} //END StopMotors

/*---------------------------*/
/* ( THE END ) */
Please email comments, critiques, suggestions and questions to: terry@yourduino.com