YourDuinoStarter AnalogValue
YourDuinoStarter - AnalogValue
This Software Sketch shows how Arduino can read Analog Voltages that result in a range of values from 0 to 1023 as compared to Digital values that are only 0 or 1. Why 1024 values? This is a choice by the ATMEL Engineers who designed the MicroController chip. They decided to create a 10-bit Analog-to-Digital Converter.
analogRead(pin)
"Pin" can be (0 to 5 on Arduino, 0 to 15 on Mega)
analogRead
Reads the voltage value from the specified analog pin. The Arduino board contains a 10-bit analog to digital converter with 6 channels (8 channels on the Mini and Nano, 16 on the Mega). This means that it will map input voltages between 0 and 5 volts into integer values between 0 and 1023. This yields a resolution between readings of: 5 volts / 1024 units or, .0049 volts (4.9 mV) per bit.
This example uses a Potentiometer connected as a "Voltage Divider" from +5V to Ground. The "wiper" connection that is changed as the user rotates the pot can go from 0.0V (Ground) to 5.0V
The "wiper" is connected to Analog Pin 0. As the user rotates the pot, the value can go from 0 to 1023. The sketch also converts that value into the 0.0 to 5.0V values it represents.
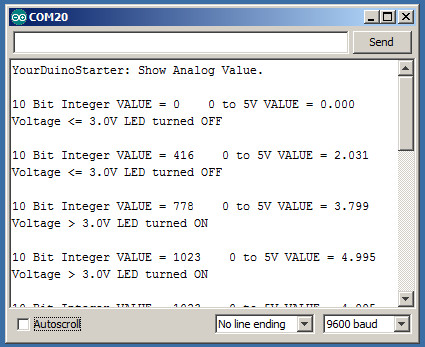
Also, the Sketch compares the voltage from the Potentiometer to 3.0 and Turns the LED ON if the voltage is > 3.0. This is an example of comparing sensor values and taking actions. Here's what the Serial Monitor Output may look like:

(Copy the text in the box below and Paste it into a blank Arduino IDE window)
/* YourDuinoStarter Example:: Analog Value
 - Reads voltage on Analog Pin 0 and displays value
 - Converts integer value to volts and displays it
 - Turns LED ON/OFF depending on Analog Voltage
 - SEE the comments after "//" on each line below
 - CONNECTIONS:
 - Potentiometer from +5 to Ground, center to pin A0
 - V1.02 02/11/13
 Questions: terry@yourduino.com */

/*-----( Import needed libraries )-----*/
//none
/*-----( Declare Constants and Pin Numbers )-----*/
#define analogPin  A0  // In separate group of pins
#define ledPin     13  // The onboard LED
/*-----( Declare objects )-----*/
//none
/*-----( Declare Variables )-----*/
int    analogIntValue;    // Holds the integer 10 bit value read in
float  analogVoltsValue;  // Value converted to 0..5V


void setup()   /****** SETUP: RUNS ONCE ******/
{
  pinMode(ledPin, OUTPUT);
  Serial.begin(9600);   //Start sending to "Serial Monitor"
  Serial.println("YourDuinoStarter: Show Analog Value.");
}//--(end setup )---


void loop()   /****** LOOP: RUNS CONSTANTLY ******/
{
  Serial.println(); // Make a new line
/*---( Read and display the 10 bit integer value )------*/
  analogIntValue = analogRead(analogPin); //Read value
  Serial.print("10 Bit Integer VALUE = ");
  Serial.print(analogIntValue,DEC); // Print value

/*---( Convert and display the  0 to 5V value )------*/
  analogVoltsValue = analogIntValue * (5.0 / 1024.0);
  Serial.print("    0 to 5V VALUE = ");
  Serial.println(analogVoltsValue, 3); // Print value

/*-( Test the voltage. If it's greater than 3.0 turn on the LED )-*/
  if (analogVoltsValue > 3.0)
  {
    digitalWrite(ledPin, HIGH);
    Serial.println("Voltage > 3.0V LED turned ON");
  }
  else
  {
    digitalWrite(ledPin, LOW);
    Serial.println("Voltage <= 3.0V LED turned OFF");
  }


  delay(2000);     // Wait 2 seconds

}//--(end main loop )---

/*-----( Declare User-written Functions )-----*/
//none
//*********( THE END )***********