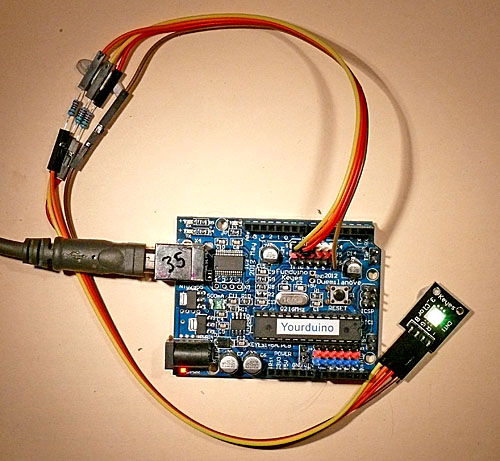
YourDuinoStarter RGB-LED-Fade
YourDuinoStarter - RGB_LED_Fade
(Version for Common Cathode RGB LED [/YourDuinoStarter_RGB-LED-Fade#CC HERE])
  An RGB LED is simply three separate LEDs crammed into a single 5mm LED package. There is one each of red, green, and blue LED elements. These three LEDs share the same positive (anode) terminal, which means that this RGB LED has a "common anode" connection. To control each color, simply connect its cathode pin to ground (through a resistor), and it will light up. Be sure to use current-limiting resistors to protect the LEDs from burning out (suggestion: 220 ohms), and you can also use pulse-width modulation (see below) to change the brightness of an LED. the correct pin-out is here:


 (By Matthew L Beckler, used by permission)

 Here is the way our RGB LED was connected with a breadboard:


  (Copy the text in the box below and Paste it into a blank Arduino IDE window)


/* YourDuinoStarter Example: RGB_LED_Fade
 - Red-Green-Blue LED fades between colors automatically
 - SEE the comments after "//" on each line below
 - CONNECTIONS: NOTE: Hold RGB LED with pins down and longer pin
                second from the Left. 4 Pins in order left-right:
   - Left:  RED
   - Second: +5V "Common Anode"
   - Third: BLUE
   - Right: Green
 - V1.00 09/17/12
   Based on code by Matthew L Beckler
   Questions: terry@yourduino.com */

/*-----( Import needed libraries )-----*/
//none
/*-----( Declare Constants and Pin Numbers )-----*/
#define redPin   11
#define bluePin 10
#define greenPin   9

#define brighter  1  //Used by SetLED_brightness function
#define dimmer    0
/*-----( Declare objects )-----*/
/*-----( Declare Variables )-----*/
int  redValue ;  // Hold the current brightness value
int  greenValue;
int  blueValue;

int  updateDelay; // Milliseconds delay on changes


void setup()   /****** SETUP: RUNS ONCE ******/
{
/* NOTE: Because the LED is "common Anode", the LEDs get brighter
   as the Arduino pin goes towards 0 volts. (It is "Inverted").
   So value=255 of OFF and value=0 in brightest.  */

  redValue = 255;  // Start with all off
  greenValue = 255;
  blueValue = 255;
  updateDelay = 5; // Ms delay. Higher will be slower. Try 2 also.
  SetLED_brightness();  // This is defined at the end of this text
}//--(end setup )---


void loop()   /****** LOOP: RUNS CONSTANTLY ******/
{

  ColorChange(&redValue, brighter ); // Red only
  ColorChange(&redValue, dimmer );
  delay(updateDelay * 100);

  ColorChange(&greenValue, brighter ); // Green only
  ColorChange(&greenValue, dimmer );
  delay(updateDelay * 100);

  ColorChange(&blueValue, brighter ); // Blue only
  ColorChange(&blueValue, dimmer );
  delay(updateDelay * 100);

  ColorChange(&redValue, brighter ); // Red plus Green = Yellow
  ColorChange(&greenValue, brighter );
  delay(updateDelay * 100);
  ColorChange(&blueValue, brighter ); // plus Blue
  delay(updateDelay * 100);
  ColorChange(&redValue, dimmer );
  ColorChange(&greenValue, dimmer );
  ColorChange(&blueValue, dimmer );
  delay(updateDelay * 200);


}//--(end main loop )---

/*-----( Declare User-written Functions )-----*/

/*------( This function updates the LED outputs)----*/
void SetLED_brightness()
{
  analogWrite(redPin, redValue);
  analogWrite(greenPin, greenValue);
  analogWrite(bluePin, blueValue);
} // End SetLED_brightness

/*--(Update one of the Colors )--------------------------*/

void ColorChange(int* LEDvalue, int howBright)
/*--( Brighten an LED to full, or dim to dark )---*/
{
  for (int i = 0; i < 255; i++)
  {
    if (howBright == dimmer)    (*LEDvalue)++;
    if (howBright == brighter)  (*LEDvalue)--;
    SetLED_brightness();
    delay(updateDelay);
  }
}
//*********( THE END )***********
See more about [/RGB-LED Red-Green-Blue (RGB) LEDs HERE]
The brightness of an LED is proportional to the current going through it, but it would be rather difficult to use a microcontroller to accurately control the current flowing through an LED. Fortunately, human vision has a nice phenomenon called persistence of vision. Persistence of vision is the phenomenon where an image that is seen for only a fraction of a second will continue to be "seen" by your brain even after the original image has vanished or moved. This this the same principle behind film and television, where a rapidly changing image tricks your brain into seeing continuous motion. By turning our LED on and off rapidly, we can trick the brain into seeing an "average" value of brightness based on the duty cycle of the driving PWM signal.

RGB-FADE Version for "Common Cathode" RGB LED
Some RGB LEDs have the - (Ground) as the common connection. Example: The RGB Electronic Brick in the following photo showing it's connections, followed by a version of the RGB FADE Sketch that sources current to the LED through 220 ohm resistors.


/* YourDuinoStarter Example:
 - WHAT IT DOES: Red-Green-Blue LED fade between colors
 - SEE the comments after "//" on each line below
 - CONNECTIONS:
   - Common Cathode (-) three-color LED such as RGB Electronic Brick
   - PINS: RED-9, GREEN-10, BLUE-11, Ground
 - V1.00 12/13/2013  Based on ideas from Matthew L Beckler
   Questions: terry@yourduino.com */

/*-----( Import needed libraries )-----*/
//none
/*-----( Declare Constants and Pin Numbers )-----*/
#define redPin   9
#define greenPin 10
#define bluePin  11

/*-----( Declare objects )-----*/
//none
/*-----( Declare Variables )-----*/
int redVal;   // Hold the changing color values
int greenVal;
int blueVal;


void setup()   /****** SETUP: RUNS ONCE ******/
{
  redVal = 0;     // Start at black
  greenVal = 0;
  blueVal = 0;
  update();       // Apply those values
}//--(end setup )---


void loop()   /****** LOOP: RUNS CONSTANTLY ******/
{
  // start out at black (all off)
  color_morph(&redVal,   1); // transition to red
  color_morph(&greenVal, 1); // transition to yellow
  color_morph(&redVal,   0); // transition to green
  color_morph(&blueVal,  1); // transition to aqua
  color_morph(&redVal,   1); // transition to white
  color_morph(&greenVal, 0); // transition to violet
  color_morph(&redVal,   0); // transition to blue
  color_morph(&blueVal,  0); // transition to black (all off)
  delay(1000);

}//--(end main loop )---

/*-----( Declare User-written Functions )-----*/

// This function updates the LED outputs.
void update()
{
  analogWrite(redPin, redVal);
  analogWrite(greenPin, greenVal);
  analogWrite(bluePin, blueVal);
}


// This function updates one of the color variables
// either getting brighter or getting dimmer.
// It also updates the outputs and delays for 10 milliseconds.
void color_morph(int* value, int get_brighter)
{
  for (int i = 0; i < 255; i++)
  {
    if (get_brighter)
      (*value)++;
    else
      (*value)--;

    update();
    delay(10);
  }
}


//*********( THE END )***********
