Abctest1
Jump to navigation
Jump to search
Test of Alberto's Graphics with added discussion and example code
PushButton Switches: INPUT Device
Pushbuttons are switches that make an electrical connection when you push them.
There are also many other sensors that act like a switch, such as Tilt Sensors, Vibration Sensors etc.
HOW IT WORKS:
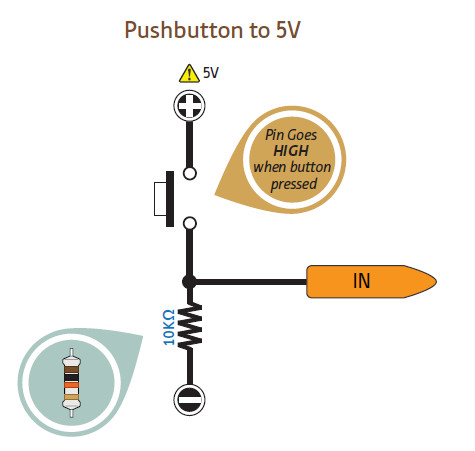
The 10K Resistor is used as a weak PULLUP Resistor which pulls the Arduino IN pin to "HIGH" which is "+5V". When the button is pushed, it over-rides the resistor and pulls the IN Pin to "LOW" which is "GROUND". When you let go of the pushbutton, the resistor pulls the IN Pin HIGH again.

What's all this stuff about PINS , BITS , ONES and ZEROS , HIGH and LOW... ? ?
See our page HERE.
PUSHBUTTON "Pull Up":
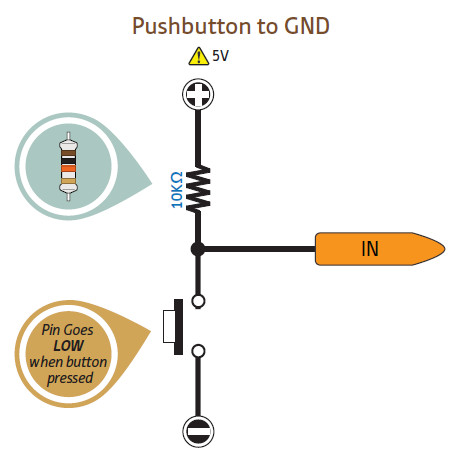
On the right there is another way to use a pushbutton. Here, the positions are reversed. The resistor is now a PULLDOWN Resistor that pulls the IN Pin to "LOW" or "GND" until the button is pushed and the switch over-rides the resistor and pulls the IN Pin "HIGH".
 WHY?
  Some devices (Like this example) only work one way: they only can pull an Arduino input HIGH or LOW. Sometimes you may want to simply think about some switch action as "Active" when the In Pin is pulled "HIGH" or "1".
"Fix It In Software"
You can always handle the question of whether some device is "Active HIGH" or "Active LOW" in your software sketch.
More About Switches: HERE
EXAMPLE SKETCH for "Pushbuttons, Switches Etc":
Copy and Paste this into a blank Arduino IDE page.
/* YourDuinoStarter Example: ItsOnOff
 - Looks at Digital value of Pin 3
 - Controls LED on Pin 13
 - Sends to Serial Monitor ON or OFF
 - SEE the comments after "//" on each line below
 - CONNECTIONS:
   - 10K Pulldown Resistor from Pin 3 to Ground
   - Pushbutton switch (OR Photoresistor) from Pin 3 to +5V
 - V1.01 09/11/12
   Questions: terry@yourduino.com */

/*-----( Import needed libraries )-----*/
// None
/*-----( Declare Constants and Pin Numbers )-----*/
const int switchPin = 3;
const int ledPin    = 13;
/*-----( Declare objects )-----*/
// None
/*-----( Declare Variables )-----*/
int switchState;  // Switch was HIGH=1 or LOW=0

void setup()   /****** SETUP: RUNS ONCE ******/
{
  pinMode(ledPin, OUTPUT);   // This pin will be an output
  pinMode(switchPin, INPUT); // Not really needed: default
  Serial.begin(9600);        // Start up the Serial Monitor
  Serial.println("YourDuinoStarterSet ITS ON OFF Test");
}//--(end setup )---


void loop()   /****** LOOP: RUNS CONSTANTLY ******/
{
  switchState = digitalRead(switchPin);
/*--(NOTE!!! "==" means "compare equal"  )--*/
  if (switchState == HIGH)   // Switch was pushed
  {
    Serial.println("ITS -ON - !");
    digitalWrite(ledPin, HIGH);
  }
  else
  {
    Serial.println("ITS -OFF- !");
    digitalWrite(ledPin, LOW);
  }
  delay(100); // Let the switch stop bouncing

}//--(end main loop )---

/*-----( Declare User-written Functions )-----*/


//*********( THE END )***********
