LCD-Serial
LCD Display with Serial (COM) Interface
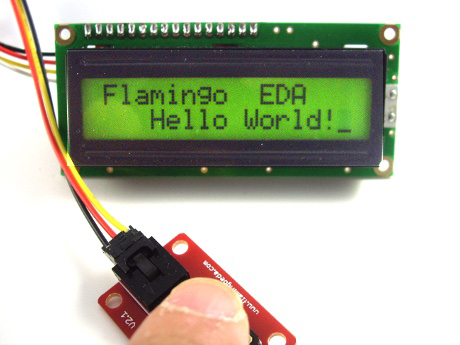
 This display includes a 2x16 LCD Display with an attached interface board that connects to Arduino vie a Serial port. This can be the "UART" Serial port on an Arduino or Mega, or any 2 Arduino pins using the "NewSoftSerial" library.

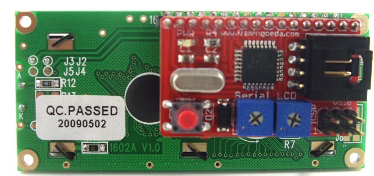
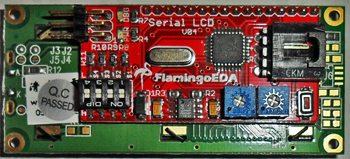
Above is a back view of the two the interface board versions. They look a little different but have the same functions.
(The 6-pin connector is for programming the onboard Microcontroller).
There are two blue adjustment pots: the left one is B (Brightness of backlight) the right is C (Contrast). If contrast is turned too far down you will not see anything on the display!
You can connect this to the serial port connector on a Sensor Shield with a 4-wire cable, or connect your own wires. (One easy way is to use the "CableMaker" HERE)
The connector is wired like this:

The serial LCD has an onboard microcontroller chip that interprets the serial characters sent to it and displays on the LCD display.
All serial port commands to control LCD begin with ”$”and end by ”return” which is written as "\n" (newline) when in an Arduino Software Sketch.
- "GO" moves the cursor to a new position
- "PRINT" displays the serial characters at the cursor position.
- "CLEAR" clears the screen .
- "HOME" moves the cursor to the initial position at the top left corner of the screen.
- "CURSOR" is to set the format of the cursor, the first parameter is whether to display the cursor (1 or 0), the second parameter is whether to blink the cursor (1 or 0).
Below is an example Arduino Software Sketch which you can cut and paste into a blank Arduino IDE screen, Verify and Upload. This version simply repeats writing to the display:
/* YourDuino.com Example Software Sketch
   Serial LCD Display
   terry@yourduino.com */

/*-----( Declare Constants, Pin Numbers )-----*/

/*-----( Declare Variables )-----*/


void setup()   /*----( SETUP: RUNS ONCE )----*/
{
  Serial.begin(9600); // Will be sent to both Serial Monitor and this LCD
}/*--(end setup )---*/


void loop()   /*----( LOOP: RUNS CONSTANTLY )----*/
{

    Serial.print("$CLEAR\n");
    delay(2000);
    Serial.print("$GO 1 1\n");
    Serial.print("$PRINT Flamingo EDA\n");
    Serial.print("$GO 2 4\n");
    Serial.print("$PRINT Hello World!\n");
    Serial.print("$CURSOR 1 1\n");

}/* --(end main loop )-- */

/* ( THE END ) */
The following version waits for a switch closure before writing to the display.
/* YourDuino.com Example Software Sketch
   Serial LCD Display
   terry@yourduino.com */

/*-----( Declare Constants, Pin Numbers )-----*/
#define SWITCH_PIN  2  // Pushbutton for Test

/*-----( Declare Variables )-----*/


void setup()   /*----( SETUP: RUNS ONCE )----*/
{
  Serial.begin(9600); // Will be sent to both Serial Monitor and this LCD
}/*--(end setup )---*/


void loop()   /*----( LOOP: RUNS CONSTANTLY )----*/
{
  if ( digitalRead(SWITCH_PIN)== HIGH)
  {
    Serial.print("$CLEAR\n");
    Serial.print("$GO 1 1\n");
    Serial.print("$PRINT Flamingo EDA\n");
    Serial.print("$GO 2 4\n");
    Serial.print("$PRINT Hello World!\n");
    Serial.print("$CURSOR 1 1\n");
  }
}/* --(end main loop )-- */

/* ( THE END ) */