RaspberryPi
Introduction to Raspberry Pi 3
What is a Raspberry Pi?
The Raspberry Pi is a low cost, credit-card sized computer that plugs into a computer monitor or TV, and uses a standard keyboard and mouse. It is a capable little device that enables people of all ages to explore computing, and to learn how to program in languages like Scratch and Python. It’s capable of doing everything you’d expect a desktop computer to do, from browsing the internet and playing high-definition video, to making spreadsheets, word-processing, and playing games.
The Raspberry Pi is slower than a modern laptop or desktop but is still a complete Linux computer and can provide all the expected abilities that implies, at a low-power consumption level. What’s more, the Raspberry Pi has the ability to interact with the outside world, and has been used in a wide array of digital maker projects, from music machines and parent detectors to weather stations and tweeting birdhouses with infra-red cameras. It was created to encourage kids all over the world to learn to program and understand how computers work.
Arduino vs Raspberry Pi
The Arduino is a micro-controller, and not in fact a mini-computer. A micro-controller is just a small part of what makes a whole computer. The Arduino only provides a subset of the functionality of the Raspberry Pi. The main differences between Arduino and Raspberry Pi are as follows:
- The Raspberry Pi is an independent computer that can run an actual Linux operating system, while the Arduino is a microcomputer that can only run C++ programs
- Raspberry Pi can multitask processes—it can run multiple programs in the background while activated. On the other hand, the Arduino only runs one program at a time
- Raspberry Pi processor has a faster clock speed than the Arduino:
- 1GHz vs 16MHz
- Raspberry Pi processor has a bigger address space:
- 32-bit process vs 8-bit processor: This means that the Raspberry Pi can handle computations with 32-bit numbers at a time while Arduino can only handle 8-bit numbers at a time in its address register. This generally mean than the Pi can have a lot more resolution and accuracy than the Arduino
- The Raspberry Pi has more GPIO Pins (40 GPIO pins) than the Arduino (14 digital pins and 6 analog pins)
- Connecting analog sensors to Arduino devices is an easier process. The micro-controller can easily interpret and respond to a wide range of sensor data using the code you put on it, which is great if you intend to repeat a series of commands or respond to sensor data as a means of making adjustments to servos and devices, while raspberry pi requires hardware assistance to read analog values.
- Because the Arduino doesn't have an operating system, it can perform tasks in real-time, whereas, the raspberry pi cannot
In a complex project, it is best to combine the Arduino and raspberry pi in such a way that the Raspberry Pi is the "Brains" for complex computing and processes while Arduino is the "Muscles" for driving actuators (servos, buzzers, LED's,) and reading sensor values. While the Raspberry Pi shines in software application, the Arduino makes hardware projects very simple. It’s simply a matter of figuring out what you want to do.
Raspberry Pi and It's Peripherals
Raspberry Pi Power Requirements
Different Models of Raspberry Pi and their Specifications
Raspberry Pi PIN Configuration
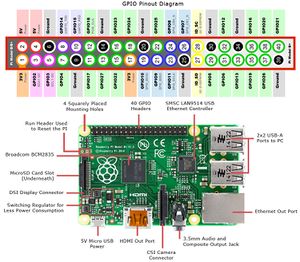
This GPIO header is the same for Raspberry Pi 3 and Pi 4 boards, so this guide applies to both versions. The Raspberry Pi has 40 GPIO (General Purpose Input Output) pins. The GPIO pins allow you to interface the Pi to the real world and do things like read switches and control LEDs and Motors. The GPIO pins on themselves cannot read analog values, hence are mostly used to read digital sensors values.
The Pi 3 and Pi 4 have the same layout as the :
- Pi Zero & Pi Zero W
- Pi 2 Model B
- Pi Model B+
- Pi Model A+
Power Pins
The header provides 5V on Pin 2 and 3.3V on Pin 1. The 3.3V supply is limited to 50mA. The 5V supply draws current directly from your microUSB supply so can use whatever is left over after the board has taken its share. A 1A power supply could supply up to 300mA once the board has drawn 700mA.
Basic GPIO
The header provides 17 Pins that can be configured as inputs and outputs. By default they are all configured as inputs except GPIO 14 & 15.
In order to use these pins you must tell the system whether they are inputs or outputs. This can be achieved a number of ways and it depends on how you intend to control them. I intend on using Python.
Pin Protection
Most of the pins in the header go directly to the Broadcom chip. It is important to carefully design the components you attach to them as there is a risk you will permanently damage your Pi. Short circuits and wiring mistakes could also ruin your day so double check everything. A multimeter is probably going to help a lot here as you can double check wiring before you connect to the Pi.
Installing Raspbian OS using NOOBS
The Raspberry Pi was designed for the Linux operating system, and many Linux distributions now have a version optimized for the Raspberry Pi.
Two of the most popular options are Raspbian, which is based on the Debian operating system, and Pidora, which is based on the Fedora operating system. For beginners, either of these two work well; which one you choose to use is a matter of personal preference. A good practice might be to go with the one which most closely resembles an operating system you’re familiar with, in either a desktop or server environment.
If you would like to experiment with multiple Linux distributions and aren't sure which one you want, or you just want an easier experience in case something goes wrong, try NOOBS, which stands for New Out Of Box Software.
There are, of course, lots of other choices. OpenELEC and RaspBMC are both operating system distributions based on Linux that are targeted towards using the Raspberry Pi as a media center. There are also non-Linux systems, like RISC OS, which run on the Pi. Some enthusiasts have even used the Raspberry Pi to learn about operating systems by designing their own.
Steps for Installing Raspbian OS using NOOBS
- Visit www.raspberrypi.org/downloads/
- You should see a box with a link to the NOOBS files. Click on the link.
- Download the zip archive of the files and extract them.
- Plug in the microSD card in which you wish to use for the raspberry pi into the computer
- Download an SD Card Formatter into your PC or MAC
- In SD Formatter, select the drive letter for your SD card, and format it.
- Next, select all the files from the NOOBS folder which you created from the extracted zip files and drag them onto the SD card.
- Eject the SD card.
- Once the files have been copied over, insert the micro SD Card into your Raspberry Pi, and plug the Pi into a power source.
- You will be offered a choice when the installer has loaded. You should check the box for Raspbian, and then click Install.
- Click Yes at the warning dialog, and then sit back and relax. It will take a while, but Raspbian will install.
Setting Up/Configuring the Raspberry Pi
Raspberry Pi Desktop
Need something here or section does not appear
The LXTerminal
Need something here or section does not appear
Raspberry Pi Connectivity
Need something here or section does not appear
Remotely Accessing the Pi
Need something here or section does not appear
Raspberry Pi GPIO Programming in Python
The GPIO.BOARD option specifies that you are referring to the pins by the number of the pin the the plug - i.e the numbers printed on the board (e.g. P1) and in the middle of the diagrams below.
The GPIO.BCM option means that you are referring to the pins by the "Broadcom SOC channel" number, these are the numbers after "GPIO" in the green rectangles around the outside of the below diagrams:


