Electronic-Brick-Homepage
Learning about Arduino can be challenging if you are a beginner. Connecting the different components correctly can seem daunting especially if soldering is required. But, there is an easier solution that allows you to experiment, learn and rapidly prototype projects with ease and safety. It is called the YourDuino Electronic Brick Set. In the YourDuino.com shop HERE.
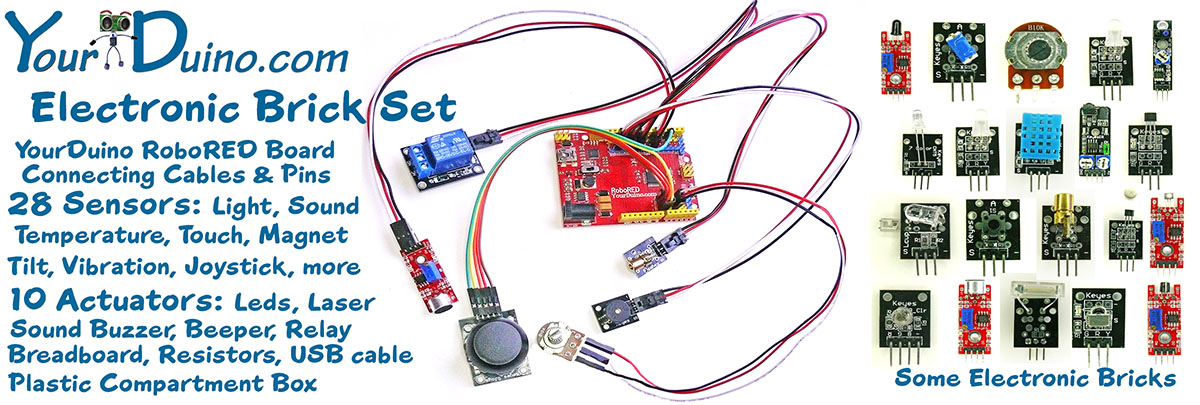
The Electronic Brick Set is a great place to start learning about Arduino and you can learn to build many interesting projects. The Bricks are small circuit boards that hold components like push-button switches, light and temperature sensors, LEDs etc. (See photo upper right). They are easily connected to the Arduino or Arduino-compatible microcomputer using a Plug and Play system of components. The Sensors and Actuators connect together easily and can be reused. No soldering is required! Each Brick has a 3 or 4 pin connector that wires easily to Ground, Voltage (Vcc) and the Signal to the Input or Output device. 3-pin cables or sections of flat cable make it easy to connect them.
Electronic Bricks are especially good for classroom situations where you'd like to be really sure wiring connections are correct and then be able to concentrate on designing software sketches and higher-level systems. See them all HERE (but continue on this page if you are ready to start using the set or want to follow our tutorials.)
LEARN WITH "ELECTRONIC BRICKS":
We will show you how to connect the various INPUT and OUTPUT DEVICES in the Electronic Brick Set and make them work. Soon, you will connect multiple devices together to make SYSTEMS that work.
LEARN ABOUT ARDUINO SOFTWARE "SKETCHES":
We will show you how to write software statements that tell Arduino "What To Do" with your INPUT and OUTPUT DEVICES.
LEARN BY DOING:
We don't expect you to know anything about Arduino yet, except that it is a MicroComputer.

  You will learn what you need to know when you need to know it. You will not study things ahead of time very much, like in school. (Unless you like to read ahead, and learn things by reading).
  This is called "Just In Time Education". You decide what you want to do, and what you need to learn to do it. It is based on doing Projects, starting work, and "Just In Time Learning".
What do I need to know about Electronics??
Well, first, Electricity is InVisible !
  Look at an Ipod or a circuit board. You can't see the electrons moving. All you can see or hear is the Results of electricity.
  If you want to make things and get results, you need to know what the electrons are doing. And Why. And How.

  And, by the way, SoftWare Is Invisible Too!
  You can't see the the code that some people wrote that makes that Ipod work.

 Not To Worry! The Electronic Brick Set and the ArduinoInfo.Info website is about making Electronics and Software visible to you, and understandable to you. You can learn how to make Electricity visible, how to trace it, how to measure it, and how to tell what it is doing. And you can learn how to write Software "Sketches" that create new and interesting high-tech things.
INPUTS AND OUTPUTS
This is the picture we will be looking at in most of the next real projects:
external image many-in-out.jpg
Arduino has many connections (PINS) that can be used as INPUTS or OUTPUTS. Usually we will use PINS numbered from 2 to 13. (There are also other pins we will talk about later).
Arduino has a nice feature: You can decide which of the PINS are INPUTS or OUTPUTS and you'll learn how to do that in a couple of minutes.
Time to look at The YourDuino RoboRED MicroComputer that comes with the Electronic Brick Set. It is an Arduino Derivative that is a legal variation of the original Open Source Arduino designs. Take a good look and then we'll figure out what's there. Then we'll hook it up and make it work.
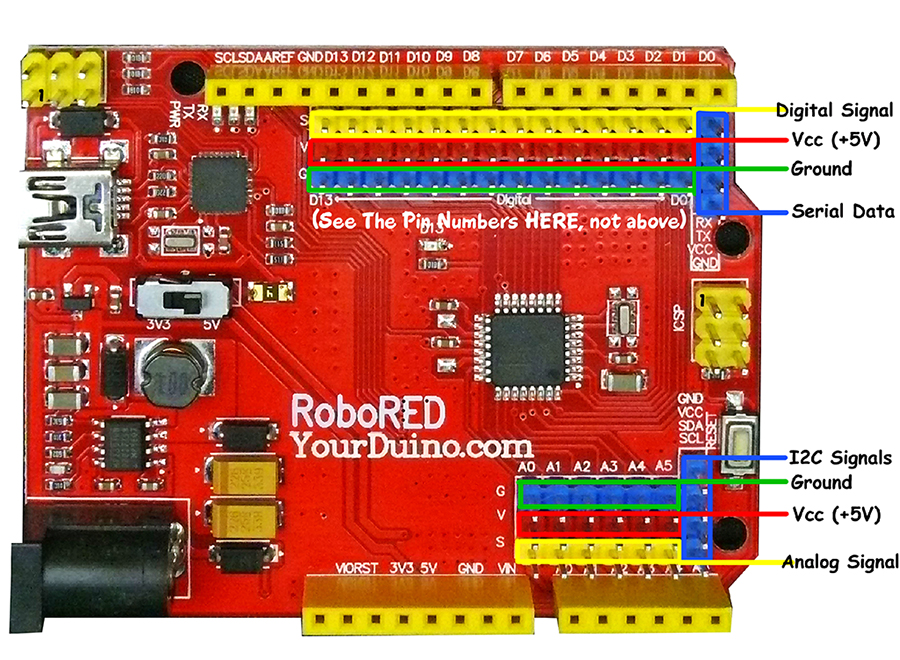
Take a couple of minutes and look at this closely. You don't need to know what the stuff on it IS, yet. Get coffee or tea. Slow down. Just look.
Often people connect to Arduino by plugging wires into the pin holes in the yellow connectors at the very top and bottom of the photo. That works OK, but you will have it easier because the RoboRED has added 3-pin connectors on every Input and Output pin. This means you can simply plug in the 3-pin cables that come with the set, and plug different Electronic Bricks on to them to get things connected fast.
If you have not used Arduino boards before then you need to get the free Arduino software downloaded and the RoboRED basically running. Let's DO that!
You should always get the latest Arduino Software from the Arduino website.
Now, click on the link to the following page that is right for your computer and operating system (Go through all the "driver install" and checkout parts of those pages):
Then come Blinkin' Back Here!
---------( A little while Later )-------------
OK, so you've got your Arduino plugged in and running. The red (power) "ON" LED is on, right? And the "D13" LED is blinking? (May be a little different for the various Arduino Open Source copies). Here's a detailed look at the YourDuino RoboRED:

Over on the right, the ON LED should be lit . And in the middle, the "D13" LED should be blinking (usually Red). (Unless you already downloaded some other software SKETCH to your Arduino.)
Most Arduinos have an LED and a resistor permanently connected from Pin 13 to GND so you can blink it easily.
SOFTWARE TIME!:
Let's take a little while to get used to writing Arduino Software, then we'll come back and start adding Electronic Brick HARDWARE and making more interesting things.
  You should have found and downloaded and installed the Arduino software, plugged your Arduino into USB, and set the right BOARD type and SERIAL PORT. If not, jump back to the links to the Arduino site just above, and do that... We will Verify and Upload the "Blink" example below.

  OK, somewhere on your desktop you should now have the Arduino ICON like this:
  Click on it, if you haven't already, and you should see the "Arduino IDE Window" pop up like this:
 This is the INTEGRATED DEVELOPMENT ENVIRONMENT where you can make Software VISIBLE! Here you will develop your own software to make Arduino into what you want it to be. We will have examples for you to start with.


 SKETCHES:
  The visible text of an Arduino software program is called a SKETCH. But the Sketch becomes alive when you upload it to your Arduino. Let's walk through looking at a Sketch and Verifying it and Uploading it:
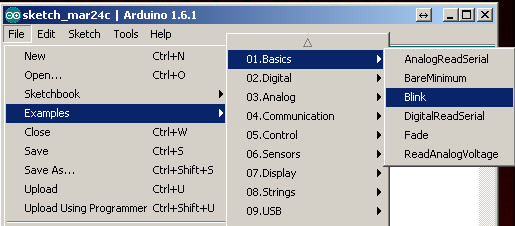
  Click on FILE and then move your mouse over EXAMPLES and BASICS and BLINK
  so it looks like this:

  And CLICK. There are lots of examples that come with the free Arduino software system, and we will look at some of them later, but we will check out the interesting devices in your Electronic Brick Set first.
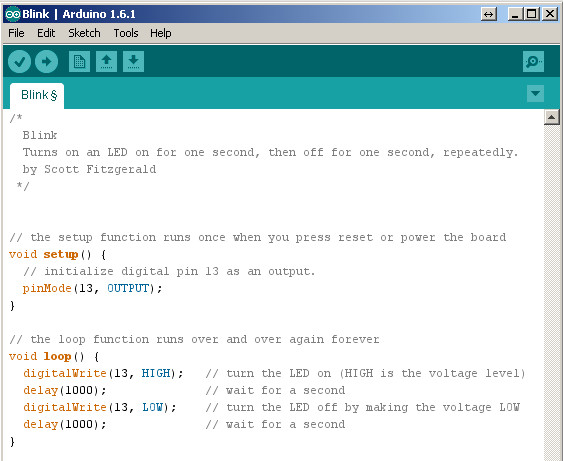
  A new IDE window should pop up and look like this:


  Wow.. A bunch of new stuff.
  Let's slow down and "Watch Closely Now"!
  Notice that a lot of the text is GREY. All of that is just "Comments" for you to read to help understand the Sketch. When you write software, you should also use "Comments" to explain to others what you are doing. (Arduino itself ignores these comments).

  Now, let's go through changing software, Verifying it, and Uploading it to see Arduino DO it. We'll use the BLINK example for now, but soon you'll start trying out your new BRICKS!

  Every Arduino Program has the same basic structure:
- SETUP - Runs Once at the beginning
- LOOP - Runs over and over again, forever
You will read a LOT of program "Code" that other people wrote, in the future. You HAVE to "Watch Closely Now" and really see the details. Read the example (above) through carefully, a couple of times. Note the colored special words that are INSTRUCTIONS.
INSTRUCTIONS: Are unique words that tell Arduino what to do.
What SETUP does: Instructs Arduino about things that need to be done once at the beginning. Remember that Arduino Digital Pins can be either INPUT or OUTPUT. You have to tell Arduino when a Pin will be used as an OUTPUT. In this example, there is one line that tells Arduino that Pin 13 must be an OUTPUT.
external image Arduino-IDA-Pinmode1.jpg
Note the COLOR of the lettering. The Arduino IDE changes the color of words as it recognizes them as special instructions.
pinMode: Note that when Instructions are two words run together, like pinMode, the beginning of the SECOND word is Capitalized. Mess with it: Change the Capital "M" to "m". Note the color changes to black. Hmmm. Click the VERIFY Button:![]()
You will get an ERROR message: ![]()
Fussy, Fussy, Fussy! Yep, every letter has to be recognized.
Change it back. Check the color. Click Verify again. OK??
What does VERIFY do??![]()
A lot! More details later, but Verify is a program in your main computer that Builds the code to be uploaded to your board. It goes through every Instruction in your Sketch (Ignoring "Comments") and checks it against the list of valid Instructions, and checks that the structure and sequence of the statements in the Sketch are correct. Fussy, Fussy! If that's OK, then it "compiles" or "translates" the sketch into the machine code that Arduino actually runs on. It saves that 'ready-to-run' code for you to Upload to Arduino and run.
What does UPLOAD do??![]()
First, Upload runs Verify to check and compile your program. Then it communicates to your Arduino over the USB connection, resets the Arduino chip, and talks to software already on Arduino (called the BOOTLOADER) to load your new program into the Arduino's memory. Then it restarts Arduino and your program runs it's SETUP section and then repeats the LOOP section.
Start Making Changes:
Ok, let's make a few changes to the sample BLINK program:

The LOOP section of your program does all the instructions in the section, and then "loops" back to the top and starts it again, over and over.
NOTE: the "Brackets" { and }
Notice that the beginning and end of the section is "inside brackets". You will see many sections of bigger programs that are grouped by these "brackets".
Now, let's look in detail at the instructions:
digitalWrite
This instruction sets an OUTPUT PIN to either HIGH (connects it to +5 V) or LOW (Connects it to GND). Remember: HIGH = 1 = ON = 5V
So, the first line in LOOP sets PIN 13 to HIGH. There is an LED and resistor already connected to PIN 13, so the LED lights up.
delay
The delay instruction just waits for a period of time. The VALUE used with delay is in Milliseconds (1/1000 second). So delay(1000); waits for 1000/1000 seconds (1 second). We'll change that soon.
NOTE: the ";"
Notice that every instruction is followed by the character " ; " which is like a period that tells the end of the sentence.
Upload your first Software Sketch:
You probably already had BLINK running, from when you installed the Arduino IDE software and cheked out your Arduino UNO or Yourduino RoboRED. If not, click uploadnow and make sure it uploads OK, without error messages.
Editing: Changing software Sketches:
Let's change the delay so that the LED blinks differently: Time to mess about and try some things!

  Suggestion: Save your own version of BLINK so you can always go back to the original one. Go to File and Save As and call it something like MyBlink. This will go in your SKETCHBOOK where you'll save your own programs.
  Now go change the VALUE in a delay statement to change the way the LED blinks. Think about the the 4 instructions in LOOP. What's happening??
- Turn the LED on.
- Wait and look at the LED.
- Turn the LED off.
- Wait and look at the dark.
So, let's change the ON time to be very short. Maybe 50 Milliseconds. So change the first delay statement to:
delay(50);
Each time you make a change, click upload ![]() which will first Verify and Compile your program and then send it to Arduino. Notice that each time you do this the LEDS flash that are marked "Tx" (Transmit) and "Rx" (receive) as your main computer communicates to the Arduino.
which will first Verify and Compile your program and then send it to Arduino. Notice that each time you do this the LEDS flash that are marked "Tx" (Transmit) and "Rx" (receive) as your main computer communicates to the Arduino.
Try some other combinations of ON and OFF times. Like ON 1000 and OFF 50. We can still see the short OFF time blink.
Try making both ON and OFF times shorter and shorter. If you make the ON and OFF times short enough your eye will no longer see blinking, because of "Persistence of Vision" (W) which happens when there are more than about 25 blinks per second. So, hmmm.... if you make the LED be ON for 1/50 of a second and OFF for 1/50 of a second that should do it. So try 1000/50= 20 Milliseconds. Put 20 for both the ON and OFF times. What do you see?? Younger eyes will see some blinking effect. How about 10 Milliseconds each?
Pulse Width Modulation: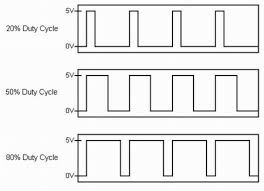
This idea of turning an OUTPUT on and off rapidly can be used to dim lights, control motor speeds and so forth, even though a DIGITAL OUTPUT can only be a 0 (OFF, or LOW) or 1 (ON, or HIGH). Later you will see how Arduino can use these for dimming, speed control and more. Change the delays back so you have 10Ms ON and 10 Ms OFF Notice how bright the LED is. Now change the ON time to 1 Ms. Upload that. Is it a lot dimmer? It is on only about 10% of the time and your eye sees it as dimmer. Arduino can change the On to OFF ratio itself without you programming it. Later we'll try out PWM.
OK, your Arduino is working, you are programming, so now let's jump to another page and start hooking up your "Electronic Bricks". (ELECTRONIC BRICKS: HERE)
