Jack O
YourDuino PROJECT: Jack O. Lantern
Demo: Jack O. Lantern, the “Singing” Pumpkin
Barry King, October 2014
What is it? What does it do?
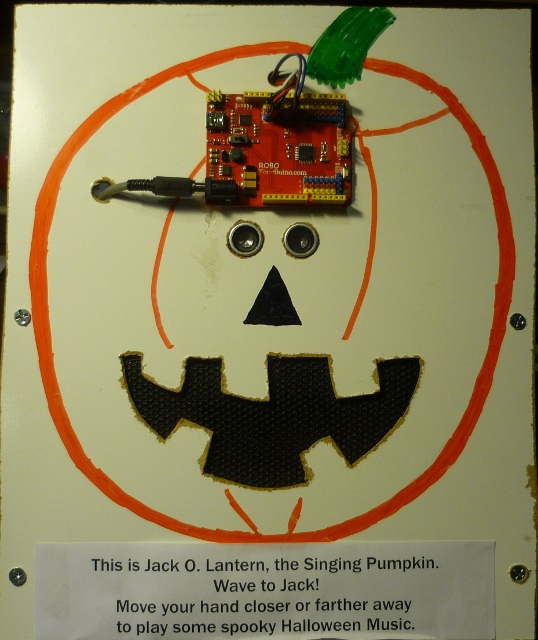
Jack has a Jack-O-Lantern face. If you hold your hand or a flat object in front of his face, he “sings” by making a musical tone, which changes depending on how far away the object is.

I built this as a demonstration for the Champlain Mini-MakerFaire in October of 2014.
How does it work?
Jack uses an ultrasonic sensor (Jack's eyes) to measure the distance to your hand by bouncing a pulse of sound off your hand, and measuring the tiny time it takes for the echo to return, kind of the same way a bat can see a mosquito at night. The farther your hand is away, the longer the time it takes for the echo to come back.
Based on how far away your hand is, the Arduino calculates the tone to play. The closer your hand, the higher the tone.
The Arduino switches one of its output pins on and off rapidly to make the tone. Switch at 440 times per second, and that's an “A” note. At about 262 times per second, it's middle “C”, and so on. So the Arduino makes an electrical signal changing at the right speed. I connected that signal to an old computer speaker that converts the electrical signal to sound.
How did you think of that?
This project was inspired by the musical instrument called a Theremin. A real Theremin has two antennas, and you hold your hand near them to control the pitch (with one hand), and the loudness (with the other). Take a look at this video: https://www.youtube.com/watch?v=w5qf9O6c20o to see the inventor himself playing one. Or listen to the chorus of the Beach Boys' “Good Vibrations”. Either way.
How did you make it?
Here are some of the details.
One of the purposes of these demonstrations is to model the process of developing a project. One of the tenets of happy hobby hacking is step-wise refinement. Step-wise refinement means you get one small part of the project working at a time, then keep adding to it, and improving it.
I set out to make an electronic “Theremin”. The first thing I needed was a way to make the sound.
Arduino is open-source, so as a result, many people share their work in “libraries” that you can re-use in your own projects. There is a library that comes with the Arduino system that makes a tone. It is called “tone”. (Tricky, huh?) I tried it. I salvaged a tiny speaker from a dead mini boom box. I connected it to the Arduino.
In Arduino, the list of instructions you write to make your project work is called a Sketch. I wrote the first bit of my sketch: Play an “A” for one second... Yes! It worked. So now I can make a tone. Later, I switched to the "NewTone" library so I could use the Ultrasonic Sensor at the same time.
The next thing I needed was a way to sense how I was moving my hand. I decided to use an ultrasonic distance sensor. This is a sensor I have used before, it is inexpensive, and it is easy to use with Arduino. Again, there is a library I could use. Its called “NewPing”. So I wrote a simple sketch to read the distance from the sensor to my hand. I could read the distance OK. I noticed that it sometimes got one weird reading mixed into the sensible ones. But... good enough for now.
Now came the fun part- designing the relationship from the distance to the tone. This was harder than you might think because I wanted to use all integer numbers, not fractions, in my calculations, so that Jack's tiny brain could do the math really fast.
I knew that I would need to experiment with different distances and different notes to get the “feel” I wanted. If you look at my sketch (below), you can see that I used a programming trick: I used the Arduino system's “#define” in my sketch to give names to my adjustment numbers such as the highest and lowest notes. This made it easy to try different numbers until it worked as I wanted.
Now I had something that sort-of worked. This is stage when you show your project excitedly to your son or co-worker and they immediately notice everything that isn't refined...yet. This is known in the technology business as the “demo” effect. It was time for more step-wise refinement.
Those occasional weird distance readings came back to bother me now, because my “Theremin” would warble a little. So I added some more calculations to average several readings, to smooth over these rough spots.
I wasn't really satisfied with the sound either. It was a tiny, tinny, coarse whine. I decided to connect the Arduino's tone signal to an old amplified computer speaker that I was not using. Re-using that speaker is another example of using old parts for a new purpose. I happened to know that I needed a couple of resistors to properly convert the Arduino signal to the headphone format that the computer speaker wanted. Usually, I have to look up an example on line or ask my local expert for details like this. I used a little “breadboard” to plug the components together.
That made the sound a lot louder and clearer, but it was still a coarse whine. So I added a capacitor to the circuit. Just like my averaging of the distance measurements, this “smoothed out the rough edges” of the sound a little. And that's where it stands now. There are several projects that others have done to make really nice tone with an Arduino, and I think the next step will be to use one of those in my project. Step-wise refinement again.
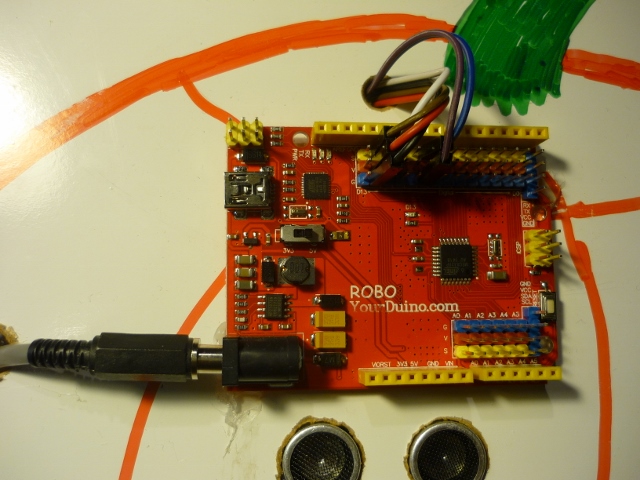
So now it was time to pack this up into a form so people at the Champlain Mini-MakerFaire could see it. When I looked at the computer speaker, it looked like a giant smile, and the ultrasonic sensor like “eyes”. So I thought to make the project look like a clown face. But then I remembered that Maker Faire is almost Halloween- so why not a Jack-o-lantern face instead? I used inexpensive whiteboard panel, scrap lumber, and hot glue to make the panel and to mount the “eyes” and “mouth”. And of course, the Arduino is Jack's brain (such as it is) so I glued it on right there in the top of his skull.

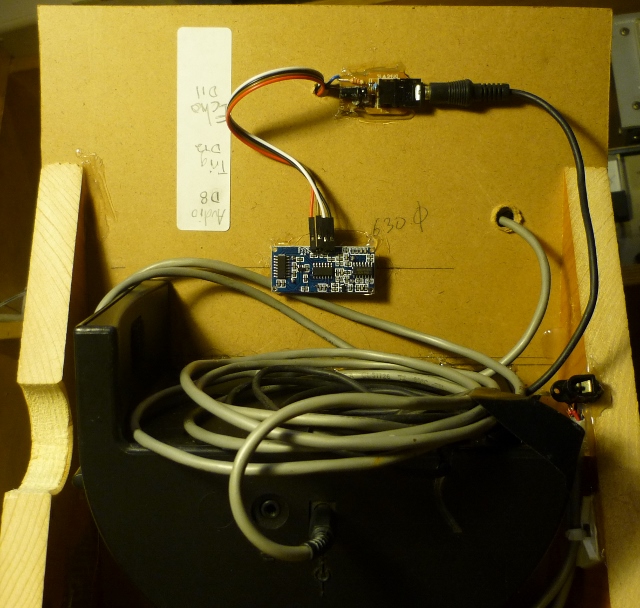
I neatened the wiring to the speaker by soldering my components instead of using the breadboard. Most of the salvage and soldering and hot glue is on the back. Here is the "behind the scenes" photo, to see how it turned out:

And, of course, my masterpiece artwork with orange, black, and green sharpie markers makes the face complete.
I hope that this explanation shows you that you can make your project idea come true. When you do, we love it when you write us and tell us how you did it, and what is the next refinement on your project.
Come join the conversation at https://arduinoinfo.mywikis.net/wiki/
More details:
Understanding the Science Behind the Ultrasonic Distance Sensor (click)
If you would like to understand more about how Ultrasonic Ranging works, click the link above.
Software Sketch
You can cut and paste this code into the Arduino IDE, then upload to your Arduino/YourDuino board:
// Jack O Lantern demo
// creates a pseudo theramin by measuring hand position with ultrasonic,
// to control the output tone.

// settings that define the range of tones
#define LOW_TONE  22     // Hz
#define HIGH_TONE 880   // Hz
#define TONE_RANGE ( HIGH_TONE - LOW_TONE )

// settings that define the range of distances
// all in terms of round-trip echo time
// #define US_ROUNDTRIP_CM 57      // Microseconds (uS) it takes sound to travel round-trip 1cm distance (2cm total)
#define CLOSE_ECHO_TIME  500  // us, slighty less than 9 cm
#define FAR_ECHO_TIME    3000 // us, about 52.5 cm
#define TIME_RANGE ( FAR_ECHO_TIME - CLOSE_ECHO_TIME )

// settings to adjust filtering of the ultrasonic data
#define FILT_SIZE 4  // number of values to average

// NewTone Library
// NewTone library outputs a tone on a digital I/O
// simplest output device is 100 ohms to an 8 ohm speaker to ground
// Note: NewTone uses Timer 1.
#include <NewTone.h>
#define TONE_PIN 8

// NewPing library
// NewPing Library controls an ultrasonic transducer to measure
// distance to a target.
// NewPing will return distance of zero if no echo returns before
// the maximum ping distance.  This speeds up the measurement if
// working range is small.
// Note: NewPing uses Timer 2.
#include <NewPing.h>

// parameters for my application of NewPing:
#define TRIGGER_PIN  12  // Arduino pin tied to trigger pin on the ultrasonic sensor.
#define ECHO_PIN     11  // Arduino pin tied to echo pin on the ultrasonic sensor.
#define MAX_DISTANCE 100 // Maximum distance we want to ping for (in centimeters). Maximum sensor distance is rated at 400-500cm.

// Declare a NewPing instance called sonar:
NewPing sonar(TRIGGER_PIN, ECHO_PIN, MAX_DISTANCE); // NewPing setup of pins and maximum distance.

// Declare working Variables:
unsigned int TripTime;
unsigned int RawReturn;
unsigned long ToneOut;

long Filter;
unsigned int Values[FILT_SIZE];
unsigned int FilterIndex;

void setup() {
//  Serial.begin(115200); // Open serial monitor at 115200 baud for debug messages
  FilterIndex = 0;
  Filter = 0;
  TripTime = 0;
}

void loop() {
  delay(30); // 30 ms is the fastest ultrasonic can update
  RawReturn = sonar.ping(); // Send ping, get ping time in microseconds (uS).

  Filter = Filter + RawReturn;
  Filter = Filter - Values[FilterIndex];
  Values[FilterIndex] = RawReturn;
  FilterIndex++;
  if (FilterIndex > (FILT_SIZE-1) )
    FilterIndex = 0;

  TripTime = Filter / FILT_SIZE;


  if ( TripTime < FAR_ECHO_TIME )
  {

    if ( TripTime > CLOSE_ECHO_TIME)
    {
      TripTime = TripTime - CLOSE_ECHO_TIME;
    }
    else
    {
      TripTime =  1;
    }

    // calculate tone as proportional to trip time.
    // closer gives shorter time, mapped to higher notes
    // do the calculation in several steps
    // each step answer fits in unsigned long
    ToneOut = TripTime;  // start with the range in us.
    ToneOut = ToneOut * (TONE_RANGE);  // multiply first to maximize precision
    ToneOut = ToneOut / (TIME_RANGE);  // divide back down
    // now ToneOut is proportionally scaled from time range to tone range
    // apply the scaled range to create the tone.  Subtract the scaled range
    // so that smaller echo times give larger tone frequencys.
    ToneOut = HIGH_TONE - ToneOut + LOW_TONE;

    NewTone(TONE_PIN, ToneOut); // start making the new tone
  }
  else // no target in range
  {
    noNewTone(TONE_PIN); // stops sound
  }

}
NOTE: You will need to download and install two libraries used in this sketch:
- Library From Tim Eckel for Ultrasonic Sensor - https://bitbucket.org/teckel12/arduino-new-ping/wiki/Home
- Library From Tim Eckel for non-conflicting tones - https://bitbucket.org/teckel12/arduino-new-tone/wiki/Home
See: How to Install Libraries HERE: