MegaQuickRef
Arduino / YourDuino MEGA 1280 and 2560 Diagram and Pinouts:
You can get the YourDuino Mega2560 HERE
COMPARISION of different Arduino/Yourduino boards:
| Brand |
HHName (link) |
HHProcessor |
HHOperating Voltage |
Input Voltage Range |
CPU Speed |
Analog In |
Digital IO |
PWM |
EEPROM [kB] |
SRAM [kB] |
Flash [kB] |
USB |
SERIAL UART |
| Arduino |
ATmega2560 |
5 V |
7 -12 V |
16 MHz |
16 |
54 |
15 |
4 |
8 |
256 |
Regular |
4 | |
| Arduino |
ATmega328P |
5 V |
7 12 V |
16 MHz |
6 |
14 |
6 |
1 |
2 |
32 |
Regular |
1 | |
| YourDuino |
ATmega328P |
5 V |
7 - 20 V |
16 MHz |
6 |
14 |
6 |
1 |
2 |
32 |
Mini |
1 |
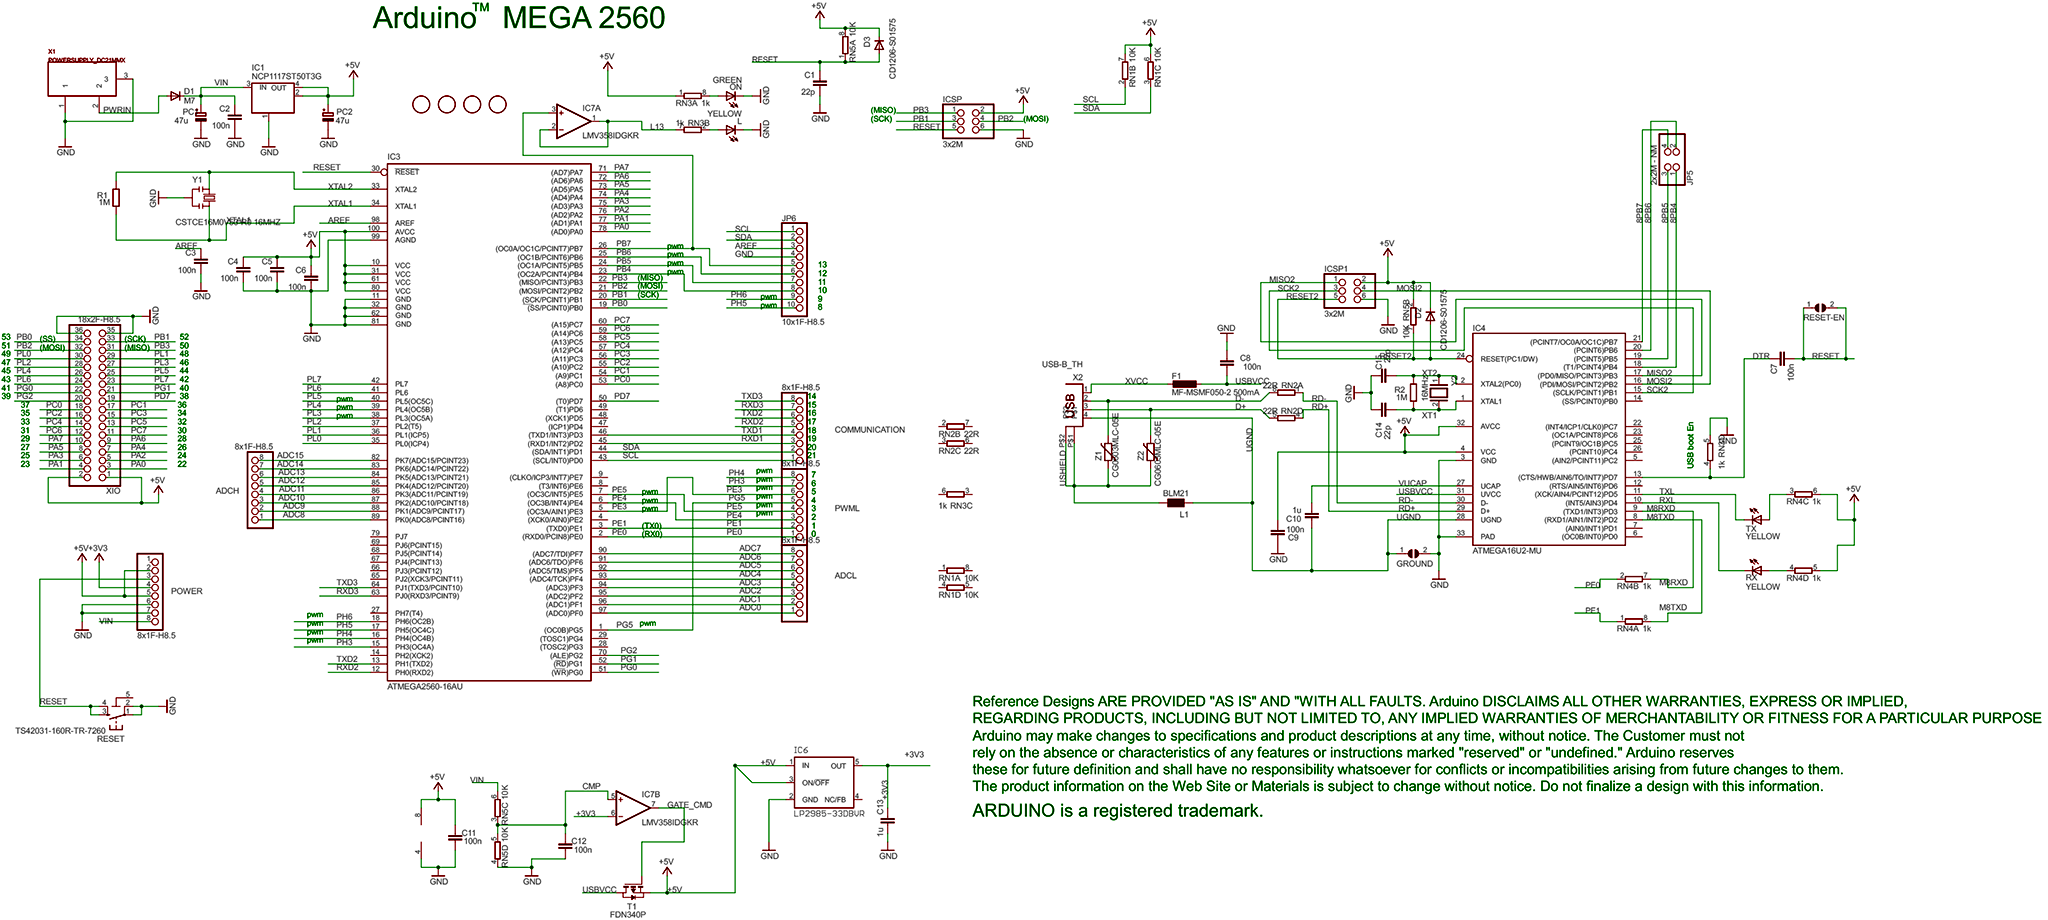
Arduino Mega 2560 Schematic Diagram (scrollable)
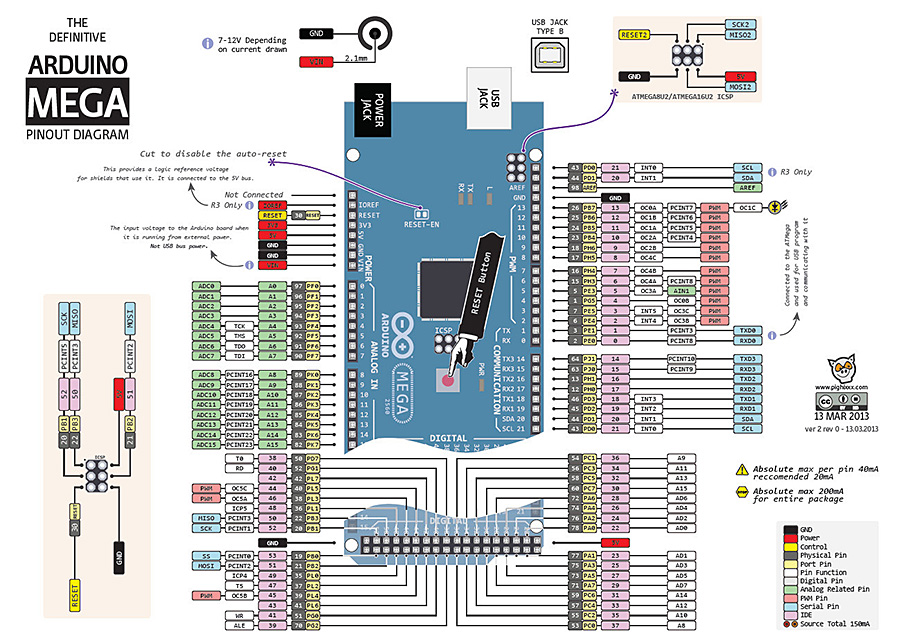
LAYOUT DIAGRAM AT BOTTOM OF PAGE..
POWER PINS:
Detailed Power Considerations HERE
- VIN. The input voltage to the Arduino board when it's using an external power source (as opposed to 5 volts from the USB connection or other regulated power source). You can supply voltage through this pin, or, if supplying voltage via the power jack, access it through this pin.
- 5V. This pin outputs a regulated 5V from the regulator on the board. The board can be supplied with power either from the DC power jack (7 - 12V), the USB connector (5V), or the VIN pin of the board (7-12V). Supplying voltage via the 5V or 3.3V pins bypasses the regulator, and can damage your board. We don't advise it.
- 3V3. A 3.3 volt supply generated by the on-board regulator. Maximum current draw is 50 mA.
INPUT AND OUTPUT:
Each of the 54 digital pins and 16 analog pins on the Mega can be used as an input or output, using pinMode(), digitalWrite(), and digitalRead() functions. The analog pins will sample voltage levels and report a digital value using analogRead(). Analog pins and a subset of the digital pins do Pulse Width Modulation (PWM) using analogWrite().
Each pin operates at 0 to 5 volts, can provide or receive an absolute maximum of 40 mA (20mA recommended), and has an internal pull-up resistor (disconnected by default) of 20-50 kOhms.
See ARDUINO PIN CURRENT LIMITATIONS: Be nice to your Arduino!
CONNECTIONS:
It's difficult to manage connections and cabling to so many Inputs and Outputs. The Mega Sensor Shield HERE makes it easier.
SPECIALIZED FUNCTIONS:
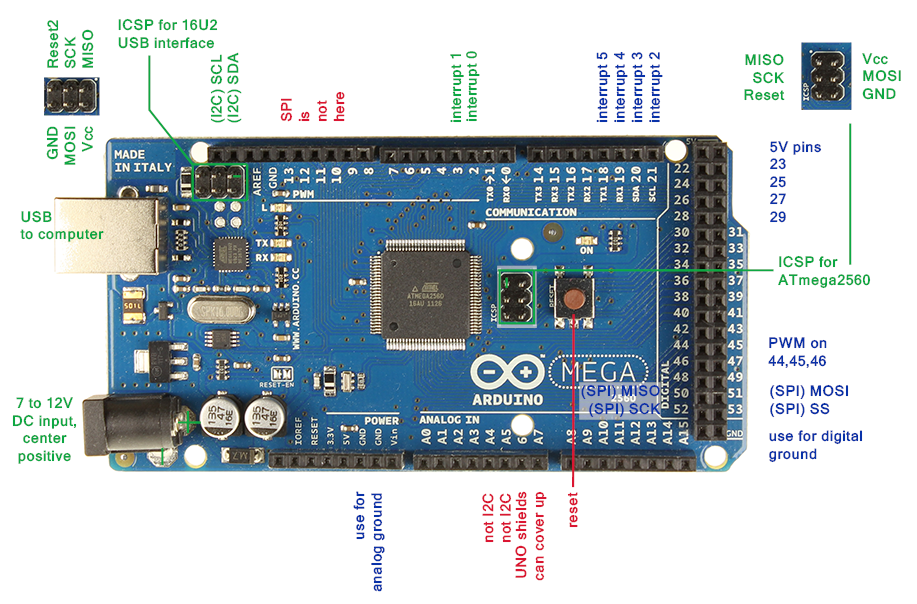
- Serial: 0 (RX) and 1 (TX); Serial 1: 19 (RX) and 18 (TX); Serial 2: 17 (RX) and 16 (TX); Serial 3: 15 (RX) and 14 (TX). Used to receive (RX) and transmit (TX) TTL serial data. Pins 0 and 1 are also connected to the corresponding pins of the USB-to-TTL Serial chip.
- External Interrupts: 2 (interrupt 0), 3 (interrupt 1), 18 (interrupt 5), 19 (interrupt 4), 20 (interrupt 3), and 21 (interrupt 2). These pins can be configured to trigger an interrupt on a low value, a rising or falling edge, or a change in value. See the attachInterrupt() function for details.
- PWM: 2 to 13 and 44 to 46, provide 8-bit PWM output with the analogWrite() function.
- SPI: 50 (MISO), 51 (MOSI), 52 (SCK), 53 (SS). These pins support SPI communication using the SPI library. The SPI pins are also broken out on the ICSP header, which is physically compatible with the Uno, Duemilanove and Diecimila.
- LED: 13. There is a built-in LED connected to digital pin 13. When the pin is HIGH value, the LED is on, when the pin is LOW, it's off.
- I2C/TWI : 20 (SDA) and 21 (SCL). Support I2C aka IIC aka TWI communication using the Wire library. Note that these pins are not in the same location as the TWI/I2C pins on the Duemilanove or Diecimila.
ANALOG PINS:
The Mega has 16 analog inputs, each of which provide 10 bits of resolution (i.e. 1024 different values). By default they measure from ground to 5 volts, though is it possible to change the upper end of their range using the AREF pin and analogReference() function.
All analog pins do analog output using PWM. You can't set an analog pin to a specific voltage; PWM just adjusts the duty cycle of a square wave alternating between 0v and +5v so that the average over time appears between 0 and +5v.
The Analog input pins can also be used as Digital Input or Output pins. Just use A0 through A15 for a pin name where you would use a digital pin number.
Other pins on the board:
- AREF: Reference voltage for the analog inputs. Used with analogReference().
- RESET: Bring this line LOW to reset the microcontroller. Typically used to add a reset button to shields which block the one on the board.
LAYOUT DIAGRAM:
THANKS! To Alberto Piganti (Original Drawing HERE)


