Brick-Temperature-Sensors
Brick-Temperature-Sensors
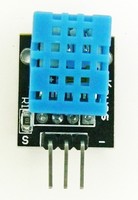
There are two types of Temperature Sensors in the YourDuino.com Electronic Brick Set. See them (left to right) on the photos to the right:
| Thermistor Analog + Digital |
| Plain Thermistor |
| DHT-11 |
| DS18B20 |
- Electronic Chip sensors:
- The DS18B20 Electronic Thermometer
- The DHT11 Electronic Thermometer and Humidity Sensor
- Thermistor (temperature-dependent resistor) sensors:
- Plain Analog Thermistors
- Thermistors with added electronics for both Analog and Digital Outputs
We have existing pages covering some of these Temperature Sensors and we will link to them. The others we will explain below.
DS18B20 Electronic Thermometer (click)
This is an electronic thermometer which has high accuracy over a wide range (accurate to ±0.5°C over the range of -10°C to +85°C) (Workable from -55°C to +125°C). You can locate these thermometer chips up to 100M away from your Arduino. Shorter cables can be just 2 wires. NOTE: There must be a pullup resistor of about 5K in all cases, but the Brick versions have this included.
DHT11 Electronic Thermometer and Humidity Sensor(click)
- Humidity measuring range: 20% ~ 9 0% RH (0-50 ? temperature compensation)
- Temperature measuring range: 0 ~ +50 ?C ;
- Humidity measuring accuracy: 5.0% RH
- Temperature measurement accuracy: 2.0 C
Plain Analog Thermistors
This is a simple thermistor on a Brick.See the thermistor here. That link shows the thermistor resistance VS temperature.
  Here is a sketch that displays the calculated temperature in C and F: (Copy/Paste into an Arduino IDE new window).


/* YourDuino Example: Simple Analog 10K Thermistor
 - WHAT IT DOES: Calculate Temperature, display on Serial Monitor
 - SEE the comments after "//" on each line below
 - CONNECTIONS:
   - Analog Thermistor Brick on A0
   -
 - V1.02 -03/26/2015
   Questions: terry@yourduino.com */

/*-----( Import needed libraries )-----*/
// Arduino trig and exponential functions
#include <math.h>  // See http://arduino.cc/en/Math/H

/*-----( Declare Constants and Pin Numbers )-----*/
#define ANALOG_PIN A0
/*-----( Declare objects )-----*/
//None
/*-----( Declare Variables )-----*/

int    rawAnalogValue;
int    correctedAnalogValue;
float  celciusTemperature;
float  fahrenheitTemperature;

void setup()   /****** SETUP: RUNS ONCE ******/
{
  Serial.begin(115200);
  Serial.println("YourDuino.com Analog Thermistor Brick Test V1.01 ");
  Serial.println("(Not as accurate as it looks :-) ");
}//--(end setup )---


void loop()   /****** LOOP: RUNS CONSTANTLY ******/
{
  rawAnalogValue = analogRead(ANALOG_PIN);  // Read the voltage from the thermistor

  // The Brick has the resistor-thermistor positions reversed from what the
  // "Thermistor" algorithm expects. "Fix It In Software" :-)
  correctedAnalogValue = map(rawAnalogValue, 0, 1023, 1023, 0);

  celciusTemperature    = Thermistor(correctedAnalogValue); // Calculate
  fahrenheitTemperature = (celciusTemperature * 9.0) / 5.0 + 32.0; // Convert Celcius to Fahrenheit

  Serial.print("Measured Temperature = ");
  Serial.print(fahrenheitTemperature, 1); // display Fahrenheit
  Serial.print(" F   ");
  Serial.print(celciusTemperature, 1); // display Celcius
  Serial.println(" C   ");

  delay(500);  // Wait a bit

}//--(end main loop )---

/*-----( Declare User-written Functions )-----*/
double Thermistor(int RawADC) {
double Temp;  // Working variable
  Temp = log(((10240000 / RawADC) - 10000));
  Temp = 1 / (0.001129148 + (0.000234125 * Temp) + (0.0000000876741 * Temp * Temp * Temp));
  Temp = Temp - 273.15;            // Convert Kelvin to Celcius
  //Temp = (Temp * 9.0)/ 5.0 + 32.0; // Convert Celcius to Fahrenheit
  return Temp;
}


//*********( THE END )***********
Thermistors with added electronics for both Analog and Digital Outputs
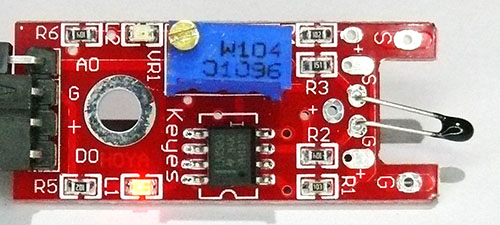
This Brick has several electronics components mounted on a small circuit board. That same circuit board is used for 7 of the Bricks in the YourDuino Electronic Brick Set. If you are interested in details you can see more information, and the schematic diagramHERE. This Brick uses the same Thermistor (black object on the right of the photo) as the Analog brick above.
This brick has both Analog and Digital outputs:
- The analog output has a varying voltage depending on the temperature applied to the Thermistor
- The digital output has a comparision "Trip Point" like a thermostat, set by the blue potentiometer
Connections:
- Start with the Arduino USB cable removed. Use a 3-pin 'flat-to-latched' cable to connect to (G)round, (+)Voltage and (DO)Digital Output . Black goes to (G). Use the connector with the thicker "Latch" on the brick end.
- Connect the other end to Digital Pin 3. Black goes to the Blue strip.
- Add a single wire from the flat cable from brick (AO) Analog Output to Arduino Analog Input (A0) White pin.
Now the brick can be powered and have both Digital and Analog outputs.
Connect the Arduino / RoboRED USB cable. Now the Red LED (bottom edge in photo) should light, showing power is applied. The upper Red LED may be ON or OFF at this time.
TEST SKETCH FOR THIS BRICK:
(Open a new Arduino IDE window, then copy and paste the sketch below). Check your COM port is correct, then Upload. Open the Serial Monitor.
  The output will look like this:

YourDuino.com Electronic Brick Set: Thermistor Analog-Digital Brick Data:
Analog value = 539   Digital value = 0
High Temperature Switch = OFF Measured Temperature = 72.5 F  22.5 C
Setting the Digital Output Trip Point
Get a very small screwdriver that will fit the screw on the top of the blue potentiometer on the brick. Hold the brick down by the wire connector.
- IF the Top Red LED is OFF: turn the screw clockwise until the LED comes ON, then back up until it just goes OFF.
- IF the Top Red LED is ON: turn the screw counter-clockwise until the LED just goes OFF.
Now grab the black thermistor with your thumb and forefinger for a few seconds (it's ONLY 5 Volts..). The Top LED should light up. If the Buzzer brick is connected to pin 13, it will make noise. TOO HOT! Let go and after a few seconds the Too Hot Alarm (Or "Air Conditioner ON") will go off.
How it works:
The thermistor changes resistance with temperature. It is connected in series with the 100K adjustable potentiometer across +5V and Ground. The center connection has a voltage that changes with temperature.
- ANALOG: The voltage is connected to brick AO (Analog Out) pin and is measured by the Arduino Analog Input A0.
- DIGITAL: An LM393 Comparator Chip - COMPARES the voltage from the thermistor and the voltage from the blue potentiometer and creates a ON-OFF (Digital) output on brick pin DO. You turn the pot to set the temperature it changes from OFF to ON.
TEST SKETCH BELOW:
/* YourDuino.com Electronic Bricks Set - Thermistor Analog-Digital
 See: http://yourduino.com/sunshop2/index.php?l=product_detail&p=364
 - ELECTRONIC BRICK: A Red brick with an LM393 comparator chip
   and both digital and analog outputs.
 - SEE the comments after "//" on each line below
 - CONNECTIONS:
   - 3-pin cable from Brick G-+-DO to RoboRED pin 3
   - added single wire from Brick AO to RoboRED A0
   - OnBoard Pin 13 LED
   - (Optional) Active Buzzer brick on Digital Pin 13
 - V1.01 03/26/2015
   Questions: terry@yourduino.com */

/*-----( Import needed libraries )-----*/
//NONE
/*-----( Declare Constants and Pin Numbers )-----*/
#define LED_PIN 13          // define on-board LED
#define DIGITAL_IN_PIN  3   // define the digital input pin
#define ANALOG_IN_PIN   A0  // define the analog input pin

/*-----( Declare objects )-----*/
//NONE

/*-----( Declare Variables )-----*/
int    digitalValue ;  // read digital value
int    analogValue;    // read analog value
int    correctedAnalogValue;  // Value corrected for "Upside down" Thermistor
float  celciusTemperature;
float  fahrenheitTemperature;

void setup()   /****** SETUP: RUNS ONCE ******/
{
  pinMode (LED_PIN, OUTPUT) ;      // Onboard LED
  pinMode (DIGITAL_IN_PIN, INPUT) ;// digital input signal (Not actually required; INPUT is default)
  pinMode (ANALOG_IN_PIN, INPUT)  ;// analog  input signal (Not actually required; INPUT is default)
  Serial.begin(9600);              // Start the Serial Monitor connection
  Serial.println("YourDuino.com Electronic Brick Set: Thermistor Analog-Digital Brick Data:");
}//--(end setup )---


void loop()   /****** LOOP: RUNS CONSTANTLY ******/
{

/*----------( Read the Analog data, do calculations )---------------------*/
  analogValue = analogRead(ANALOG_IN_PIN);
  Serial.print("Analog value = ");
  Serial.print(analogValue), DEC; // display analog value

  // The Brick has the resistor-thermistor positions reversed from what the
  // "Thermistor" algorithm expects. "Fix It In Software" :-)
  correctedAnalogValue = map(analogValue, 0, 1023, 1023, 0);

  celciusTemperature    = Thermistor(correctedAnalogValue); // Calculate temperature
  fahrenheitTemperature = (celciusTemperature * 9.0) / 5.0 + 32.0; // Convert Celcius to Fahrenheit

/*----------( Read the Digital data, do calculations )---------------------*/
  digitalValue = digitalRead (DIGITAL_IN_PIN) ;
  Serial.print("   Digital value = ");
  Serial.println(digitalValue), DEC; // display digital value
  Serial.print("High Temperature Switch = ");
  if (digitalValue == HIGH) // When the sensor value exceeds the set point, LED/Buzzer is turned on
  {
    digitalWrite (LED_PIN, HIGH);
    Serial.print("ON ");
  }
  else
  {
    digitalWrite (LED_PIN, LOW);
    Serial.print("OFF ");
  }


/*-----( Print out the calculated Temperatures )-----*/
  Serial.print("Measured Temperature = ");
  Serial.print(fahrenheitTemperature, 1); // display Fahrenheit
  Serial.print(" F  ");
  Serial.print(celciusTemperature, 1); // display Celcius
  Serial.println(" C");

  Serial.println(); // A blank line separator
  delay(1000);      // Wait a little

}//--(end main loop )---

/*-----( Declare User-written Functions )-----*/
// "Thermistor" function does a 3rd order formula to find the temperature from the voltage
// See http://en.wikipedia.org/wiki/Thermistor
double Thermistor(int RawADC)
{
double Temp;  // Working variable
  Temp = log(((10240000 / RawADC) - 10000));
  Temp = 1 / (0.001129148 + (0.000234125 * Temp) + (0.0000000876741 * Temp * Temp * Temp)); //Cube!
  Temp = Temp - 273.15;            // Convert Kelvin to Celcius
  return Temp;
}// END Thermistor Function

//*********( THE END )***********
zz


