TEMP-PRESENTATION
MakerSpace Workshop Presentation / Resources

Content Outline:
- Arduino: Basics / What is it? What are MicroComputers?
- What can you do with Arduino? (LINK)
- The Arduino Software Installation:
- Arduino Architecture:
- Input Devices
- Output Devices
- Decision Making
HANDS-ON WORKSHOP:
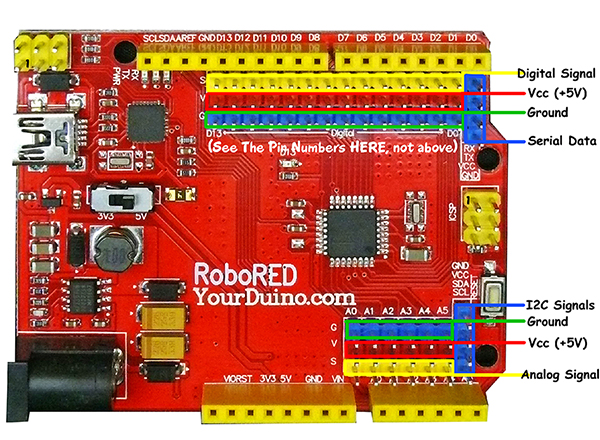
Getting Started: Plug in the RoboRED

 Making things with Electronics and MicroComputers is different than Woodworking or Metalworking. There are a couple of little problems: Uh Oh!

Electricity is INVISIBLE !
AND, Software is INVISIBLE !
Not to worry! We will show you the ways to make these powerful tools Visible so you can use them.
Getting Started: Run "BLINK" (LINK)
- How to use the IDE
- Making changes / saving your version
- Errors / IDE highlighting
- Change the delay so that the LED blinks differently / Persistence of Vision
- Arduino Structure: I/O and Decision-Making concepts
THINKING about Arduino: (Need to update graphic ??)

Electrical Symbols (LINK)
[Sensor Inputs | Software Decisions | Action Outputs]

Now, we'll hook up some real input and output devices:
- Hands-On-Hardware:
- Breadboard (Details: LINK) (See Layout Photo: end of this page)


- Cables and Pins (Graphics plus hands-on)
- Pin Strips: Hold&Twist...

- Pin Strips: Hold&Twist...
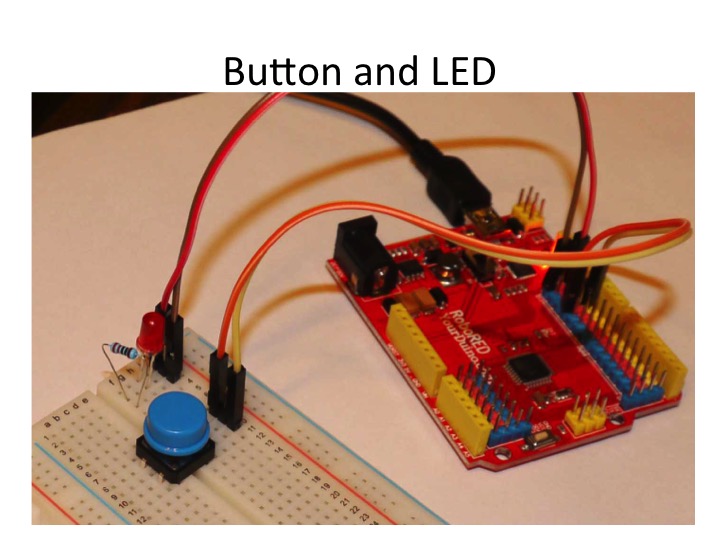
- Connect 2-wire cable to Breadboard, add LED and resistor


- Blink Variations
- Connect 2-wire cable to breadboard, add Pushbutton Switch
- Breadboard (Details: LINK) (See Layout Photo: end of this page)


Now, get a New IDE window. We will start writing our own Software Sketches:
BlinkSwitch
void setup()
{
  // put your setup code here, to run once:
pinMode(13,OUTPUT);
pinMode(12,INPUT_PULLUP);

}

void loop()
{
  // put your main code here, to run repeatedly:
digitalWrite(13,digitalRead(12));
}
Input-DecisionMaking-Output
How to interact with Humans: The Serial Monitor
Optional: Serial Monitor Details and discussion (LINK)

  HelloWorld


void setup()
{
  // put your setup code here, to run once:
Serial.begin(115200);
Serial.println("Hello World!");
}

void loop() {
  // put your main code here, to run repeatedly:
  Serial.println("Now I'm inside the Loop!");
  for (int count = 0; count < 1000; count++)
  {
    Serial.println(count);
    //delay(100);
  }


  delay(1000);
}
Digital VS Analog: What's THAT all about??

Voltage Divider Concept
AnalogInPOT
void setup()
{
  // put your setup code here, to run once:
Serial.begin(115200);
}

void loop() {
  // put your main code here, to run repeatedly:
Serial.println(analogRead(0));
delay(250);

}

Sensing Hand Movement. Now: Sensing Light
- Voltage Dividers
- 10 K resistor(s)
- PhotoResistor
AnalogInOut2-LightSensor
void setup()
{
  // put your setup code here, to run once:
  Serial.begin(115200);
}

void loop() {
  // put your main code here, to run repeatedly:
  Serial.println(analogRead(0));
  if (analogRead(0) < 800)
  {
    Serial.println("It's Getting Dark!");
  }
  analogWrite(11, analogRead(0) / 4);
  delay(250);
}

Sensing Temperature: The Thermistor
AnalogInOut3-TemperatureSensor
void setup()
{
  // put your setup code here, to run once:
  Serial.begin(115200);
}

void loop() {
  // put your main code here, to run repeatedly:
  Serial.println(analogRead(0));
  if (analogRead(0) > 550)
  {
    Serial.println("It's Getting HOT!");
  }
  analogWrite(11, analogRead(0) / 4);
  delay(250);
}
A look at Arduino Architecture again:
SIGNAL Inputs and Outputs:
- Digital SIGNALS to/from devices
- Pulse concepts
Its' Complicated Code. Use Libraries others have written.
The ServoMotor: (Signal Output)
- Load File>Examples>Servo>Sweep
- What's the #define ??
- Libraries usually have "Examples"
- NOTE: Some Laptops do not have enough 5V power to run Servo.
- Can upload sketch, then switch to battery or WallWart power
The Ultrasonic Sensor: (Signal Input)
- A complex device
- Understanding the Ultrasonic Distance Sensor and it's Science:(LINK)
- Connect 4 pins: Vcc, Gnd, 7, 6
- Plug in Ultrasonic Sensor
Sketch for Ultrasonic Sensor:
/* YourDuino SKETCH UltraSonic Serial 2.1
 Runs HC-04 and SRF-06 and other Ultrasonic Modules
 Modified to use pins 7 and 6: MakerSpaceWorkshops
 Open Serial Monitor to see results
 Reference: http://playground.arduino.cc/Code/NewPing
 Questions?  terry@yourduino.com */

/*-----( Import needed libraries )-----*/
#include <NewPing.h>
/*-----( Declare Constants and Pin Numbers )-----*/
#define  TRIGGER_PIN  7
#define  ECHO_PIN     6
#define MAX_DISTANCE 200 // Maximum distance we want to ping for (in centimeters).
                         //Maximum sensor distance is rated at 400-500cm.
/*-----( Declare objects )-----*/
NewPing sonar(TRIGGER_PIN, ECHO_PIN, MAX_DISTANCE); // NewPing setup of pins and maximum distance.
/*-----( Declare Variables )-----*/
int DistanceIn;
int DistanceCm;

void setup()   /****** SETUP: RUNS ONCE ******/
{
  Serial.begin(9600);
  Serial.println("UltraSonic Distance Measurement");
  Serial.println("YourDuino.com  terry@yourduino.com");
}//--(end setup )---


void loop()   /****** LOOP: RUNS CONSTANTLY ******/
{
  delay(100);// Wait 100ms between pings (about 10 pings/sec). 29ms should be the shortest delay between pings.
  DistanceIn = sonar.ping_in();
  Serial.print("Ping: ");
  Serial.print(DistanceIn); // Convert ping time to distance and print result
                            // (0 = outside set distance range, no ping echo)
  Serial.print(" in     ");

  delay(100);// Wait 100ms between pings (about 10 pings/sec). 29ms should be the shortest delay between pings.
  DistanceCm = sonar.ping_cm();
  Serial.print("Ping: ");
  Serial.print(DistanceCm);
  Serial.println(" cm");

}//--(end main loop )---

/*-----( Declare User-written Functions )-----*/

// None
//*********( THE END )***********
More information about Ultrasonic Sensors:
How does the Ultrasonic Sensor Work?
The DS18B20 Temperature Sensor (To be added)
Breadboard Layout
